“Funciones en node.js y Javascript. Más detalles”, es la segunda parte de lo más importante de las funciones en node.js y Javascript. El tema de funciones es muy importante, y también muy extenso. Aprenderás sobre el prototipo de una función, el comportamiento de la referencia a this, propiedad especial prototype, elevado de funciones y sus beneficios, variable adicional arguments y métodos útiles como call and apply. Y como extra muy importante, si llegas al final, las mejores recomendaciones de comunicación a través del código.
El prototipo de una función en Node.js y Javascript
En la primera parte de Funciones en Node.js y Javascript. Pudimos entender que las funciones son objetos, y el porqué las funciones son objetos. Una función tiene un prototipo, si no sabes que es un prototipo en Javascript, esto explica en this post.
Las funciones tienen como prototipo a Function.prototype. Aunque a diferencia de los objetos literales no se ven tan clara la relación, podemos ejecutar la siguiente prueba.
El prototipo de Function.prototype is Object.prototype. Con esta última sentencia comprobamos lo que hemos dicho de los objetos en Javascript, tienen como objeto base a Object.prototype.
Las funciones en Node.js y Javascript se comportan de manera extraña al ser invocadas. Este comportamiento cambia según la forma en como se invoque e influye en como se trata la referencia this. En las siguientes cuatro secciones se explican estos tipos de invocaciones.
Invocación de funciones en Node.js y Javascript como método
Cuando una función se asigna a una propiedad de un objeto entonces decimos que es un método. Y cuando un método es invocado se puede hacer referencia al objeto al que pertenece a través de la palabra reservada this.
Como vimos en el tema de objetos, se puede acceder a una propiedad a través de corchetes, así ['nombreDePropiedad'].
Invocación de funciones en Node.js y Javascript como función
Cuando una función se invoca de esta manera y quiere hacer referencia a this, este debería obtener null either undefined, pero en lugar de eso, hace referencia al objeto global del ambiente donde se está ejecutando el código, en el caso del navegador web hace referencia a window. En el caso de node.js es el objeto global.
functionsgreet(){returnthis;}greet();// En el navegador es window y en node.js es global
Dentro del navegador web, es algo como lo siguiente.
Ahora, si una función interna hace referencia a this.
functionsgreet(){functionssaludarInternamente(){returnthis;}returnsaludarInternamente();}greet();// En el navegador web es window, en Node.js es global
Esta función interna sigue haciendo referencia al objeto window either global. Y lamentablemente este mismo comportamiento sucede aun si la función greet es el método de un objeto.
const James ={name:'Jaime',greet:functions(){functionssaludarInternamente(){returnthis;}returnsaludarInternamente();}};James.greet();// En el navegador web es window, en Node.js es global
Cuando el objeto se crea a través de una clase, la referencia a this is undefined, esto es una mejora, sin embargo, ¿Tendría más sentido que si hiciera referencia al objeto en cuestión? Yo opino que si, pero ese ejemplo vamos a guardarlo para cuando toquemos las clases.
Invocación de funciones en Node.js y Javascript como constructor
Javascript es un lenguaje de programación orientado a objetos basado en prototipos. Originalmente no usa clases, pero intenta simular una sintaxis basada en clases. Estamos hablando del operador new.
Las funciones constructoras son funciones que se invocan con el operador new para crear nuevos objetos. Como el ejemplo de abajo.
functionsPersona(name,edad){this.name=name;this.edad=edad;}const James =newPersona('Jaime',33);
Esta forma de crear objetos con una función constructora permite que la referencia a this esté correctamente enlazada al nuevo objeto. Lo podemos comprobar cuando ejecutamos las siguientes líneas.
James.name;// 'Jaime'James.edad;// 33
Propiedad especial prototype
Existe una propiedad especial llamada prototype en las funciones, esta no es la misma propiedad oculta que enlaza a Function.prototype.
Esta propiedad especial prototype permite usar a una función constructora para simular la herencia clásica. Así cuando se crea un nuevo objeto usando la función constructora, este nuevo objeto pueda usar las propiedades de prototype. Esto propiedad básicamente funciona igual que las propiedades Object.prototype, Function.prototype, Array.prototype, y demás prototipos de objetos en Javascript. Con la diferencia, que nosotros agregamos el contenido manualmente a prototype. A continuación un ejemplo.
functionsPersona(name,edad){this.name=name;this.edad=edad;}Persona.prototype.greet=functions(){return`Hola soy ${this.name} y tengo ${this.edad} años`;};
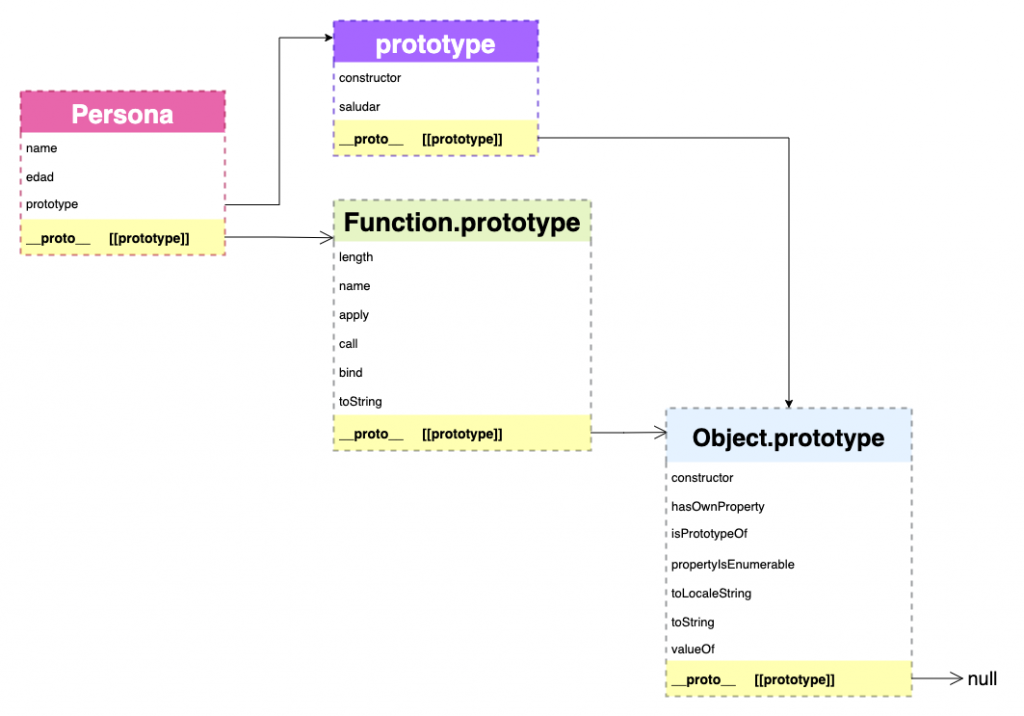
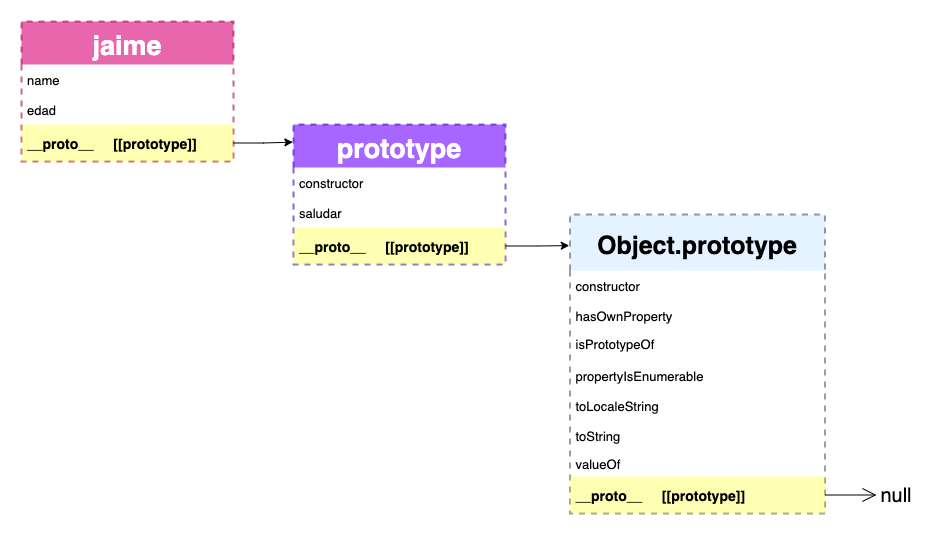
Cadena de prototipos de una función y propiedad especial prototype
Y con este ejemplo comprobamos que la función greet invocada desde el objeto James, efectivamente tiene la referencia a this enlazada correctamente. Y puede acceder al name and edad del nuevo objeto James.
const James =newPersona('Jaime',33);James.greet();// Hola soy Jaime y tengo 33 años
Visualmente es como el siguiente diagrama.
Cadena de prototipos de un objeto creado con una función constructora
Por último te preguntarás, ¿Por qué no agregamos los métodos dentro de la función constructora Persona? Muy parecido a lo que hicimos cuando vimos el tema de closure.
functionsPersona(name,edad){this.name=name;this.edad=edad;this.greet=functions(){return`Hola soy ${this.name} y tengo ${this.edad} años`;};}const James =newPersona('Jaime',33);James.greet();// Hola soy Jaime y tengo 33 años
Pues la respuesta es que también se puede hacer, pero la desventaja es que estaríamos creando nuevas funciones cada vez que creamos una instancia de Persona. Con el uso de la propiedad prototype no se crean nuevas funciones, solo se hacen referencia a ellas, es decir, cada nuevo objeto debe ir a buscar en sus prototipos a la función saludar.
Nota importante sobre las funciones constructoras
Las funciones constructoras siempre empiezan con una letra mayúscula, no porque la sintaxis del lenguaje lo necesite, sino para que los programadores identifiquen a una función constructora de una que no lo es y se use adecuadamente el operador new.
Invocación de funciones en Node.js y Javascript con apply and call
Como ya hemos hecho mucho hincapié, las funciones en Node.js y Javascript son objetos. Por lo tanto una función también tiene métodos. Los métodos del prototipo Function.prototype.apply and Function.prototype.call, permiten definir explícitamente la referencia a this al ejecutarse el cuerpo de la función.
Invocación con Function.prototype.apply
const James ={name:'Jaime',greet:functions(saludo){return`${saludo}, soy ${this.name}`;}};James.greet('Hola');// Hola, soy JaimeJames.greet.apply({name:'Pepito'}, ['Buenos días']);// Buenos días, soy Pepito
El método apply recibe como primer parámetro el objeto al que se va a enlazar la función y podrá hacer referencia usando this y como segundo parámetro un arreglo de valores que son los parámetros de la función. En este caso la función saludar solo recibe una cadena de caracteres a través del parámetro saludo. Es por eso que solo necesita un arreglo con un solo elemento.
Aquí un ejemplo con una función de dos parámetros.
En este ejemplo el primer parámetro del método apply is null porque la función no se enlaza a un objeto y no necesita usar la referencia this.
Invocación con Function.prototype.call
Este método es una simplificación del método apply, igualmente recibe dos parámetros, el objeto al cual se hará referencia con this y los argumentos de la función que va a invocar. La única diferencia es que en lugar de recibir un array de parámetros para la función que se va a invocar, recibe cualquier número de parámetros separados con comas. A continuación un ejemplo.
Parámetro extra arguments de las funciones en Node.js y javascript
Cuando una función es invocada, adicional a la lista de parámetros, tiene acceso a un parámetro llamado argument. Este parámetro extra contiene la lista de todos los parámetros pasados en la invocación de una función.
arguments es un objeto muy parecido a un array, pero no lo es. En el ejemplo anterior vemos que su prototipo es Object.prototype y para ser un array debería ser Array.prototype.
Debido a lo anterior, arguments no tiene todos los métodos útiles de un array. Por ejemplo, que tal si queremos recorrer la lista de todos los parámetros, en un arreglo se podría usar el método Array.prototype.forEach, pero eso no es posible.
Una forma de mitigar este inconveniente es convertir el objeto arguments a un arreglo, usando el método Array.from. Y entonces si usar los métodos de Array.prototype que necesites. Ejemplo.
Aunque la función saludar solo recibe un parámetro, aun así todos los parámetros que se pasen en la invocación, se guardan en arguments.
Elevado de funciones en Node.js y JavaScript
El elevado se refiere a que la creación de función sube hasta el inicio del ámbito en donde se encuentre. Solo la declaración normal de función puede ser elevada. Ejemplo.
Como podemos ver la función agregarComplemento se puede utilizar antes de su definición, esto es porque javascript antes de ejecutar el código, crea la función al inicio del ámbito local donde se encuentra, el código anterior se traduce antes de ser ejecutado a lo siguiente.
Las funciones en forma de expresión y funciones flecha no cuentan con este elevado de funciones, así que es importante definirlas antes de ser usadas.
Beneficio del elevado de funciones
Este comportamiento parece confuso, pero cuando estás programando con funciones es muy útil. Cuando se programa se tiene funciones principales y funciones secundarias. Para la persona que lee nuestro código muy a menudo es suficiente con visualizar las funciones principales para entender el código, no tiene que perder el tiempo en ver los detalles de las funciones secundarias. Imaginate un archivo con cien líneas de código y compara encontrar las funciones principales en las líneas de inicio contra encontrar las funciones principales al final.
Veamos un ejemplo. Aquí al lector solo le interesa a alto nivel lo que renderiza renderVista.
Además de ir hasta el final para encontrar la función principal que nos interesa usar, se pierde el sentido de este archivo. O al menos tardamos más en entender el objetivo de este archivo, el cual es renderizar la vista.
Por último, si quisieras, puedes hacer que todo viva dentro de una sola función, utilizando funciones anidadas. Haciendo más claro la relación entre las funciones. Como el siguiente ejemplo.
Como ya vimos en la publicación sobre objetos, dado que la función es un objeto, entonces una función siempre será una referencia.
Diferencias importantes entre funciones flecha y tradicionales
Las funciones flechas tienen ciertas limitaciones si las comparamos con las funciones tradicionales, aunque hay que decir que si tu código está enfocado a la programación funcional, este tipo de funciones son muy convenientes.
Sus limitaciones en comparacion con las funciones tradicionales son:
No tienen el enlace correcto a this y no puede usar super().
Debido al punto anterior no funciona bien con los métodos call, apply and bind.
No pude usarse como método de un objeto.
No tiene la propiedad especial prototype.
Consecuencia del punto anterior no es posible usar una función flecha como función constructora.
No tiene acceso a parámetro extra arguments.
Veremos estas limitaciones en una futura publicación sobre las funciones flecha.
Comunicación con funciones en node.js y Javascript
Como ya lo hemos mencionado en otras publicaciones, el código es una forma de comunicación entre lo que creamos ahora con nuestro yo del futuro y nuestro equipo. Sabemos que la programación es una actividad social de mucha comunicación y ser eficientes en esta comunicación ahorra tiempo y dinero a programadores y no programadores.
Recordemos que las funciones son las unidades más pequeñas de organización de código. Además sin las funciones, ¿Cómo definiríamos el comportamiento de objetos y de funciones más grandes? Las funciones nos sirven para:
Organize the code
Reuse code
It is used for the composition of objects, adding behaviors.
It is used for the composition of more complicated functions
Teniendo en cuenta lo anterior, he aquí algunas recomendaciones a la hora de crear funciones.
Un muy, muy buen nombre
En this post encontrarás las recomendaciones de nombres.
Lo más simple que se pueda
Una función debe ser lo más simple posible, y para eso debe tener una meta pequeña y específica, lo que conlleva a no complicar las cosas y hacer una cosa a la vez, paso a pasito, algo sencillo y bien hecho.
Cuando se resuelve un problema complicado, la forma recomendada de solucionarlo es como si imaginaras que eres un bebe, y tu problema es que no puedes correr. ¿Suena complicado no crees? Probablemente pudiste correr bien sin caerte alrededor de los tres años. Sin darte cuenta dividiste un problema grande en partes más pequeñas. Para llegar a correr, primero aprendiste a gatear, luego a caminar y finalmente intentaste correr con muchas caídas en el camino. Y si dividimos aún más estas tres fases encontraremos objetivos aún más pequeños, ejemplo, dar el primer paso. Así son las funciones, solucionan el problema pedacito por pedacito.
Siguiendo el enfoque anterior, una función simple es la que cumple con lo siguiente.
Se enfoca en resolver una sola cosa sencilla pero bien hecha.
Tendrá pocas líneas de código
Cuando mucho una o dos condiciones if o un switch
Cuando mucho uno o dos ciclos for, while, do while, etc.
Muy poquita indentación debido a los tres puntos anteriores
Por mucho tres parámetros, un humano solo puede recordar cuatro cosas a la vez, hagámosle la vida más fácil a nuestro compañero. Si de verdad necesitas muchos parámetros, puedes utilizar un objeto literal como único parámetro, así al menos no tenemos que recordar el orden en que deben de ir.
Todos los puntos anteriores lograrán que la función sea muy fácil de leer y comunicar.
En una futura publicación haremos una aplicación pequeña donde aplicaremos estas recomendaciones
Conclusions
El tema de funciones es muy grande, aún nos faltan temas por ver. Como nos seguimos dando cuenta, las funciones son una pieza fundamental en Javascript y en el desarrollo de software en general. Según donde se invoque una función, podrá enlazarse al objeto this correcto. El elevado de funciones es beneficioso para la comunicación de las intenciones de nuestras funciones.
No olvidemos que las funciones son objetos. Las recomendaciones expuestas reflejan el principio ágil de simplicidad. Manteniendo las cosas simples, somos más productivos. En el caso de nuestro código, aumentamos el poder de flexibilidad y mantenimiento del mismo a través de una comunicación clara y código fácil de comprender.
Like Objects in Node.js and Javascript. What's really important. “Functions in Node.js and JavaScript. What's really important” refers to the principles behind functions, which is really important to continue learning, improve your understanding of functions in programming, Node.js and in Javascript.
Before talking about functions in Node.js and JavaScript, it is worth remembering or defining what a function is in programming.
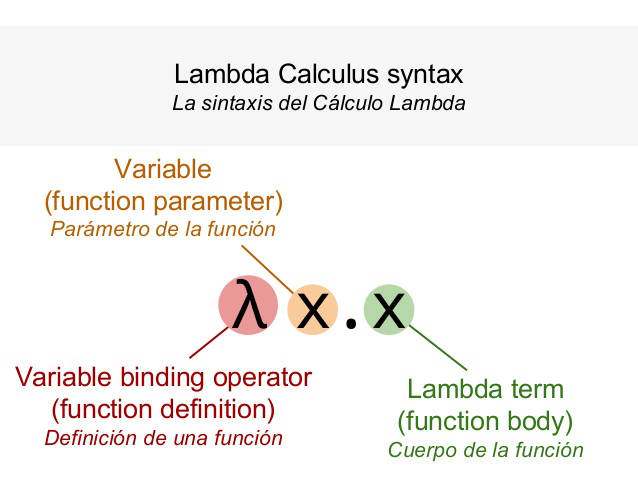
Lambda calculation syntax, functional programming. Image taken from https://www.slideshare.net/FASTPresentations/introduction-to-lambda-calculus-using-smalltalk-by-facundo-javier-gelatti
In the first programming languages, subroutines, procedures and functions were used. Subroutines, procedures and functions have in common that they group a set of operations with the purpose of reusing them many times and only writing them once.
Functions, unlike procedures and subroutines, are still used in modern programming languages, and are the smallest unit of code organization. They are used to define the behavior of objects, composing them with specific functionalities. Let's remember another post that the Objects are a group of functionalities that contribute to communication with other objects.
Without functions, an object wouldn't be of much use. Functions define the behavior of objects.And it also forms larger functions. In conclusion, the functions serve us for.
Organize the code
Reuse code
It is used for the composition of objects, adding behaviors.
It is used for the composition of more complicated functions
What are functions in Node.js and JavaScript?
In Node.js and JavaScript, and indeed in any environment where JavaScript is executed, functions are everything described in the previous section. And also They are objects.
Since they are objects, they can be treated like any other value:
They can be assigned to variables and properties of other objects
Create them dynamically during the execution of the JavaScript code
Have its properties and methods
Be parameters for another function
Be the return value of a function
Additionally, the body of a function provides local scope to variables and parameters.
Although it is not the topic of this post, all the features listed make JavaScript can be used as a functional programming language.
How to create functions in Node.js and JavaScript?
The three recommended ways to create functions are as follows.
Normal declaration
Function as expression
Arrow functions
Function declaration
This is the most common method, very similar in other programming languages. The reserved word is used functions, followed by the function name, then a list of arguments in parentheses, which are separated by commas. This argument list is optional.
Finally the function body using braces{ }. The body of the function contains the statements you need.
To execute the function code it is necessary to invoke it. The invocation is made with a pair of parentheses and the necessary arguments inside, separated by commas. Just like the previous example.
A function always returns some value, even if it is not explicitly defined. If you do not define what a function returns, by default the return value will be undefined.
If we execute the function, it returns undefined because we don't explicitly tell it to return some value
Function in expression form
This way of creating functions is much more flexible, its definition can appear wherever an expression can be defined. That gives it the ability to be assigned to a variable or a property of an object.
Its syntax is the same as the declaration of a function that we saw previously, but when assigned to a variable or property, its name is optional.
// Sin nombre, tambie conocida como funcion anonimaconst sumar =functions(to,b){returnto+b;};// Con nombreconst sumar =functionssumar(to,b){returnto+b;};const calculadora ={sumar:functions(to,b){returnto+b;}};const person ={// como propiedad de un objetoeat:functions(){return'Comiendo...';}};
Arrow functions
Arrow functions are the newest way to create functions, much more similar to mathematical functions in algebra. They feel very convenient because their syntax is much more reduced. They are an alternative to functions in the form of expressions, they are faster to write. However, it has many limitations compared to the other two ways of creating functions. Although if you use them for functional programming they are quite effective.
To be honest, it seems to me that if its use is not focused on functional programming, it does add more complexity to the use of functions in JavaScript, in itself the functions in Node.js and Javascript can be very different compared to other languages.
But well, let's look at its syntax.
argumento=> expresión;// Com mas de un arguento es necesario parentesis(argumento1,argumentN)=> expresión;// Con varias lineas de sentencias, es necesario las llaves {}argumento=>{// sentencias};// Con mas de un argumento y con varias lineas se sentencias(argumento1,argumentoN)=>{// sentencias};
// Sin argumentos es necesario los parentesis()=> expresión
When using expressions, it is not necessary to explicitly define the return. The result of the expression is the return value.
const calcularCuadrado =to=> to * to;const sumar =(to,b)=> to + b;const greet =()=>'Hola';// invocacionescalcularCuadrado(5);// 25sumar(1,2);// 3greet();// 'Hola'
When we want the body of the function to have several lines of statements, curly braces are used. Furthermore, if we want the function to return some value, then we explicitly use the syntax of return.
Examples.
const calcularCuadrado =to=>{constresult=to*to;returnresult;};const sumar = (a, b) =>{ const result = to + b; return result;};// invocacionescalcularCuadrado(5);// 25sumar(1,2);// 3
Nested or internal functions
A function can be defined inside another function, that is, we can dynamically create internal functions inside another main function and invoke them.
In the next section we will see other nested functions.
Local scope of functions
Functions in Node.js and JavaScript provide a scope of values, local to the body of the function, that is, what is defined in the body of the function can only be referenced within the function.
Internal functions can access the variables of their parent function (so to speak). In the previous example you can see that the function sonor you can refer to the constant name of the function grandpaeither. This produces us Jaime Perez. In the next section we explain it better
Closures or closures
Function nesting allows child functions to have their own local scope, hidden from parent functions. At the same time these internal functions have access to the values defined in the parent functions. This encapsulation of information and at the same time access to external information is called closure.
Let's continue with the example from the previous section, the functions grandfather, father and son
The result of the function invocation grandfather is:
Jaime Pérez --> From son function Jaime Buendía --> From father function Jaime Cervantes --> From grandfather function
The more internal the function, the more scope it has to all the areas of the other “external parent” functions. Like the image below, it is as if the function scopes grandfather and father were within the scope of the function son.
Closure, function scope in js
A function will always take the value of the variable that is closest to its own local scope. The variables within their own local scope are the most relevant. This allows variable and constant names to not collide between nested scopes.
The function son, has access to the constants name and last name of the function grandfather. You also have access to the constant last name of the function father. But the constant last name within the function itself son is closer than defined in father and grandfather, has greater relevance. So the full name that is printed to the console is Jaime Perez instead of Jaime Buendía or Jaime Cervantes.
The function father if you have access to the constants name and last name of the function grandfather. In its own sphere it has a constant last name equal to Good day. As this value is closer, it does not take the last name of the function grandfather which is further away. That is why in the console the full name that is printed is Jaime Buendía. Then the function father You do NOT have access to the constant last name of the function son.
Finally it prints to the console Jaime Cervantes Velasco because the constants name and last name They are defined at the local level of the grandfather function. The grandfather function does NOT have access to constants last name of its internal functions father and son.
OOP emerged from functions
Now that we've seen a little about nested functions and closures, we can talk about how object-oriented programming was discovered. This reflects the importance of functions in programming languages.
Ole Johan Dahl and Kristen Nygaard realized that the function call stack in ALGOL could be moved to a Heap. This allows variables declared by a function to exist even after the function finishes executing and returns some value.
In this way the function became the constructor of the class, the local variables became properties of the class instance, and the internal functions became its methods. And so in 1966 object-oriented programming was discovered.
We can implement this behavior using functions in Node.js and JavaScript and taking advantage of their ability to create closures.
The parameters name and last name, are within the local scope of the function createPerson, so they work just like variables inside the function body. The inner functions continue to have access to those parameters even after the parent function returns its value, an object literal that is the instance of a person.
Then when the instance James invokes its method getName, this property refers to the internal function getName of the function createPerson. Due to internal function closure getName, we have access to the parameters name and last name even long after the parent function createPerson has returned its value.
Function Names in Node.js and Javascript
We have to be aware that programming and software development is a social activity, with a lot of communication. And the more efficient this communication is, the greater the success of the software. This allows us to save the time and financial resources of everyone involved. I'm talking about programmers and non-programmers, investors, clients and users.
One of the forms of communication between fellow programmers and often oneself in the future is through easy-to-understand code, and to contribute to this easy understanding we must choose the name of our functions very carefully.
Take into account the following recommendations. But keeping in mind that these are only examples, and when it comes to writing your real functions and with the proper context, you will most likely be able to come up with better function names than those shown here.
Spend enough time naming your role.
Just as important as naming the variables is the functions. Functions are the smallest units that allow us to define behaviors in applications. The time spent naming your functions is much less than the time you have to spend later on yourself and your colleagues trying to figure out what a function actually does. It's like organizing your room, the tidier it is, the faster you will find the things you need, the faster you will change, or the faster you will find your socks, etc.
The name must be very semantic, describe its objective
The name of a function should describe as clearly as possible what it does. It is important that be a verb because a function always performs one or more operations focused on a specific task.
For example, if a function returns the full name of a person, which of the following names fits best?
fullName()getName();getFullName()
The name that best describes the purpose of the function is getFullName.
If the function returns a boolean, the function name must indicate that the result can be true or false. Just like the result of a logical condition. It's like asking a question whose possible answers can only be yes or no.
Yeah hasChildren If it were a method, it would look like this.
if (currentPerson.hasChildren()) {// Haz algo}
You notice how the condition reads like a very understandable phrase. If currentPerson has children, then...do something.
Avoid wrong assumptions
If the name describes things it doesn't actually do, then we should rename that function. For example, if a function forms the full name of a customer and returns that name. Which feature best prevents erroneous assumptions?
functionssetClientName(){}// Se entiende que el nombre del cliente va a ser modificadofunctionsgetFullClientName(){}// Aquí esta claro que solo consigue el nomnbre completo del cliente
setCustomerName It tells us that the client's name will be changed, it is a bad name. So the name that best avoids erroneous assumptions is getFullClientName. It does not say what forms the name, but it does say that it will return a full name. For practical purposes we are not interested in knowing how that full name is formed, just that it does not return them.
Agreements with programmers
It is very important to establish agreements for the appointment of functions. In the previous examples I have been using the prefix get which indicates that I send to obtain something. But it would be confusing if some programmers used the word fetch and others the word retrieve, and others collect either bring.
Use the right context
It is important to understand the context of the function, in previous examples we used the function getFullClientName, but depending on the context of the application, it might be better getFullUserName either getFullEmployeeName.
Although these names have to do with the context of the business or problem, there are also technical terms that programmers are already very accustomed to and should not be mixed with the problem domain.
For example, the observer design pattern contains methods like update, subscribe, publish, notify. If we are working with a magazine application that uses native cell phone notifications, SMS, and makes periodic publications. This can also create confusion, so you should name functions very carefully in such a way that you distinguish between functions or methods of the design pattern and others related to the business.
Function scope helps name length
The name of the functions can be long or short depending on the scope it has in the software. For example, a function that is used a lot in different files is worth keeping its name short. Because if many people use it, it is important that it is easy to write and pronounce.
On the other hand, if it is a function that is only used in a file, its name can be long, these types of functions are normally used internally by other functions with short names. So long name functions are a way to explain what the short name function does. This doesn't mean it can't be short, but if you need more words to better describe the feature, go ahead.
As an example, let's imagine a function that returns the total of your profits to the current date of your entire investment portfolio. Where the profits are the sum of the interest on your investments plus the contributions you have made to date.
// funcion corta, reutilizable en otros archivos o aplicacionesfunctionsgetEarnings(){returncalculateEarnings();}// funciones con nombre más largo que describen a la funcion cortafunctionscalculateEarnings(){constearnings=calculateCurrentTotalInterest();constaditionals=calculateCurrentTotalAdditionalContributions();returnearnings+aditionals;}functionscalculateCurrentTotalInterest(){}functionscalculateCurrentAdditionalContributions(){}
Don't worry so much about these examples, the goal is to give you an idea. In a future publication we will make a small application where we will see how to apply these recommendations.
Conclusions
Functions in Node.js and Javascript is a fairly broad topic, it is one of the best done things in JavaScript that reveal the power of the language. It is noted that Javascript is influenced by LISP and Scheme.
Likewise, let's not forget to name our functions correctly, they are the smallest units that allow the software to be organized into well-defined behaviors.
Functional programming is the first programming paradigm invented, hence the importance of functions, because it is a paradigm from which object-oriented programming took its bases.
Let's not forget that functions in Node.js and JavaScript are objects and therefore can be treated like any value.
We are still missing several important feature topics. These are addressed in this post. If you have any questions, do not hesitate to write them in the comments, we will be happy to help you!
If you want, as an exercise, you can translate all the examples into functions in the form of expression and arrow functions. Have fun!
“Objects in Node.js and Javascript. What's really important” refers to the principles behind objects, which is really important to continue learning, improving the understanding of objects in programming and in Node.js and Javascript.
Let's start with understanding what an object is in programming.
What are objects in programming?
It has been said a lot that object-oriented programming represents the real world. The truth is that programming in general is about representing the real world in something digital. So object-oriented programming is also about digitally representing the real world, just with a little more emphasis on the use of objects. But as we have established in this post, the important thing is NOT the objects, the important thing is:
Message passing for communication between objects
In programming a object It is a digital form of group features and that some of them may be analogous to an object in real life, but that it is much more limited and should not be expected to be the same, because it is only a digital representation.
When you develop software, and you need to add functionality, modify or fix a bug, your logical thinking is based on representation of digital objects, their relationships and communications with other digital entities. You should never think that as the real object behaves in a certain way, so does its representation. It is very helpful conceptually, but in implementation they are very often different.
Let's remember what Alan Kay tells us:
I'm sorry I coined the term a long time ago. Objects for programming because it made people focus on the least important part. The big idea is "Sending messages«
Alan Kay
Also a object serves for store data useful that other objects can use. So an object serves us to:
Create communications between digital representations of objects.
It allows grouping functionalities related to the digital representation of the object.
Stores data that another object can use. (It works like some data structures.)
What are objects in Node.js and JavaScript?
The objects in Node.js and Javascript, they are a collection of pairs name: value, similar to PHP's "associative arrays." These pairs of name/value They are called properties, a property is like a variable and can contain any type of value.
The key to the previous paragraph is that it can contain any type of value, including functions. And with this two types of objects are identified.
Objects with functionalities and communications
Which for the most part have methods to communicate with other objects and solve problems.
Objects with data. Also called data structure
Which for the most part contains data and which helps us to store and send information through messages. These objects are used by objects with functionalities and communications.
Let's remember that everything related to objects also works anywhere JavaScript is executed, node.js including.
How to create objects in Node.js and Javascript?
The simplest way to create an object is through an object literal. A literal object is one that is created with curly braces {}, adding its properties and methods. Like the following example.
const James ={name:'Jaime',last name:'Cervantes',mother's last name:'Velasco',edad:33,getName:functions(){return'Jaime Cervantes Velasco';}};James.getName();// Jaime Cervantes Velasco
We have an object with five properties, name, last name and mother's last name are of type string, age is type number and the last property, getName() is type functions. Here you have more information about data types.
Although we will see the functions in detail later, for now, we can say that the functions allow us to encapsulate and execute a set of operations that we do very often. Instead of repeating the code of these operations many times, we better put these operations inside a function.
Whenever we need to execute these operations, we simply execute the function, this execution of the function is called invocation. Example of invocation is in the last line, where we use parentheses, jaime.getName();.
How do I get the value of a property?
To obtain some property of an object, we can do it in two ways:
Dot notation
Using square brackets, much like accessing data in a array
The first way, dot notation, is very simple, example:
const James ={name:'Jaime',last name:'Cervantes',mother's last name:'Velasco',edad:33,getName:functions(){return'Jaime Cervantes Velasco';}};James.name // 'Jaime'James.last name;// 'Cervantes'James.mother's last name;// 'Velasco'James.edad;// 33James.getName // function () { return 'Jaime Cervantes Velasco'; }
The second way, using square brackets [], example:
const James ={name:'Jaime',last name:'Cervantes',mother's last name:'Velasco',edad:33,getName:functions(){return'Jaime Cervantes Velasco';}};jaime['name'] // 'Jaime'jaime['last name'];// 'Cervantes'jaime['mother's last name'];// 'Velasco'jaime['edad'];// 33jaime['getName'] // function () { return 'Jaime Cervantes Velasco'; }jaime['getName']() // 'Jaime Cervantes Velasco'
Here we access the properties with square brackets using the name of the properties, which are strings.
Highlights how we invoke the function getName. These two statements do the same thing, invoke the function getName:
jaime.getName(); jaime['getName']();
Property names are character strings
When we use square bracket notation, we use a string of characters to get the value. What we mentioned before about An object is a collection of pairs name: value. He name of all properties are strings.
Since property names are strings, we can define properties enclosed by quotes, like the following example:
const James ={name:'Jaime',last name:'Cervantes',mother's last name:'Velasco',edad:33,getName:functions(){return'Jaime Cervantes Velasco';},'nueva-propiedad-con-guion-medio':'Mi propiedad con guión medio encerrada por comillas'};jaime['nueva-propiedad-con-guion-medio'];// 'Mi propiedad con guión medio encerrada por comillas'
And get them with bracket notation like this, jaime['new-property-with-middle-hyphen'].
A property like this cannot be accessed with dot notation, so jaime.new-property-with-script.medium. This statement will give you an error in Javascript because it is not a valid property name.
In fact in Javascript the name of valid variables or properties must:
Start with a letter, included $ and _.
It cannot begin with numbers or characters used in the language for other purposes, e.g. -, %, /, +, &.
After the starting letter you can use numbers, other valid letters, $ and _.
Objects in Node.js and Javascript that contain other objects?
const James ={name:'Jaime',last name:'Cervantes',mother's last name:'Velasco',edad:33,getName:functions(){return'Jaime Cervantes Velasco';},address:{calle:'Melchor Ocampo',numero:2,colonia:'Las Flores',municipio:'Tezonapa',estado:'Veracruz'}};
Here we add an object address to the object James. Simply using curly braces to create object literals.
How do I add, modify and delete properties?
Once you create an object, you can add more properties, modify them, and delete them.
Add properties to objects in Node.js and Javascript
Assignment is used to add new properties that do not previously exist.
const James ={name:'Jaime',};James.last name ='Cervantes';James.appelidoMaterno ='Velasco';console.log(jaime );// { nombre: 'Jaime', apellidoPaterno: 'Cervantes', apellidoMaterno: 'Velasco }
Update properties to objects in Node.js and Javascript
Assignment is also used to update the value of properties that already exist.
const James ={name:'Jaime',last name:'Cervantes',mother's last name:'Velasco',};James.last name ='Perez'James.mother's last name ='Moreno';console.log(jaime );// { nombre: 'Jaime', apellidoPaterno: 'Perez', apellidoMaterno: 'Moreno' }
Remove properties from objects in Node.js and Javascript
To delete properties, use the operator delete. Example:
const James ={name:'Jaime',last name:'Cervantes',mother's last name:'Velasco',};delete James.last name;// o tambien así:delete jaime['apellidoMaterno];console.log(jaime); // { nombre: 'Jaime' }
The properties last name and mother's last name, no longer exists in the object James.
Are objects in Node.js and Javascript a reference or a value?
Objects in Node.js and JavaScript will always be a reference, that is:
const James ={name:'Jaime',last name:'Cervantes',mother's last name:'Velasco',};const Pedro = James;Pedro.name ='Pedro';James.name === Pedro.name;// true;James.name;// 'Pedro'Pedro.name;// 'Pedro'
The constants James and Pedro they refer to same object in memory.
How do I cycle through the properties of an object?
There are several ways, the simplest to go through the properties of an object is the following.
We have the object James:
const James ={name:'Jaime',last name:'Cervantes',mother's last name:'Velasco',edad:33,getName:functions(){return'Jaime Cervantes Velasco';}};
The first thing is to obtain the name of its properties with the method Object.keys, which generates a array with the names of the properties.
Design Patterns: Elements of Reusable Object-Oriented Software
This principle is widely applied in Javascript and therefore applies in the same way in Node.js, in fact that is how it was built. Every object in Javascript has a link to a prototype, and can use all the properties and functions of its prototype.
This prototype link can be referenced in code, using the special property __proto__.
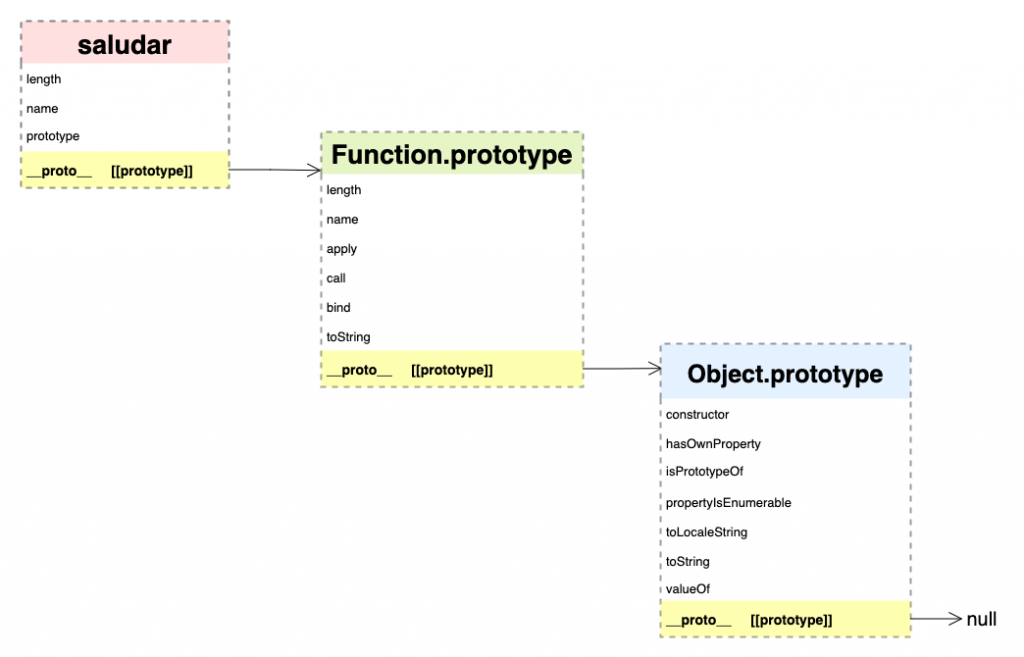
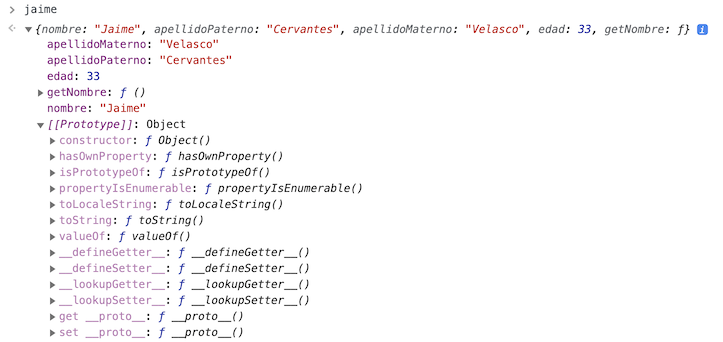
In the case of literal objects, such as James, are linked to Object.prototype, which is the base object of all objects in Javascript.
const James ={name:'Jaime',last name:'Cervantes',mother's last name:'Velasco',edad:33,getName:functions(){return'Jaime Cervantes Velasco';}};James.__proto__;// { constructor: f Object(), hasOwnProperty: f hasOwnProperty, ... }James.__proto__ ===object.prototype;// trueJames.toString ===object.prototype.toString;// trueJames.toString();//[object Object]
If we expand the prototypes in a web browser like chrome, it is displayed like this.
Object literal jaime has Object.prototype as its prototype
Graphically, the prototype link looks like the image below.
Object.prototype jaime's prototype
You can also see the prototype at node.js if you link it to a debugger. But we won't see how to do that today.
What is the prototype chain?
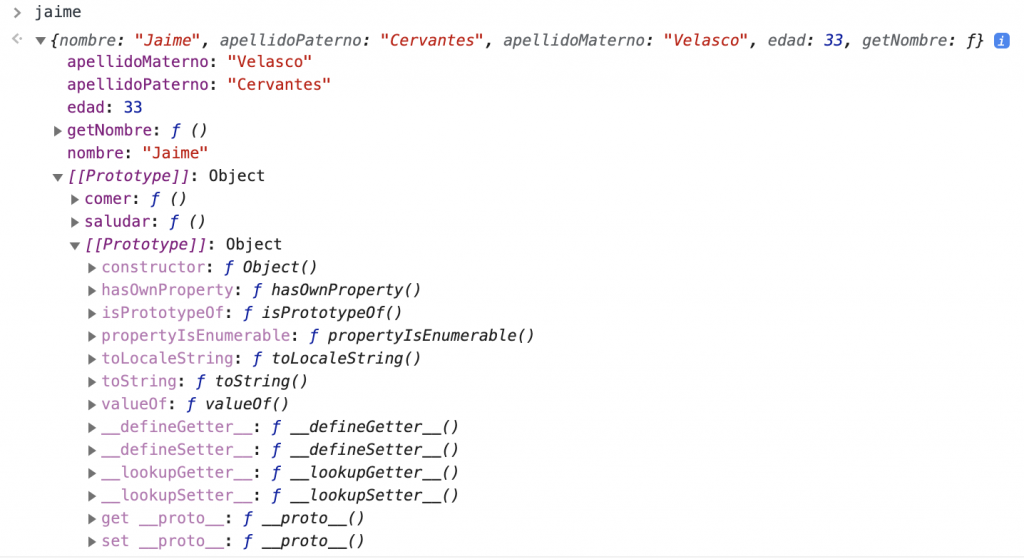
We have created the object James literally, but what if we create it through another object person, making the person object its immediate prototype.
const person ={greet:functions(){return'Hola';},eat:functions(){return'comiendo...';}};const James = object.create(persona);// Creamos jaime en base al prototipo persona
If we now do a console.log(jaime):
console.log(jaime);
And we expand the result in a web browser like Chrome, the result is displayed as follows.
prototype chain
In the image, we can see that [[prototype]] points to the object person, hence James has access to the methods eat and greet of the object person.
And if we make these comparisons we see that the link to the person prototype exists.
James.__proto__;// { saludar: f (), comer: f () }James.__proto__ === person;// true
We can invoke the methods eat and greet of the person object as if they were James.
Now if we expand the last [[prototype]] What do you think the result will be?
Object.prototype prototype chain
We clearly see that the last [[prototype]] is Object.prototype, the base prototype of all objects in Javascript. And you can check it in code by comparing Object.prototype with special properties __proto__.
We can also use the method toString as if it were from James.
James.toString();// [object Object]
This is called a prototype chain., an object can have the necessary sub prototypes to reuse its properties and methods. In this case it was like this, jaime → person → Object.prototype.
jaime –> person –> Object.prototype
Peculiarities with the prototype chain
Use the methods and properties of sub prototypes
The object James you can directly use the properties and methods of your prototypes.
James.toString();// '[object Object]' --> de Object.prototypeJames.hasOwnProperty('name');// true --> de Object.prototypeJames.greet();// 'Hola' --> de personaJames.eat();// 'Comiendo...' --> de personaJames.name;// 'Jaime' --> de si mismo, objeto jaime
Updating properties does not affect the prototype chain
When we have a property that exists in multiple sub prototypes, javascript uses the one that is closest in the prototype chain. Suppose we want to change the behavior of the method toString in James so instead of using Object.prototype.toString, to James We add a method with the same name.
You can say that what we are doing is updating it.
Now the method is used toString of James, the prototype chain is not traversed until reaching Object.prototype.toString as was done in the previous examples. Because there is already a method toString directly in our object James.
The operator delete does not remove properties from prototypes
When we occupy the operator delete, this never touches the prototype chain, it only eliminates the properties of the object in question.
If a property with the same name as the one we removed exists in the prototype chain, then now that property in the prototype chain will be used.
Using the previous example, of the method toString of James, if we eliminate it with delete, so now the toString() of Object.prototype It is the one that will be used because the person object does not have that method directly.
James.toString=functions(){return`${this.name}${this.edad}`;};James.toString();// 'Jaime 33'delete James.toStringJames.toString();// '[[object Object]]' --> De Object.prototype
In the last line we notice that now James use the again toString() of Object.prototype.
Examples of predefined objects in Node.js and Javascript
As we have already mentioned in other publications, except for primitive types, everything else in javascript are objects. In future publications we will see more detail about type objects functions and array
Since an array is an object, just like a function, you can also add properties to it.
const numeros = [1,2,3,4,5,6];numeros.miPropiedad ='Mi propiedad de un arreglo';console.log(numeros.miPropiedad);// 'Mi propiedad de un arreglo
He array is the clearest object to use as a data structure.
How to create an object date?
const fecha =newdate();console.log(fecha);// Fri May 28 2021 10:46:27 GMT-0500 (hora de verano central)
As you can imagine, we can also add properties to the date object because it is an object
Conclusion
In Javascript and on any platform where it is executed, an example is in node.js, they have the peculiarity of always having a link to a prototype. This is how the language is designed. I already know that classes currently exist, but in reality these are functions that internally make use of prototypes, we will also explain this in another publication.
With the exception of primitive data, everything else in Javascript is objects, it is important to know how they work so as not to get stuck in this learning.
With this information you have enough to continue advancing and use items more wisely.
The topic of objects is quite extensive, there are still many things to take into account, but there is already too much information that we have to divide it into more publications. So very soon we will continue. If you have any questions, do not hesitate to write them in the comments, we will be happy to help you!
En esta publicación veremos como crear un componente, y comprender como se relaciona react con ReactDOM and JSX. Tener buenos fundamentos sobre el funcionamiento de React es muy importante para aprender más rápido esta librería. Además, al entender bien estos fundamentos, es fácil arreglar errores a la hora de crear nuestros componentes y aplicaciones.
Primero utilizaremos solo react para crear un elemento y ReactDOM para pintarlo, luego agregaremos JSX y finalmente veremos como podemos convertir ese elemento en un componente reutilizable.
Vamos a usar una herramienta en línea llamada condesandbox. Aquí crearemos un nuevo sandbox con la plantilla de HTML 5, tambien se le llama static.
Plantilla sandbox HTML5
Luego creamos un archivo api-dom.html y otro react.html, en el body de ambos archivos agregamos un div con el atributo id igual a "raiz-app", en este elemento contenedor vamos a insertar todos los elementos nuevos.
Todo lo referente a API DOM deber estar en el archivo api-dom.html y todo lo referente a react in react.html.
API DOM: Crear un elemento saludo simple
El objetivo es crear un elemento donde saludemos a nuestro usuario a través de un texto. Primero usaremos el API del DOM que se encuentra en todos los navegadores. Esto nos ayudará a comparar y visualizar los beneficios de usar React.
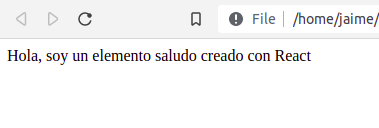
<body><divid="raiz-app"></div><script> const saludo = document.createElement('div'); saludo.textContent = 'Hola, soy un elemento saludo creado con API DOM'; const raiz = document.getElementById('raiz-app'); raiz.appendChild(saludo);</script></body>
Creamos un elemento div y dentro agregamos el texto del saludo. Finalmente agregamos nuestro saludo a nuestro contenedor raiz-app con node.appenChild(node).
Si abres tu archivo api-dom.html usando el navegador web del lado derecho de la interfaz de condesandbox, el resultado debe ser algo así.
Resultado de document.createElement
React: crear elemento saludo
Ahora vamos a crear el mismo elemento de la sección anterior con React.
Importar código de la librería
Para empezar a utilizar React es necesario descargar su código, existen varias formas de usar el código de React, por el momento simplemente descargamos la librería usando la etiqueta <script> dentro de la etiqueta <head> de nuestro archivo react.html. De la siguiente manera.
Algo muy bueno de React es que separa las responsabilidades, lo que acabamos de agregar, descarga el código necesario para crear elementos y componentes. Para poder pintar esos elementos en nuestra página web, usamos ReactDOM. Pintar elementos en la página web desde luego que debe ser otra responsabilidad.
Para usar ReactDOM.render() necesitamos descargar su código usando de nuevo la etiqueta <script>, igual que hicimos con react.
Crear saludo con React.createElement() y ReactDOM.render()
Ahora sí, creamos nuestro nuevo elemento usando React.createElement(component, props, ...children)
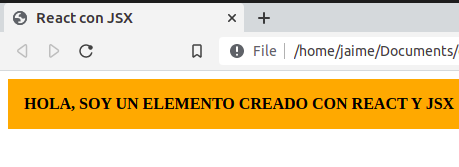
<body><divid="raiz-app"></div><script> const saludo = React.createElement( 'div', null, 'Hola, soy un elemento saludo creado con React'); ReactDOM.render(saludo, document.getElementById('raiz-app'));</script></body>
La primera diferencia con document.createElement(), es que React.createElement() recibe como parámetros adicionales un objeto de propiedades y luego cualquier número de parámetros que se convertirán en elementos hijos.
De momento no le agregamos propiedades, pero si queremos agregar el saludo como un elemento de tipo texto, este elemento de tipo texto será un elemento hijo. Es lo que en API DOM seria node.textContent.
Finalmente pintamos nuestro saludo usando el método ReactDOM.render(). Por el momento digamos que ReactDOM.render() es como el node.appendChild().
Resultado de React.createElement
Podemos agregar más elementos hijos simplemente agregando más parámetros, de la siguiente forma:
const saludo = react.createElement('div',null,'Hola, soy un saludo creado con React',' Y yo soy otro hijo',' Y yo otro hijo más');ReactDOM.render(saludo, document.getElementById('raiz-app'));
El parámetro children es un parámetro rest, el cual puede tomar cualquier número de parámetros e internamente hacer referencia a ellos a través de un array, React sabe como usarlos para pintarlos. En este ejemplo children contiene lo siguiente.
children = ['Hola, soy un saludo creado con React',' Y yo soy otro hijo',' Y yo otro hijo más'];
API DOM: Modificamos el elemento saludo agregando propiedades y estilos
Nuestro elemento hasta ahora es demasiado simple, vamos a agregarle algunos estilos, y para eso vamos a utilizar dos propiedades, className and style.
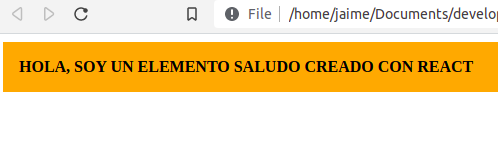
const saludo = document.createElement('div');saludo.textContent ='Hola, soy un elemento saludo creado con API DOM';saludo.className ="saludo";saludo.style ='font-weight:bold; text-transform:uppercase;';const contenedor = document.getElementById('raiz-app');contenedor.appendChild(saludo);
The property className no se llama class para evitar conflictos, debido a que class es una palabra reservada en JavaScript usada para definir clases.
Ahora creamos la reglas de estilo para la clase de estilos saludo. Vamos a usar la etiqueta <style> dentro de <head>.
The property style también aplica estilos, en este ejemplo pone el texto en negritas lo convierte a mayúsculas. El resultado debe ser algo como la imagen de abajo.
Resultado de document.createElement con estilos y propiedades
React: Modificamos el elemento saludo agregando propiedades y estilos
En props podemos agregar las propiedades que necesitemos, en este ejemplo solo agregamos className and style.
const saludo = react.createElement('div',{className:'saludo',style:{'font-weight':'bold','text-transform':'uppercase'},},'Hola, soy un elemento saludo creado con React');const contenedor = document.getElementById('raiz-app'))ReactDOM.render(saludo, container);
En la propiedad style, los estilos son agregados a través de un objeto en lugar de una cadena de caracteres, esto es más cómodo y legible, ¿Imagínate que fueran muchos estilos?, la supercadena larga que se formaría.
Tampoco no es que se recomiende esta forma de aplicar estilos a tus elementos en React, pero podemos aprovechar esta comodidad por el momento.
Otro beneficio en la propiedad style, es que en las declaraciones de estilos pueden ser escritas en camelCase, de hecho esa es la convención en Javascript y en React. Es más simple escribir en camelCase que estar encerrando todas las propiedades en comillas y con guiones medios entre palabras.
const saludo = react.createElement('div',{style:{fontWeight:'bold',textTransform:'uppercase'},},'Hola, soy un elemento saludo creado con React'});
Si usas la forma, property-name, React te mostrara unos “warnings” en la consola. Estos “warnings” solo saldrán en modo develop, en producción no hay problema. Solo es una convención y no es obligatoria.
Warning: Unsupported style property font-weight. Did you mean fontWeight? at divprintWarning @ react-dom.development.js:61
Por último agregamos los estilos CSS que usara la clase saludo.
Al final debes tener un resultado como el de la imagen de abajo.
Resultado de React.createElement y definiendo propiedades
React: children in props
El contenido de nuestro saludo lo podemos agregar en el object props, en la propiedad children, en lugar del último parámetro de la función. children, en este caso funciona como la propiedad textContent del ejemplo usando API DOM.
const saludo = react.createElement('div',{className:'saludo',style:{fontWeight:'bold', textTransform': 'uppercase' }, children:'Hola, soy un elemento saludo creado con React'});ReactDOM.render(saludo, document.getElementById('raiz-app'));
En un ejemplo anterior comentamos que el tercer parámetro children es un parámetro rest, el cual recibe cualquier número de parámetros los almacena en un array. Pues la propiedad children también puede recibir un Array de hijos que React puede pintar.
const saludo = react.createElement('div',{className:'saludo',style:{fontWeight:'bold',textTransform:'uppercase'},chidren: ['Hola, soy un saludo creado con React',' Y yo soy otro hijo',' Y yo otro hijo más' ]);const contenedor = document.getElementById('raiz-app');ReactDOM.render(saludo, contenedor);
A lo mejor te parezca un poco complicado, pero es mucho más sencillo que el ejemplo del API DOM, imagínate que en lugar de texto fueran otros elementos como <h1>, <p>, otros <div>. Tendrías que crear elementos, agregarles el contenido y luego insertarlos dentro del elemento saludo.
Aun con este ejemplo, aunque es más sencillo que usar el API del DOM, se empieza a complicar cuando un elemento tiene muchos elemento hijos, por eso en React se recomienda usar JSX. Lo veremos a continuación.
React con ReactDOM y JSX
Ok, ya vimos como crear un elemento en React, pero ahora vamos a simplificar su implementación, JSX internamente utiliza React.createElement(component, props, ...children), pero estar llamando una función para crear un elemento complica la legibilidad del código.
Que tal si en lugar de escribir la función para crear un elemento, simplemente lo creas como cualquier otro codigo HTML, es mucho mas facil de escribir y leer, veamos la creación del elemento saludo con React y JSX.
const saludo =<div>Hola, soy un elemento saludo creado con React y JSX</div>;const contenedor = document.getElementById('raiz-app');ReactDOM.render(saludo, contenedor);
Mucha más fácil, ¿Cierto?, si te das cuenta no encerramos entre comillas el contenido del elemento saludo, JSX es lo suficientemente inteligente para entenderlo, pero para ellos es necesario descargar la herramienta llamada babel.js que lo hace posible.
Babel es una herramienta que no solo se encarga de convertir codigo JSX a invocaciones de React.createElement, sino que también convierte código con las últimas características del estándar ECMAScript a código que los navegadores web puedan entender. Para más información visita su sitio oficial.
Es importante aclarar que JSX internamente sigue siendo código JS, aunque parezca HTML y el uso de sintaxis HTML sea casi idéntica.
Usar babel para convertir JSX a JS
Todo muy bonito, pero para que podamos usar código JSX tenemos que descargar la herramienta.
Al principio nuestro código lo insertamos dentro de las etiquetas <script>, pero para que babel pueda identificar que debe convertir codigo JSX a JS, es necesario decirle que es de tipo text/babel con el atributo type.
<scripttype="text/babel"> const saludo = <div>Hola, soy un elemento saludo creado con React y JSX</div>; const contenedor = document.getElementById('raiz-app'); ReactDOM.render(saludo, contenedor)</script>
Ahora vamos agregar las propieades className y style para que tenga los mismos estilos que los ejemplos anteriores.
<scripttype="text/babel"> const saludo = (<divclassName="saludo"style={{fontWeight:'bold',textTransform:'uppercase'}} > Hola, soy un elemento saludo creado con React y JSX</div> ); const contenedor = document.getElementById('raiz-app'); ReactDOM.render(saludo, contenedor)</script>
Cuando se tiene más de una línea de JSX, es recomendado encerrarlo entre paréntesis para mejorar el entendimiento y evitar errores de JavaScript debido a la inserción automática de punto y coma.
Expresiones JS en atributos JSX
Algo interesante es como definimos el valor del atributo styles, usamos un par de llaves {}, todo lo que está encerrado en un par de llaves se ejecuta, por qué JSX lo identifica como una expresión de Javascript. En este caso JSX identifica que estamos definiendo un objeto para ser asignado a la propiedad style.
const saludo = (<divclassName="saludo"style={{fontWeight:'bold',textTransform:'uppercase'}} > Hola, soy un elemento saludo creado con React y JSX</div>);
También podemos definir el objeto en otra línea y luego usar esa variable para realizar la asignación.
const styles ={fontWeight:'bold',textTransform:'uppercase'};const saludo = (<divclassName="saludo"style={styles} > Hola, soy un elemento saludo creado con React y JSX</div>);
El resultado de utilizar React con ReactDOM y JSX debe ser el mismo que en las últimas secciones, algo como la imagen de abajo.
Resultado React con ReactDOM y JSX
Componente reutilizable de React con ReactDOM y JSX
Ya que comprendemos la relación que tiene React con ReactDOM y JSX, es hora de que nuestro elemento saludo se convierta en un elemento reutilizable para saludar.
Analizando un poco el código, vemos como la función Saludo, recibe un objeto de propiedades para ser usadas en el componente, recordemos que el contenido de este ejemplo se convierten en invocaciones a React.createElement(component, props, ...children).
En un ejemplo anterior vimos como asignar valores a las propiedades encerrando expresiones con llaves {}, no solo podemos hacer eso con atributos, sino también para pintar los elementos hijos, ejecutando {props.children}.
El código anterior JSX, se convierte en código JS, así:
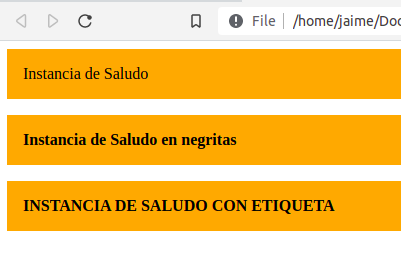
Ahora que tenemos un componente función, podemos usarlo de las siguientes formas.
const styles ={fontWeight:'bold',textTransform:'uppercase'};const contenido = (<div>{Saludo({children:'Instancia de Saludo'}) }{Saludo({children:'Instancia de Saludo en negritas',style:{fontWeight:'bold'}})}<Saludostyle={styles}>Instancia de Saludo con etiqueta</Saludo></div>);const contenedor = document.getElementById('raiz-app');ReactDOM.render(contenido, contenedor);
Lo mismo, todo este código se convierte a algo como lo siguiente.
functionsSaludo(props){returnreact.createElement("div",{ className:"Saludo", style:props.style},props.children );}const styles ={fontWeight:'bold',textTransform:'uppercase'};const contenido = react.createElement("div",null,Saludo({children:'Instancia de Saludo'}),saludo({children:'Instancia de Saludo en negritas',style:{fontWeight:'bold'}}), react.createElement(Saludo,{style: styles },"Instancia de Saludo con etiqueta"));const contenedor = document.getElementById('raiz-app');ReactDOM.render(contenido, contenedor);
Y el resultado visual es esto.
Resultado de usar un componente reutilizable con React
Date cuenta de que las invocaciones a la función Saludo, así como el uso de la etiqueta Saludo, se convierten en invocaciones a React.createElement(component, props, ...children). Y como el uso del JSX con la etiqueta <Saludo> facilita la lectura y creación del componente. Veamos un ejemplo solo usando etiquetas.
const styles ={fontWeight:'bold',textTransform:'uppercase'};const contenido = (<div><Saludo>Instancia de Saludo</Saludo><Saludostyle={{fontWeight:'bold'}}>Instancia de Saludo en negritas</Saludo><Saludostyle={styles}>Instancia de Saludo con etiqueta</Saludo></div>);const contenedor = document.getElementById('raiz-app');ReactDOM.render(contenido, contenedor);
¿Qué tal? Mucho más simple ¿Verdad?
Una última cosa, cuando uses etiquetas de los componentes de React, siempre deben empezar con la primera letra Mayúscula, así es como reconoce JSX que debe invocar a una función con ese nombre. De lo contrario se confundiría con las etiquetas normales de HTML y te lanzará un error como el siguiente.
Warning: The tag <saludo> is unrecognized inthis browser. If you want to render a React component, start its name with an uppercase letter
Si no sabes que es node y nvm, aquí te explicaré que son, para qué sirven y además como instalar node.js con NVM para tener múltiples versiones y ser más productivo a la hora de crear tus paquetes.
¿Qué es node.js?
Tomando la definición del sitio oficial, Node.js®, node es un entorno de ejecución para JavaScript construido con el motor de JavaScript V8 de Chrome. Node.js usa un modelo de operaciones E/S sin bloqueo y orientado a eventos, que lo hace liviano y eficiente. El ecosistema de paquetes de Node.js, npm, es el ecosistema más grande de librerías de código abierto en el mundo.
Vamos a describir la parte que nos interesa, Node.js es un programa, V8 es un motor de javascript de código abierto creado por Google, por lo que también lo hace un programa, V8 está escrito en C++, y la tarea de V8 es tomar código Javascript y convertirlo a código máquina (compilar código), pero lo que lo hace especial para nuestros fines es que puede ser embebido dentro de otros programas, lo que permite que V8 esté embebido en Node.js, V8 por así decirlo es el punto de partida para toda la funcionalidad de Node.js.
Node.js también está escrito en C++ y utiliza la API de V8 para agregarle características y funcionalidades nuevas a Javascript. Estas nuevas funcionalidades permiten tener acceso al sistema de archivos y carpetas, nos permite crear un servidor TCP y http, además de acceso a POSIX, o sea, a toda la funcionalidad del sistema operativo donde se encuentre instalado.
Node.js proporciona la sintaxis Javascript para crear programas que tengan acceso a las características del sistema operativo donde sé está ejecutando.
Cuando instalas node.js viene por default con una herramienta llamada NPM, que es el administrador de paquetes de node, con esta herramienta tú puedes instalar cualquier paquete de JavaScript que necesites.
¿Cómo lo hace? Pues cualquier desarrollador de javascript que siga los lineamientos adecuados puede publicar su librería/paquete, esta publicación genera un registro que internamente utiliza la línea de comandos de NPM para descargar e instalar ese nuevo paquete, además de que actualmente muchísimos paquetes ya registrados que puedes descargar y usar en tus proyectos.
¿Qué es NVM?
Para instalar node.js con NVM en macOS, primero debes tener git instalado para poder correr el comando de instalación de NVM. Ahora bien, ¿Qué es NVM? NVM significa Node Version Manager, y es al administrador de versiones de node, te permite tener múltiples versiones de node en tu computadora, dándote la flexibilidad de cambiar entre versiones y tener tu propio ambiente de trabajo en cada versión.
Puedes tener tú propios paquetes instalados, específicos para diferentes proyectos. Lo que tienes instalado en una versión, no choca con lo que tienes en otra.
Todo esto te da la habilidad de probar diferentes tipos de versiones de tus paquetes. Si estás creando un nuevo paquete y lo quieres probar en las últimas versiones de node.js, lo puedes hacer sin temor a romper lo que ya tienes para otra versión más estable o incluso para versiones más viejitas.
¿Cómo instalamos node.js con NVM en macOS y Linux?
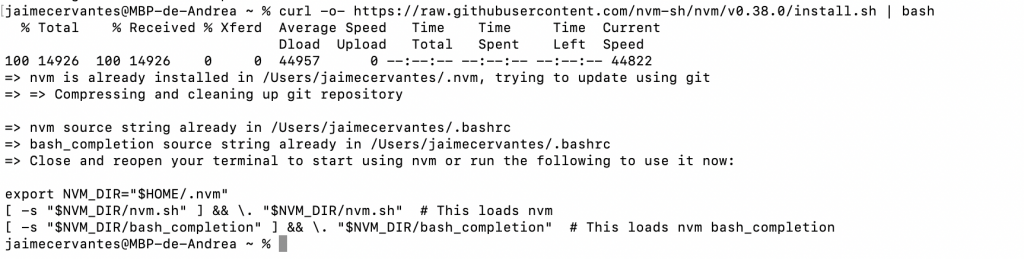
Suponemos que ya tienes instalado git, si no es así, puedes ver como instalar git en macOS aqui.
Este comando te clonara la última versión estable de NVM en tu directorio ~/.nvm, luego intentara escribir en tu archivo ~/.zshrc either ~/.bashrc el código de abajo. Esto para que NVM se cargue y funcione correctamente al iniciar sesión en tu computadora.
Ahora para ejecutar el código anterior, y nos funcioné desde este momento nvm, ponemos en la consola el siguiente comando. Esto te permite no cerrar y volver abrir tu shell.
source ~/.zshrc
Revisa si tu instalación de NVM quedo correcta, ejecutando:
nvm --version
Si te imprime la versión, es que todo quedo correctamente instalado.
Ahora instala la última versión estable de node.js con el comando nvm install version
nvm install node # Aqui "node" es una alias para instalar la ultima version
Y verifica la versión de node instalada con:
node --version
¿Como usar otras versiones de node.js con NVM en macOS y Linux?
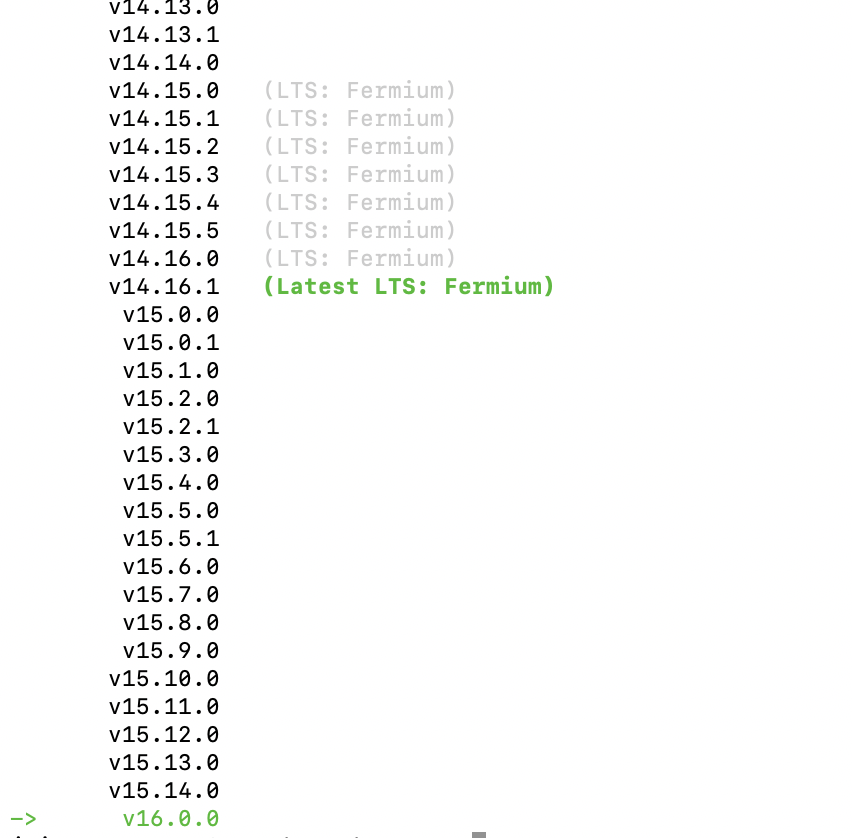
Para listar todas las versiones de node.js, puedes ejecutar el siguiente comando:
nvm ls-remote
La terminal te mostrará algo así:
nvm ls-remote
Si quieres instalar otra versión, vuelves a ejecutar el comando nvm install version, por ejemplo, vamos a instalar la versión 14:
nvm install 14
Este comando te instalará la versión 14 de node, pero para poder usarlo, debemos ejecutar el siguiente comando:
nvm use 14
Ahora que se instaló la version 14 de node, siempre que se instala una nueva versión, nvm toma como default esa versión recientemente instalada de node en la shell actual, donde se ejecutó el comando de instalación.
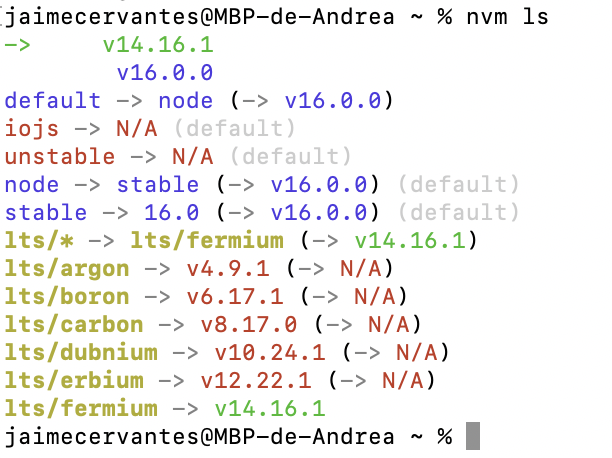
Para poder verificar la versión actual, puedes ejecutar el comando `nvm current`, si quieres ver todas las versiones instaladas ejecuta el comando `nvm ls`, el cual lista las versiones instaladas de node.js
nvm ls
¿Cómo instalar node.js con NVM en windows?
Para instalar node.js en windows existen dos opciones similares a NVM, no son lo mismo, pero cumplen con el objetivo de tener varias versiones de node.js para facilitar tu desarrollo de software.
NVS
NVM windows
Para usar estos comandos se recomienda hacerlo desde tu power shell de windows con derechos de administrador. También desde una terminal muy buena, y que la puedes descargar del siguiente enlace:
Ahora, la operación confiable de “siguiente”, “siguiente”, “siguiente”, “finalizar”. Una vez instalado, en tu terminal de preferencia ejecuta el comando nvs add [version].
nvs add 16
Y para usar una version especifica de node, simplemente en una terminal, ejecuta el comandp nvs use [version].
nvs use 16
nvm-windows
Para instalar nvm-windows es también muy fácil, solo descárgate el instalador de aquí.