En esta publicación veremos como utilizar redux para obtener datos de una API. Con estos datos obtenidos vamos a llenar una lista de criptomonedas y agregar un buscador.
Para comprender el contenido debes de saber lo que es redux y sus principios. Si quieres más información fundamental sobre como usar redux, puedes revisar estas publicaciones:
Primera iteración, datos en duro en los componentes
La idea de empezar con los datos en duro es conocer el formato de lo que responde la API y como esos datos los queremos encajar en los componentes visuales.
¿Cómo son los datos de la respuesta del API?
Primero revisemos la forma de los datos que regresa la API. Estos datos son tomados de here. Más adelante simularemos la petición al API para facilitar el desarrollo.
Vamos a crear la interfaz pensando en los datos mostrados y componentes, de momento se me ocurre una tabla donde estarán listados los detalles del mercado y un campo de búsqueda.
Componente CryptoMarkets
Entonces agregamos un componente contenedor /src/CrytoMarkets/CryptoMarkets.js. En este componente contenedor vivirán los dos componentes antes mencionados, uno para hacer la búsqueda y otro para la tabla donde se listaran los mercados y el resultado de la búsqueda.
Y el componente Table in /src/CryptoMarkets/Table.js
import styles from"./Table.module.scss";exportdefaultfunctionsTable(){return (<div><divclassName={styles.row}><p>Mercado</p><p>Moneda</p><p>Último precio</p><p>Volumen</p><p>Precio más alto</p><p>Precio más bajo</p><p>Variación 24hrs</p><p>Cambio 24hrs</p></div><divclassName={styles.row}><p>btc/mxn</p><p>btc</p><p>1007500.03</p><p>85.76293860</p><p>1031000.00</p><p>1003978.08</p><p>1015844.01</p><p>-1808.15</p></div><div><p>eth/btc</p><p>eth</p><p>0.08</p><p>52.02866824</p><p>0.08</p><p>0.08</p><p>0.08</p><p>-0.00040000</p></div></div> );}
Y para que se vea como una tabla le agregamos los siguientes estilos en /src/CrytoMarkets/Table.module.scss. Los estilos no es tema de esta publicación así que no le tomes mucha importancia por el momento, en caso de que se te compliquen.
Lo único es que si no estás haciendo el buscador en codesandbox y te sale algún problema con los estilos en sass, instala la librería de la siguiente forma.
En la tabla podemos notar que los divs que contiene los datos y el div del encabezado son muy similares, dentro se encuentran varios párrafos conteniendo cada pedazo de información. Así que crearemos un componente que hago eso, lo que contiene cada fila de la tabla.
Dentro del componente Table agregamos dos arreglos, uno para el header de la tabla y otro para una fila de la tabla. Como mencionamos antes, el header y las filas son muy similares, así que reutilizamos el mismo componente TableRow para generarlos.
Como te puedes dar cuenta el componente TableRow recibe items and className como propiedades, para que el header de la table no tenga el efecto del estilo :hover agregamos la clase .header.
Generando filas dinámicamente y dummies separados.
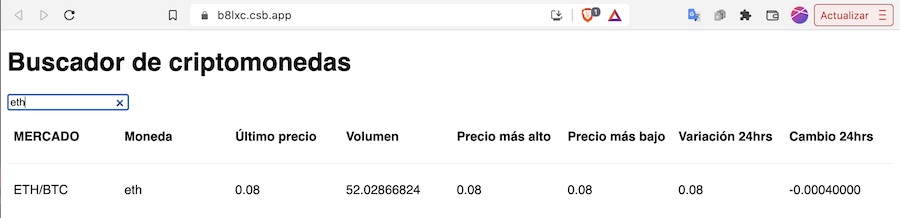
Usamos el nombre del mercado como el id porque es un dato que no se puede repetir. En este punto debemos tener algo así:
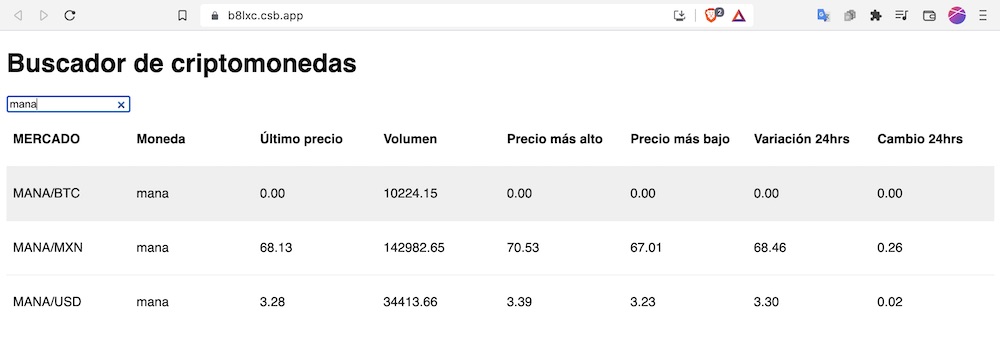
Buscador con dummies
Segunda Iteración, agregando Redux
Para usar redux, necesitamos instalar la librería redux y para facilitar su uso en React instalamos también react-redux. Desde condesandbox puedes agregar estas dependencias en la parte inferior izquierda del editor donde dice “Dependencies“.
En tu computadora local corre el siguiente comando.
yarn add redux react-redux
En este punto ya sabemos la forma en que necesitamos los datos, la tabla necesita unos headers y una lista de filas con valores (rows).
Además, necesitamos crear un store que sea accesible desde cualquier parte de nuestra aplicación. El principal insumo que necesita el store es un reducer. Aún no obtendremos los datos de los mercados de la API, utilizaremos de momento los datos del archivo /src/CryptoMarkets/dummies.js
Importamos la función createStore que recibe una función reducer y opcionalmente un estado inicial. La función reducer de momento solo regresará el estado inicial tal cual, como sabemos, en redux las funciones reducers reciben un estado y una acción. Como segundo parámetro opcional le pasamos los datos dummies.
The function configureStore la utilizaremos a continuación.
Hacer al store accesible
Para que cualquier componente pueda acceder al store es necesario crear un contexto global, esto normalmente se realiza con React.createContext() y usando su componente Context.Provider. Por suerte la librería react-redux ya cuenta con este funcionamiento y podemos utilizar su propio componente Provider.
Si tienes curiosidad como usar el Context de React, puedes revisar esta publicación:
Al componente Provider debemos pasarle una propiedad store. Esa propiedad es el store generado por la función configureStore que creamos en la sección anterior.
Acceder al store desde el componente contenedor CryptoMarkets
Ahora que ya tenemos el store listo para usarse, vamos a obtener el estado para mostrar el listado de markets en el componente Table.
Usamos lo que en redux llaman selectors, los cuales son funciones que acceden a una parte especifica del estado para facilitar su acceso. Se usa el “custom hook” useSelector of react-redux para invocar las funciones selectoras.
Componente Table recibe headers y rows como propiedades
Finalmente, el componente Table debe poder recibir las propiedades headers and rows en lugar de importarlos del dummies.js
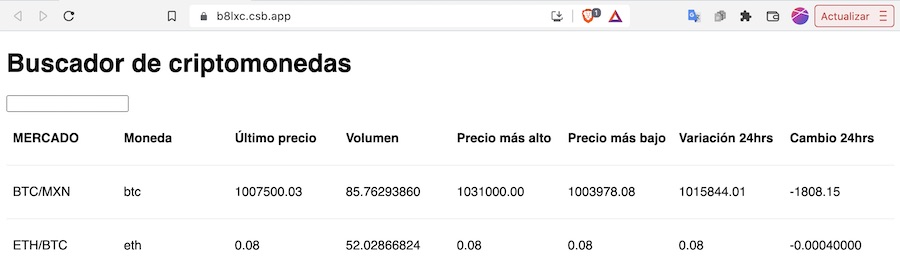
El resultado deberá ser el mismo de la primera iteración, pero con los datos obtenidos del store
Buscador con dummies
Implementar la busqueda de mercados
La búsqueda que vamos a implementar será por el nombre del mercado. Así que basándonos en los datos del archivo /src/CrytoMarkets/dummies.js, vamos a modificar nuestra función reducer para agregar la acción de filtrado.
Creamos el archivo /src/CryptyoMarkets/cryptoMarketsState.js donde ahora vivirá nuestro reducer, separándolo del archivo /configureStore.js.
// state = { headers [], all = [], filtered = []}exportdefaultfunctionscryptoMarkets(state,action){switch (action.type) {case"FILTER_MARKETS":return{...state, filtered:state.all.filter((market)=>market.id.includes(action.payload) )};default:returnstate;}}
El comentario muestra la estructura del estado. La estructura sé cambio porque necesitamos guardar la lista original de mercados para ser utilizado en cada búsqueda, de lo contrario filtraríamos mercados sobre los últimos filtrados y así sucesivamente eliminando todos los mercados.
Una acción es un objeto literal que contiene un tipo y demás datos necesarios para cambiar el estado del store, estos datos los vamos a guardar en una propiedad llamada payload.
La acción 'FILTERED_MARKETS', filtra todos los markets que en su propiedad id incluyan el texto contenido en payload.
Disparar acción de filtrado desde el componente CryptoMarkets
Aunque ya creamos la acción, debemos dispararla cuando el usuario escribe en el campo de búsqueda, primero vamos a modificar el componente SearchField. Ahora además de recibir el label como propiedad, también la función que se ejecuta cada vez que el valor de búsqueda cambia.
Se usa el “custom hook” useDispatch of react-redux para disparar acciones desde cualquier componente funcional. Este hook regresa una función dispatch que se utiliza para disparar cualquier acción.
Al componente SearchField se le pasa la propiedad onSearchChange donde recibe la función que invoca la acción cuando el valor del campo de búsqueda cambia.
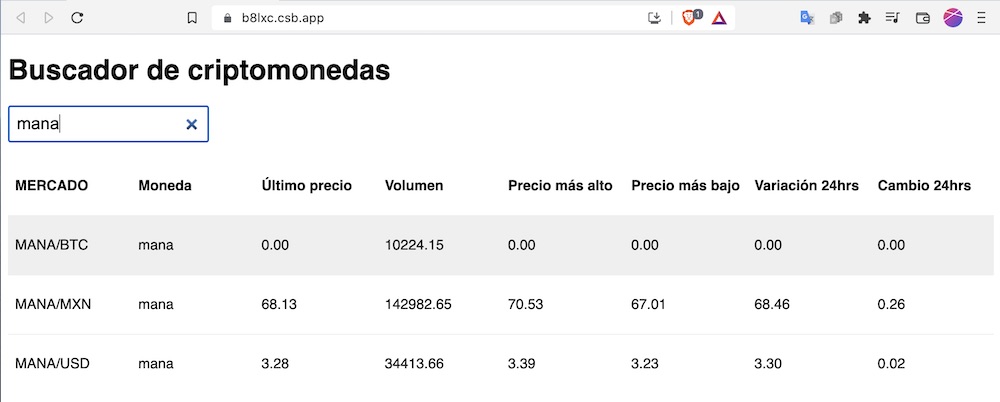
El resultado de esta iteración debe ser algo como lo siguiente:
Buscador implementado
Refactor, action creator para disparar búsqueda
The action creators no son más que simples funciones que regresan una acción, y una acción es simplemente un objeto literal con un tipo y datos necesarios para la acción. En esta ocasión vamos a crear el action creator para la acción FILTER_MARKETS. En el archivo /src/CryptoMarkets/cryptoMarketsState.js agregamos al final lo siguiente
En el código anterior se importa el json en una variable llamada markets y se crea una promesa con un temporizador de un segundo, después del segundo la promesa se resuelve retornando los datos de los mercados (contenidos en la variable markets).
Usar redux-thunk para obtener los markets
¿Qué es un thunk?
Su definición en el ámbito de programación en general:
Los thunks se utilizan principalmente para retrasar un cálculo hasta que se necesite su resultado.
https://en.wikipedia.org/wiki/Thunk
En react se utiliza para escribir funciones en redux con lógica avanzada relacionadas con el estado de la aplicación. Donde se puede trabajar con operaciones tanto asíncronas como síncronas. Estas funciones thunk tienen acceso a las funciones dispatch() and getState() de redux, por esta razón un thunk internamente puede disparar cualquier numera de acciones y obtener los datos actuales del estado por si son necesarios en su lógica de programación.
Crear un Thunk action creator
En realidad un thunk se usa como se usan los action creators, por ese se les llama Thunk action creator.
En el codigo de arriba, el action creator regresa una función asíncrona que recibe solo la función dispatch (no vamos a necesitar la función getState()). La función comienza pidiendo los markets y una vez obtenidos, dispara la acción RECEIVE_MARKETS.
Actualizar reducer para entender la acción RECEIVE_MARKETS
En el archivo /CryptoMarkets/cryptoMarketsState.js agregamos él case para la acción RECEIVE_MARKETS. El código de este archivo debe quedar como el de abajo.
Para que el thunk se ejecute correctamente es necesario indicarle al store como tratar este tipo de funciones, para eso necesitamos agregar el middleware de react-thunk. Un middleware extiende o mejora la funcionalidad en un punto medio del software o comunica diferentes puntos de la aplicación, y también puede comunicar aplicaciones diferentes. De hecho en redux también se les llama enhancers.
Primero importamos la función applyMiddleware, luego importamos el middleware llamado thunk y finalmente aplicamos el middleware en el terecer parametro de createStore.
También cambiamos el initialState, los header los dejamos en el archivo dummies.js. Las propiedades all and filtered las cambiamos a array vacíos.
Invocando el thunk desde el componente CryptoMarkets
Por último, necesitamos invocar nuestro thunk para obtener los markets de nuestro servicio simulado. El archivo /CrytoMarkets/CryptoMarkets.js donde vive el componente padre CryptoMarkets debe quedar como el de abajo.
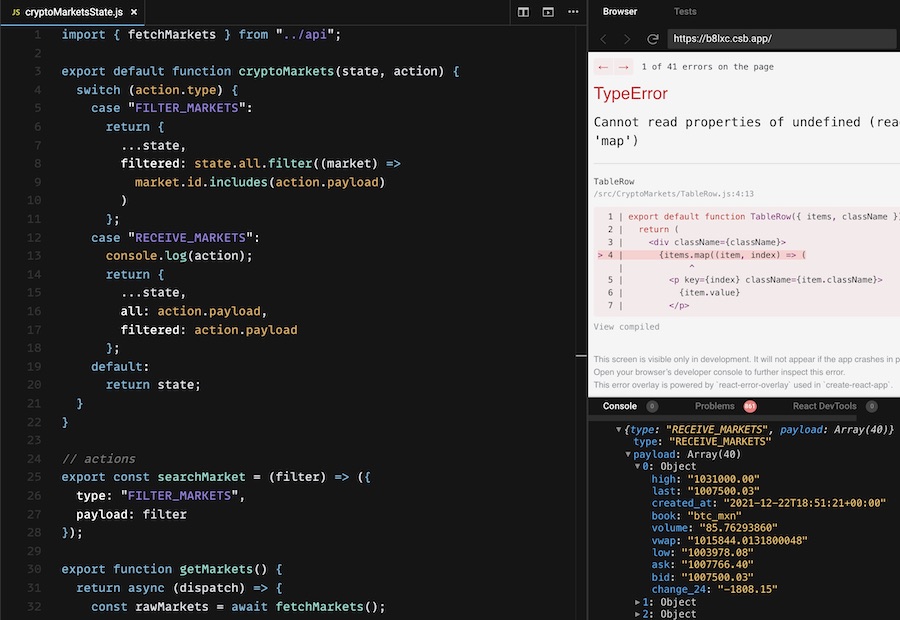
En este punto nuestra aplicación nos debe mostrar un error porque el formato de las propiedades de los componentes no son iguales a la respuesta del api, pero podemos agregar un console.log(action) en el reducer para comprobar que el api simulado está respondiendo con los datos.
En la imagen de arriba vemos en la consola que recibimos los datos del API simulado. En la siguiente sección eliminaremos este error mapeando correctamente los datos al formato de como los necesita el componente.
Mapeando datos a UI
Para que el error desaparezca, necesitamos mapear los datos obtenidos del servicio a datos que entienda los componentes, para esto creamos el archivo /mappers.js y vamos a crear las funciones de mapeo:
Ahora la función de mapeo es recibida por nuestro thunk, de esta manera, podemos utilizar diferentes mapeos para diferentes tipos de componentes. Imagínate que tenemos otra pantalla donde necesitamos mostrar la misma información en una lista de cards, ¿Verdad que el mapeo es diferente? ´Todo lo demás se deja intacto y solo cambiamos el mapeo.
Para esta pantalla donde tenemos una tabla, el resultado es el siguiente:
Error arreglado
Estilos en campo de búsqueda
Un toque final, vamos a mejorar el campo de búsqueda creando estos estilos:
Todavía quedan más cosas por hacer y mejorar, al igual que hicimos en esta publicación incrementando en iteraciones pequeñas hasta conseguir que funcione el buscador, así tendremos más publicaciones para continuar mejorando e incrementando aún más las funcionalidades.
Los React Hooks, son funciones que se ejecutan en un determinado punto en la vida de un componente funcional. Permiten usar características de React, sin la necesidad de usar clases. Por ejemplo te permite agregar state a un componente funcional.
También permite controlar efectos colaterales en caso de ser necesarios. Por ejemplo, peticiones a servicios, subscribirse a eventos, modificar el DOM, logging o cualquier otro código imperativo.
¿Por qué funciones y componentes funcionales?
Si necesitas más detalles sobre como son las funciones en Javascript, puedes revisar estas dos publicaciones:
Se sabe que las funciones son la unida esencial para la organización y reutilización de código, es decir, las funcionalidades de cualquier software.
Al utilizar funciones se elimina la complejidad de usar clases. No necesitas usar this, constructores, ni separar funcionalidades estrechamente relacionadas en varios métodos del ciclo de vida de un componente en React.
Si has creado componentes en React, de seguro has aprendido ver a los componentes como una función y sus propiedades como sus parámetros. ¿Por qué no hacerlo más transparentes al usar solamente funciones?
De hecho las clases, surgieron de funciones. Como se explica here and here. No necesitamos clases y nos ahorramos muchos dolores de cabeza.
Composición
Es mucho más simple y flexible utilizar funciones en lugar de clases para la composición, tanto de componentes como de cualquier funcionalidad en general.
Better object composition over class inheritance
Design Patterns: Elements of Reusable Object-Oriented Software
Simplicidad
Normalmente con las clases, el flujo del código de los efectos colaterales necesita brincar de un método del ciclo de vida a otro, con React Hooks esto es más lineal y fácil de leer. También la definición del estado de un componente es mucho más simple, sin necesidad de definirlo en el constructor. En el siguiente punto viene un ejemplo de como los React Hooks son más simples.
Se elimina el uso de componentes de alto nivel
Aunque los componentes de alto nivel (HOC) se basan en las funciones de alto nivel, la naturaleza del código HTML y clases hace que esto sea complejo. El código se vuelve difícil de leer y también provoca que los componentes envolventes se aniden demasiado.
Los React Hooks resuelven el famoso “HOC hell”, muy parecido a como las promesas y funciones asíncronas resuelven el “Callback hell”.
HOCs, complejo
Ahora, si se utilizan React Hooks, esos HOC complejos se convierte en un código más simple y lineal.
React hooks, simple y lineal
Más rápido
Es un hecho que las funciones tienen mayor rendimiento que las clases. En el caso de React, un componente de función es más rápido que un componente de alto nivel. Además, usando los React hooks adecuadamente, los componentes con React hooks suelen ser más rápidos que los componentes de clases en React.
Fácil de probar
Haciendo tus pruebas correctas evitando detalles de implementación, tu react hook debería estar cubierto con tus pruebas del componente funcional. En otras publicaciones veremos cómo hacer esto. En caso de que tengas un React Hook complejo, existen herramientas que te facilitan estas pruebas aisladas o también podemos hacer a mano nuestro wrapper que use nuestro React Hook para cada uno de sus casos.
Las dos reglas importantes de React Hooks
Solo ejecuta React Hooks en el nivel superior de la función
La clave de esta regla es que React depende del orden en que se ejecutan los React Hooks.
No ejecutes React Hooks dentro de condiciones, ciclos o funciones anidadas porque se necesita asegurar el orden correcto de los hooks cada vez que el componente se renderiza. Esto permite que React controle correctamente el estado entre multiples useState y useEffect.
Si existe alguna condición en el código, y permite que a veces un hook se ejecute y otras no, el orden se pierde al igual que los datos correctos del estado. Hay que aclarar que las condiciones, ciclos y funciones anidadas dentro de los hooks como en el caso de useEffect si son posibles.
// No hagos esto!!if (nombre) {useEffect(()=>{document.title=`Algo con ${name}`;}, [name]);}// Esto si lo puedes haceruseEffect(()=>{if (name!=='') {document.title=`Algo con ${name}`;}}, [nombre]);
Solo ejecuta React Hooks dentro de funciones de React
Ejecuta React Hooks dentro de componentes de función.
En las clases los React Hooks no funcionan, además en clases ya existen los métodos del ciclo de vida de un componente en React.
Ejecuta React Hooks dentro de otros React Hooks (puedes hacer tus propios hooks).
Para garantizar el orden y controlar correctamente el estado entre múltiples Hooks. Te permite ejecutar react hooks al inicio de otro hook creado por ti.
Reac Hooks, useState(initialState)
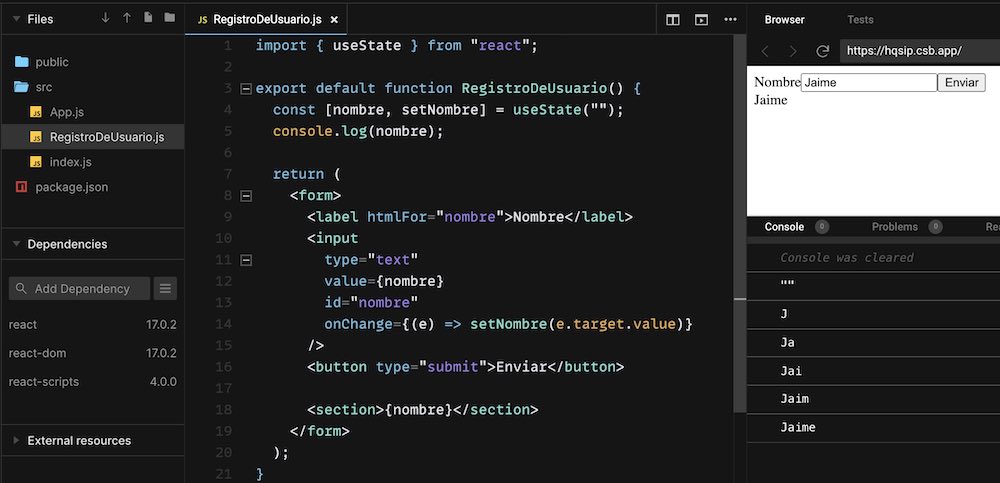
Empecemos con el hook más utilizado, useState. Este hook proporciona la misma capacidad de los componentes de clases para tener un estado interno. Vamos a hacer un formulario de registro de un usuario nuevo, algo sencillo y genérico, nada de detalles de implementación específicos. Probablemente con el campo nombre será suficiente.
Vamos a utilizar la herramienta de codesandbox.io, usando la plantilla de React. Agregamos un archivo RegistroDeUsuario.js
Primero, la función useState(initialState), regresa un arreglo de dos elementos, el valor del estado (inicializado) que queremos controlar y un método para modificar ese estado. Este par de valores se asignaron a las constantes name and setNombre con la sintaxis de destructuring assignment.
He desctructuring assignment de la línea 4 se traduce a lo siguiente.
const statePair =useState('');const name = statePair[0];const setNombre = statePair[1];
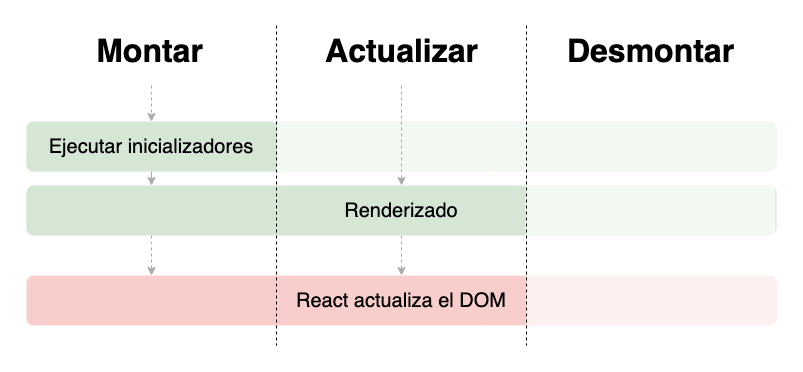
Invocaciones y renderizados
Cada vez que se escribe sobre el campo Name, se vuelve a renderizar el componente. Pero React guarda el estado entre renderizados. Se puede notar como la línea 5 se ejecuta al primer rénder (Montar, con texto vacío) y también cada vez que se actualiza el valor de name (Actualizar, revisa la consola de la parte derecha de la imagen de abajo).
El resultado debe ser algo como lo siguiente.
Renderizados por useState input Nombre
El flujo de useState es el siguiente. Modificado de este original.
Flujo useState
El valor de name se actualiza a través del evento onChange and the method setNombre. Al modificar este estado interno, provoca la ejecución de la función RegistroDeUsuarios y un “re-renderizado”. Si el componente se renderiza debido a un cambio a otro estado u otra propiedad, el estado de name permanece con la última actualización.
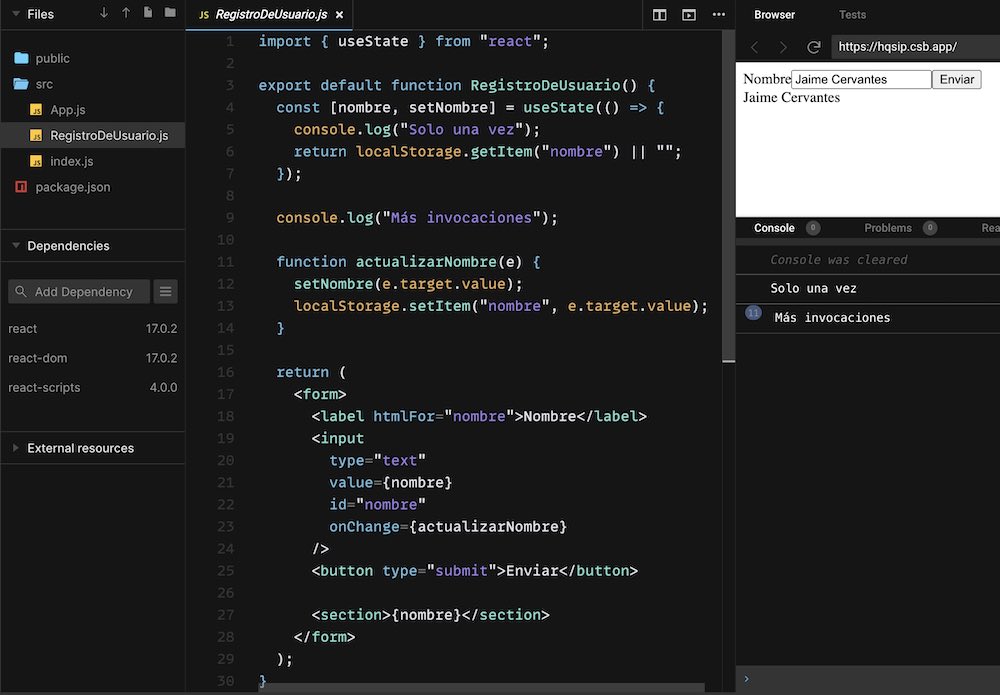
useState(() => { return initialState; })
useState(initialState) puede recibir una función que regrese el estado inicial usado en el primer render. Un ejemplo de su uso es el que sige, ¿Qué podemos hacer si queremos guardar y obtener el estado de localStorage?
import{useState}from"react";exportdefaultfunctionsRegistroDeUsuario(){const[name,setNombre]=useState(()=>{console.log("Solo una vez");returnlocalStorage.getItem("name") ||"";});console.log("Más invocaciones");functionsactualizarNombre(and){setNombre(and.target.value);localStorage.setItem("name",and.target.value);}return (<form><labelhtmlFor="name">Name</label><inputtype="text"value={name}id="name"onChange={actualizarNombre} /><buttontype="submit">Send</button><section>{name}</section></form> );}
Ahora usamos una función para definir el estado, le agregamos un console.log('Solo una vez') para demostrar que la función solo se ejecuta una vez. Y un console.log('Más invocaciones') para demostrar que en los siguientes invocaciones ya no se ejecuta la función de nuestro useState(initialState), pero si el de Más invocaciones.
En el resultado de abajo, escribí Jaime en el campo nombre, luego recargue la página, revisa el lado derecho en la vista y la consola.
useState, campo nombre en localStorage
Al recargar se imprime Sola una vez y al empezar a escribir Cervantes se imprime Más invocaciones un total de 11 veces. Mi nombre James, lo obtuvo del localStorage al primer renderizado.
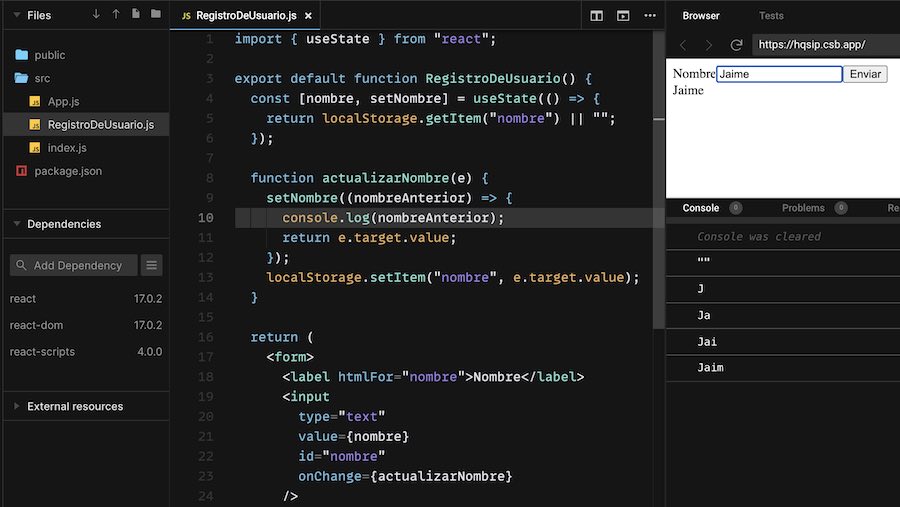
setState(prevState => {})
El método para actualizar el estado setNombre también puede recibir una función, cuyo parámetro es el valor anterior. Veamos un ejemplo modificando la función actualizarNombre.
The function setNombre obtenida de useState recibe como parámetro el nombreAnterior, y al imprimir en la consola nos damos cuenta de que siempre imprimirá el valor anterior del estado name.
Actualizar el estado pasando una función
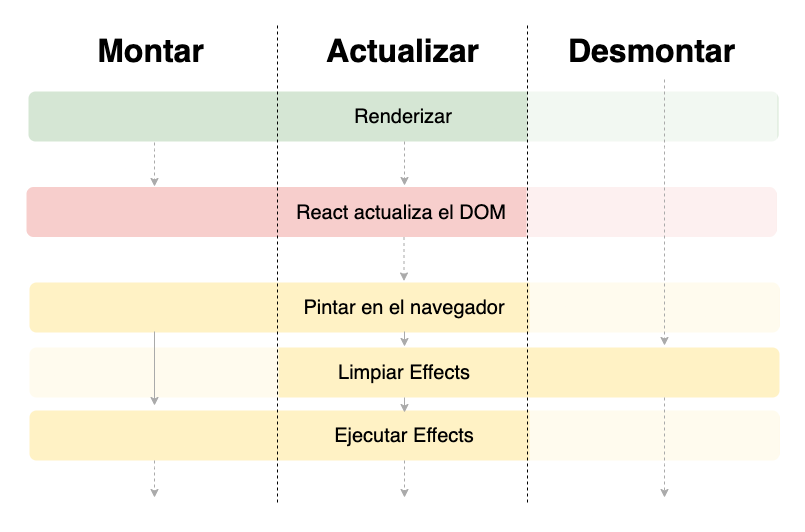
useEffect(effectFn, [deps])
Este React hook, useEffect, nos permite ejecutar y controlar efectos colaterales, como pueden ser peticiones a servicios, subscribirse a eventos, modificar el DOM o cualquier funcionalidad que no pueda ejecutarse en el cuerpo de nuestro componente función porque no pertenece al flujo lineal del mismo.
Flujo de useEffect
The function effectFn se ejecuta después de que el navegador ya ha pintado el componente en pantalla por primera vez (montar). También por defecto después de cada posterior repintado (actualizar). Este comportamiento descrito tiene el mismo propósito que los métodos componentDidMount and componentDidUpdate.
El tercer propósito en useEffect se le llama limpieza, el cual lo podemos comparar con componentDidUnmount. En el primer pintado (montar) la función de limpieza no se ejecuta, solo se ejecuta en la fase de actualizar. Es decir, se ejecuta después de cada repintando, pero antes del que el cuerpo de useEffect se ejecute. Este caso en específico se explica mejor con ejemplos enthis post.
El flujo de useEffect es el siguiente. Modificado de este original.
Flujo useEffect
useEffect recibe un segundo parámetro, deps, el cual es un Array con la lista de dependencias que permiten decidir si ejecutar el efecto colateral o no, después de cada repintado. Sirve bastante para mejorar el rendimiento si no queremos que después de cada repintado se ejecute effectFn.
Si te das cuenta, he usado la palabra pintado en lugar de renderizado. Esto se debe a que efectivamente el efecto se ejecuta después de que los cambios ya estén pintados en el navegador web. El renderizado involucra al Virtual DOM, y React decide en que momento es conveniente actualizar el DOM, pero el pintado sucede un poco después de lo anterior. Aclaremos que aunque se actualice el DOM, el navegador debe calcular estilos y el layout de los elementos para posteriormente realizar el pintado de los pixeles.
useEffect(effectFn)
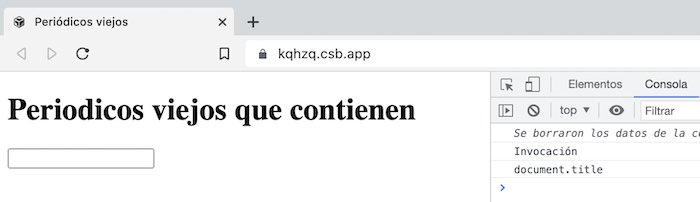
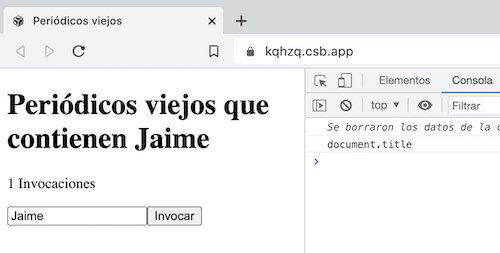
Veamos un ejemplo, aquí la idea es tener un input de búsqueda y queremos que lo que tengamos en el input se imprima en título de la pestaña de nuestro navegador web. Para poder realizar esto necesitamos un efecto utilizando la API del DOM.
De nuevo, con la herramienta codesandbox.io y su plantilla de react, creamos un nuevo proyecto. Agregamos un archivo llamado OldNewsPapers.js donde vivirá nuestra funcionalidad en forma de un componente funcional.
import{useEffect,useState}from"react";exportdefaultfunctionsOldNewsPapers(){const[query,setQuery]=useState("");useEffect(()=>{console.log("document.title");document.title=`Periodicos viejos ${query}`;});console.log('Invocación);return (<><h1>Periódicos viejos que contienen {query}</h1><form><inputtype="text"value={query}onChange={(and)=>setQuery(e.target.value)} /></form></> );}
Este efecto se ejecuta después de la primera vez que se pinta el componente, esto es el primer propósito que se puede comparar con componentDidMount. ¿Cómo es el flujo?
Se ejecuta la función, es decir, el componente funcional.
Lo cual inicializa el estado de query y el efecto colateral.
Se renderiza y se pinta el elemento de react en el navegador con el valor inicial de query = ''.
Texto “Periódicos viejos que contienen” en el <h1>.
Se ejecuta el efecto colateral después del primer pintado.
Texto “Periódicos viejos que” en el título de la pestaña.
useEffect flujo al montar
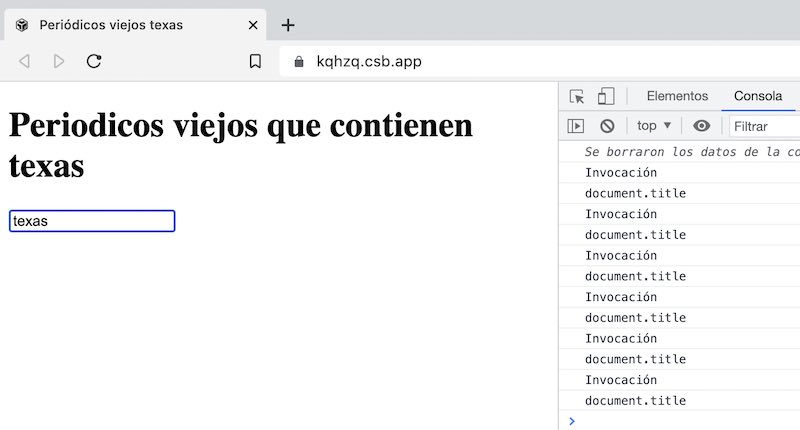
Si escribimos “texas” en el input, ahora el flujo es de la siguiente manera
Cada vez que se introduce una letra en el input (cinco veces más, por las cinco letras de “texas”)
El estado de query cambia debido al setQuery en el onChange, provocando un nuevo pintado (invocación del componente función, renderizado y finalmente pintado).
Después del pintado se actualiza document.title, cambiando el título de la pestaña del navegador web.
useEffect, flujo actualizar document.title
En la imagen de arriba vemos seis “document.title”, como describimos al principio, por defecto el useEffect se invoca después de cada pintado en el navegador web.
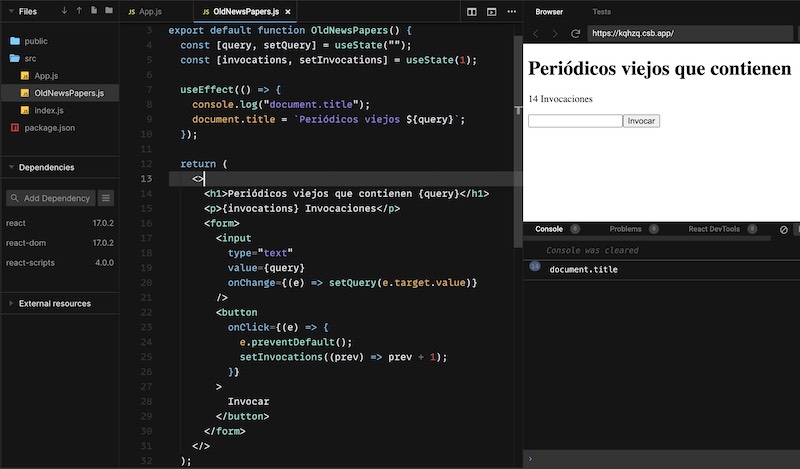
En el último ejemplo nuestro efecto se va a ejecutar después de cada pintado, incluso si el estado de query no ha cambiado. Para comprobar esto vamos a agregar otro estado para llevar la cuenta del número de invocaciones de nuestro componente funcional, que se traduce en el número de renderizados realizados. Estas invocaciones las haremos a través de un botón.
Inicializamos invocations con 1, porque la primera vez que se renderiza será el estado actual. Luego si oprimimos el botón Invocar, se cambia el valor de invocations, se hace otro re-renderizado, y luego se vuelve a ejecutar nuestro efecto, incluso cuando query no ha cambiado.
useEffect por defecto siempre se ejecuta después de cada pintado
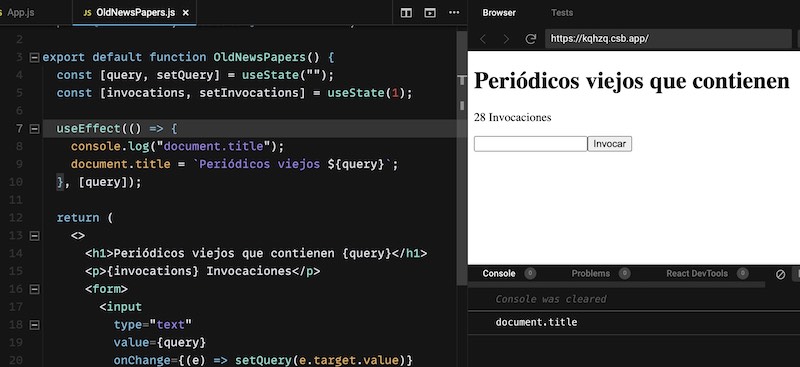
Para evitar que se ejecute demasiadas veces nuestro efecto, podemos indicarle que corra solo cuando una de sus dependencias ha cambiado. En este caso para evitar que se le asigne a cada rato el valor a documen.title, le indicamos que solo lo haga cuando query cambia.
Las siguientes veces que se actualice query escribiendo en el input, el título de la pestaña ya no se actualiza.
useEffect con deps vacío
Conclusión sobre
Las funciones han existido desde mucho antes de la programación, gracias al cálculo lambda de Alonzo Church. No es extraño que en los últimos años el desarrollo de software ha volteado hacia la functional programming debido a la simplicidad y el poder expresivo. Resolviendo varios problemas en el camino.
Y bueno, con el uso de React Hooks, se ha dado un paso muy importante debido a los beneficios que es programar de esta manera, desde hace años que se utilizaban componentes funcionales, y ahora con esto creo que React tiene más futuro prometedor por delante.
Hemos entendido, con suficiente profundidad (para comenzar con hooks), como funcionan los flujos de los Hooks useState y useEffect. De useEffect aún quedan temas por ver, así como también los React Hooks personalizados. Aquí pondré el enlace con los temas pendientes, cuando estos estén publicados. Cualquier duda, no dudes en escribirla en los comentarios, ¡Estaremos contentos de ayudarte!.
“Funciones en node.js y Javascript. Más detalles”, es la segunda parte de lo más importante de las funciones en node.js y Javascript. El tema de funciones es muy importante, y también muy extenso. Aprenderás sobre el prototipo de una función, el comportamiento de la referencia a this, propiedad especial prototype, elevado de funciones y sus beneficios, variable adicional arguments y métodos útiles como call and apply. Y como extra muy importante, si llegas al final, las mejores recomendaciones de comunicación a través del código.
El prototipo de una función en Node.js y Javascript
En la primera parte de Funciones en Node.js y Javascript. Pudimos entender que las funciones son objetos, y el porqué las funciones son objetos. Una función tiene un prototipo, si no sabes que es un prototipo en Javascript, esto explica en this post.
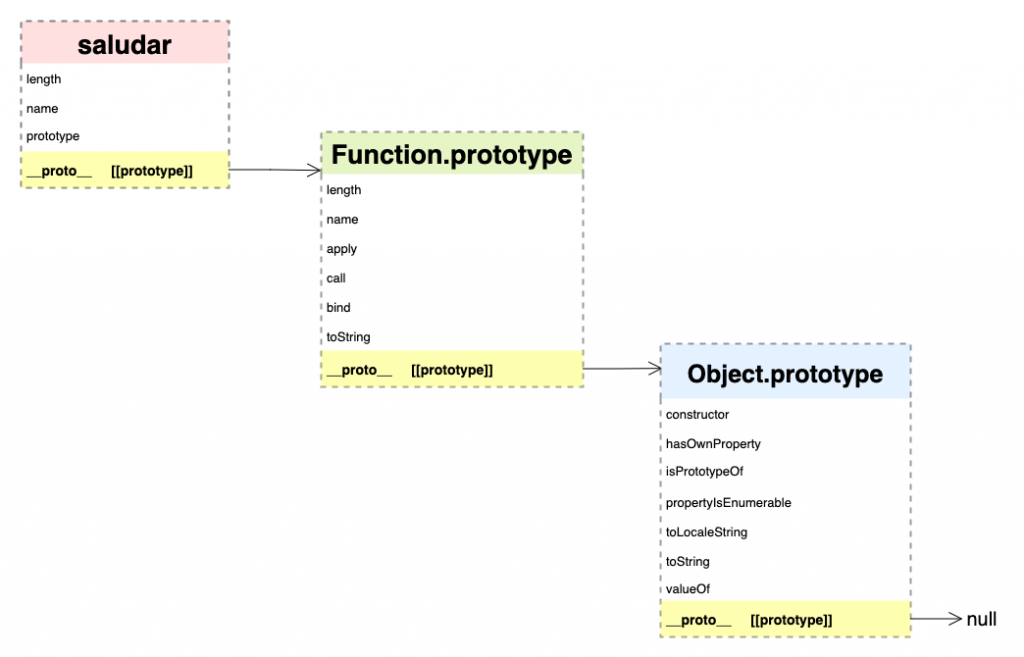
Las funciones tienen como prototipo a Function.prototype. Aunque a diferencia de los objetos literales no se ven tan clara la relación, podemos ejecutar la siguiente prueba.
El prototipo de Function.prototype is Object.prototype. Con esta última sentencia comprobamos lo que hemos dicho de los objetos en Javascript, tienen como objeto base a Object.prototype.
Las funciones en Node.js y Javascript se comportan de manera extraña al ser invocadas. Este comportamiento cambia según la forma en como se invoque e influye en como se trata la referencia this. En las siguientes cuatro secciones se explican estos tipos de invocaciones.
Invocación de funciones en Node.js y Javascript como método
Cuando una función se asigna a una propiedad de un objeto entonces decimos que es un método. Y cuando un método es invocado se puede hacer referencia al objeto al que pertenece a través de la palabra reservada this.
Como vimos en el tema de objetos, se puede acceder a una propiedad a través de corchetes, así ['nombreDePropiedad'].
Invocación de funciones en Node.js y Javascript como función
Cuando una función se invoca de esta manera y quiere hacer referencia a this, este debería obtener null either undefined, pero en lugar de eso, hace referencia al objeto global del ambiente donde se está ejecutando el código, en el caso del navegador web hace referencia a window. En el caso de node.js es el objeto global.
functionsgreet(){returnthis;}greet();// En el navegador es window y en node.js es global
Dentro del navegador web, es algo como lo siguiente.
Ahora, si una función interna hace referencia a this.
functionsgreet(){functionssaludarInternamente(){returnthis;}returnsaludarInternamente();}greet();// En el navegador web es window, en Node.js es global
Esta función interna sigue haciendo referencia al objeto window either global. Y lamentablemente este mismo comportamiento sucede aun si la función greet es el método de un objeto.
const James ={name:'Jaime',greet:functions(){functionssaludarInternamente(){returnthis;}returnsaludarInternamente();}};James.greet();// En el navegador web es window, en Node.js es global
Cuando el objeto se crea a través de una clase, la referencia a this is undefined, esto es una mejora, sin embargo, ¿Tendría más sentido que si hiciera referencia al objeto en cuestión? Yo opino que si, pero ese ejemplo vamos a guardarlo para cuando toquemos las clases.
Invocación de funciones en Node.js y Javascript como constructor
Javascript es un lenguaje de programación orientado a objetos basado en prototipos. Originalmente no usa clases, pero intenta simular una sintaxis basada en clases. Estamos hablando del operador new.
Las funciones constructoras son funciones que se invocan con el operador new para crear nuevos objetos. Como el ejemplo de abajo.
functionsPersona(name,edad){this.name=name;this.edad=edad;}const James =newPersona('Jaime',33);
Esta forma de crear objetos con una función constructora permite que la referencia a this esté correctamente enlazada al nuevo objeto. Lo podemos comprobar cuando ejecutamos las siguientes líneas.
James.name;// 'Jaime'James.edad;// 33
Propiedad especial prototype
Existe una propiedad especial llamada prototype en las funciones, esta no es la misma propiedad oculta que enlaza a Function.prototype.
Esta propiedad especial prototype permite usar a una función constructora para simular la herencia clásica. Así cuando se crea un nuevo objeto usando la función constructora, este nuevo objeto pueda usar las propiedades de prototype. Esto propiedad básicamente funciona igual que las propiedades Object.prototype, Function.prototype, Array.prototype, y demás prototipos de objetos en Javascript. Con la diferencia, que nosotros agregamos el contenido manualmente a prototype. A continuación un ejemplo.
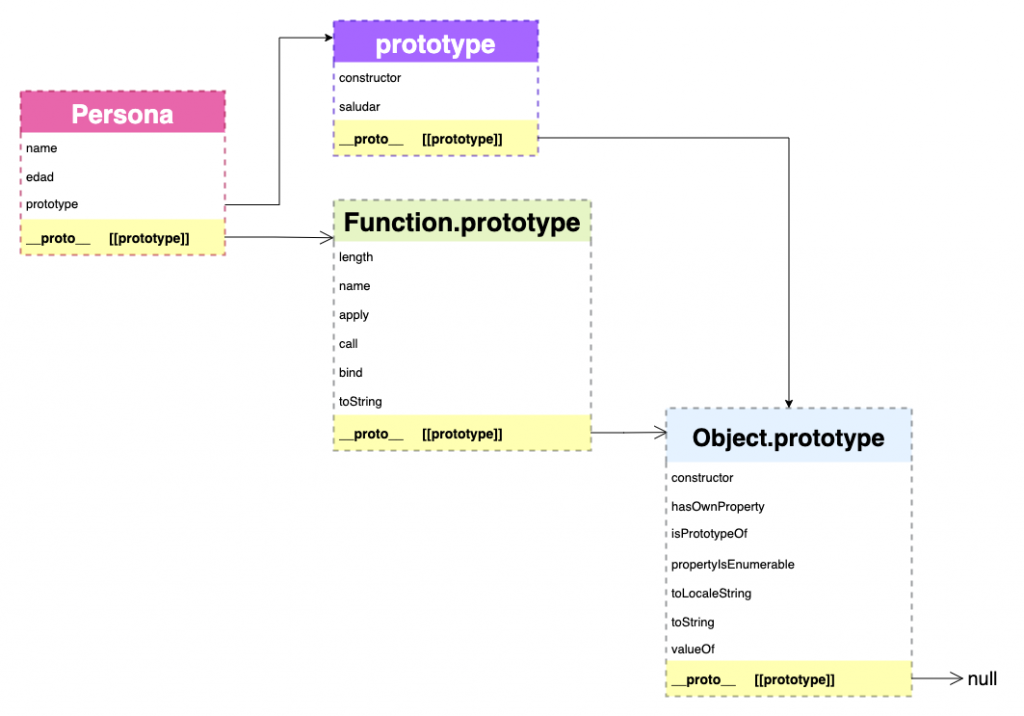
functionsPersona(name,edad){this.name=name;this.edad=edad;}Persona.prototype.greet=functions(){return`Hola soy ${this.name} y tengo ${this.edad} años`;};
Cadena de prototipos de una función y propiedad especial prototype
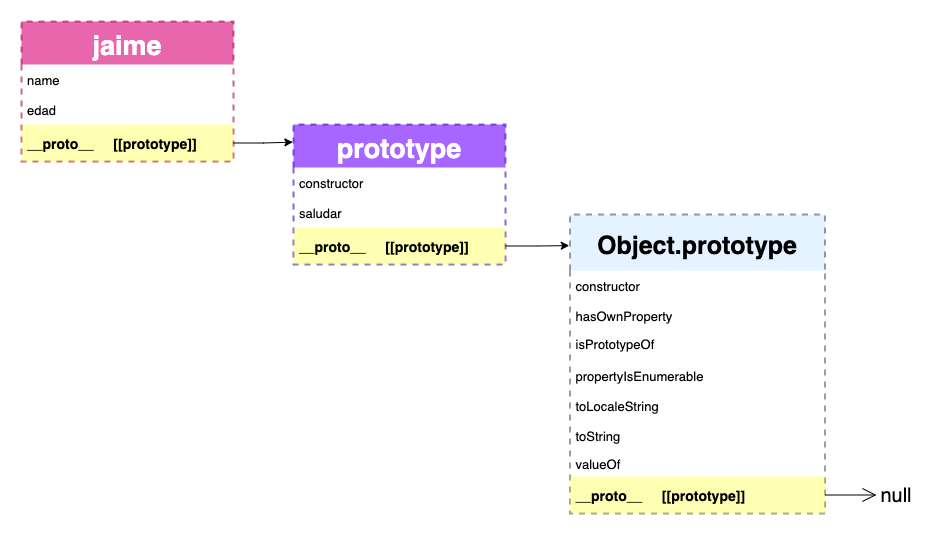
Y con este ejemplo comprobamos que la función greet invocada desde el objeto James, efectivamente tiene la referencia a this enlazada correctamente. Y puede acceder al name and edad del nuevo objeto James.
const James =newPersona('Jaime',33);James.greet();// Hola soy Jaime y tengo 33 años
Visualmente es como el siguiente diagrama.
Cadena de prototipos de un objeto creado con una función constructora
Por último te preguntarás, ¿Por qué no agregamos los métodos dentro de la función constructora Persona? Muy parecido a lo que hicimos cuando vimos el tema de closure.
functionsPersona(name,edad){this.name=name;this.edad=edad;this.greet=functions(){return`Hola soy ${this.name} y tengo ${this.edad} años`;};}const James =newPersona('Jaime',33);James.greet();// Hola soy Jaime y tengo 33 años
Pues la respuesta es que también se puede hacer, pero la desventaja es que estaríamos creando nuevas funciones cada vez que creamos una instancia de Persona. Con el uso de la propiedad prototype no se crean nuevas funciones, solo se hacen referencia a ellas, es decir, cada nuevo objeto debe ir a buscar en sus prototipos a la función saludar.
Nota importante sobre las funciones constructoras
Las funciones constructoras siempre empiezan con una letra mayúscula, no porque la sintaxis del lenguaje lo necesite, sino para que los programadores identifiquen a una función constructora de una que no lo es y se use adecuadamente el operador new.
Invocación de funciones en Node.js y Javascript con apply and call
Como ya hemos hecho mucho hincapié, las funciones en Node.js y Javascript son objetos. Por lo tanto una función también tiene métodos. Los métodos del prototipo Function.prototype.apply and Function.prototype.call, permiten definir explícitamente la referencia a this al ejecutarse el cuerpo de la función.
Invocación con Function.prototype.apply
const James ={name:'Jaime',greet:functions(saludo){return`${saludo}, soy ${this.name}`;}};James.greet('Hola');// Hola, soy JaimeJames.greet.apply({name:'Pepito'}, ['Buenos días']);// Buenos días, soy Pepito
El método apply recibe como primer parámetro el objeto al que se va a enlazar la función y podrá hacer referencia usando this y como segundo parámetro un arreglo de valores que son los parámetros de la función. En este caso la función saludar solo recibe una cadena de caracteres a través del parámetro saludo. Es por eso que solo necesita un arreglo con un solo elemento.
Aquí un ejemplo con una función de dos parámetros.
En este ejemplo el primer parámetro del método apply is null porque la función no se enlaza a un objeto y no necesita usar la referencia this.
Invocación con Function.prototype.call
Este método es una simplificación del método apply, igualmente recibe dos parámetros, el objeto al cual se hará referencia con this y los argumentos de la función que va a invocar. La única diferencia es que en lugar de recibir un array de parámetros para la función que se va a invocar, recibe cualquier número de parámetros separados con comas. A continuación un ejemplo.
Parámetro extra arguments de las funciones en Node.js y javascript
Cuando una función es invocada, adicional a la lista de parámetros, tiene acceso a un parámetro llamado argument. Este parámetro extra contiene la lista de todos los parámetros pasados en la invocación de una función.
arguments es un objeto muy parecido a un array, pero no lo es. En el ejemplo anterior vemos que su prototipo es Object.prototype y para ser un array debería ser Array.prototype.
Debido a lo anterior, arguments no tiene todos los métodos útiles de un array. Por ejemplo, que tal si queremos recorrer la lista de todos los parámetros, en un arreglo se podría usar el método Array.prototype.forEach, pero eso no es posible.
Una forma de mitigar este inconveniente es convertir el objeto arguments a un arreglo, usando el método Array.from. Y entonces si usar los métodos de Array.prototype que necesites. Ejemplo.
Aunque la función saludar solo recibe un parámetro, aun así todos los parámetros que se pasen en la invocación, se guardan en arguments.
Elevado de funciones en Node.js y JavaScript
El elevado se refiere a que la creación de función sube hasta el inicio del ámbito en donde se encuentre. Solo la declaración normal de función puede ser elevada. Ejemplo.
Como podemos ver la función agregarComplemento se puede utilizar antes de su definición, esto es porque javascript antes de ejecutar el código, crea la función al inicio del ámbito local donde se encuentra, el código anterior se traduce antes de ser ejecutado a lo siguiente.
Las funciones en forma de expresión y funciones flecha no cuentan con este elevado de funciones, así que es importante definirlas antes de ser usadas.
Beneficio del elevado de funciones
Este comportamiento parece confuso, pero cuando estás programando con funciones es muy útil. Cuando se programa se tiene funciones principales y funciones secundarias. Para la persona que lee nuestro código muy a menudo es suficiente con visualizar las funciones principales para entender el código, no tiene que perder el tiempo en ver los detalles de las funciones secundarias. Imaginate un archivo con cien líneas de código y compara encontrar las funciones principales en las líneas de inicio contra encontrar las funciones principales al final.
Veamos un ejemplo. Aquí al lector solo le interesa a alto nivel lo que renderiza renderVista.
Además de ir hasta el final para encontrar la función principal que nos interesa usar, se pierde el sentido de este archivo. O al menos tardamos más en entender el objetivo de este archivo, el cual es renderizar la vista.
Por último, si quisieras, puedes hacer que todo viva dentro de una sola función, utilizando funciones anidadas. Haciendo más claro la relación entre las funciones. Como el siguiente ejemplo.
Como ya vimos en la publicación sobre objetos, dado que la función es un objeto, entonces una función siempre será una referencia.
Diferencias importantes entre funciones flecha y tradicionales
Las funciones flechas tienen ciertas limitaciones si las comparamos con las funciones tradicionales, aunque hay que decir que si tu código está enfocado a la programación funcional, este tipo de funciones son muy convenientes.
Sus limitaciones en comparacion con las funciones tradicionales son:
No tienen el enlace correcto a this y no puede usar super().
Debido al punto anterior no funciona bien con los métodos call, apply and bind.
No pude usarse como método de un objeto.
No tiene la propiedad especial prototype.
Consecuencia del punto anterior no es posible usar una función flecha como función constructora.
No tiene acceso a parámetro extra arguments.
Veremos estas limitaciones en una futura publicación sobre las funciones flecha.
Comunicación con funciones en node.js y Javascript
Como ya lo hemos mencionado en otras publicaciones, el código es una forma de comunicación entre lo que creamos ahora con nuestro yo del futuro y nuestro equipo. Sabemos que la programación es una actividad social de mucha comunicación y ser eficientes en esta comunicación ahorra tiempo y dinero a programadores y no programadores.
Recordemos que las funciones son las unidades más pequeñas de organización de código. Además sin las funciones, ¿Cómo definiríamos el comportamiento de objetos y de funciones más grandes? Las funciones nos sirven para:
Organize the code
Reuse code
It is used for the composition of objects, adding behaviors.
It is used for the composition of more complicated functions
Teniendo en cuenta lo anterior, he aquí algunas recomendaciones a la hora de crear funciones.
Un muy, muy buen nombre
En this post encontrarás las recomendaciones de nombres.
Lo más simple que se pueda
Una función debe ser lo más simple posible, y para eso debe tener una meta pequeña y específica, lo que conlleva a no complicar las cosas y hacer una cosa a la vez, paso a pasito, algo sencillo y bien hecho.
Cuando se resuelve un problema complicado, la forma recomendada de solucionarlo es como si imaginaras que eres un bebe, y tu problema es que no puedes correr. ¿Suena complicado no crees? Probablemente pudiste correr bien sin caerte alrededor de los tres años. Sin darte cuenta dividiste un problema grande en partes más pequeñas. Para llegar a correr, primero aprendiste a gatear, luego a caminar y finalmente intentaste correr con muchas caídas en el camino. Y si dividimos aún más estas tres fases encontraremos objetivos aún más pequeños, ejemplo, dar el primer paso. Así son las funciones, solucionan el problema pedacito por pedacito.
Siguiendo el enfoque anterior, una función simple es la que cumple con lo siguiente.
Se enfoca en resolver una sola cosa sencilla pero bien hecha.
Tendrá pocas líneas de código
Cuando mucho una o dos condiciones if o un switch
Cuando mucho uno o dos ciclos for, while, do while, etc.
Muy poquita indentación debido a los tres puntos anteriores
Por mucho tres parámetros, un humano solo puede recordar cuatro cosas a la vez, hagámosle la vida más fácil a nuestro compañero. Si de verdad necesitas muchos parámetros, puedes utilizar un objeto literal como único parámetro, así al menos no tenemos que recordar el orden en que deben de ir.
Todos los puntos anteriores lograrán que la función sea muy fácil de leer y comunicar.
En una futura publicación haremos una aplicación pequeña donde aplicaremos estas recomendaciones
Conclusions
El tema de funciones es muy grande, aún nos faltan temas por ver. Como nos seguimos dando cuenta, las funciones son una pieza fundamental en Javascript y en el desarrollo de software en general. Según donde se invoque una función, podrá enlazarse al objeto this correcto. El elevado de funciones es beneficioso para la comunicación de las intenciones de nuestras funciones.
No olvidemos que las funciones son objetos. Las recomendaciones expuestas reflejan el principio ágil de simplicidad. Manteniendo las cosas simples, somos más productivos. En el caso de nuestro código, aumentamos el poder de flexibilidad y mantenimiento del mismo a través de una comunicación clara y código fácil de comprender.
Like Objects in Node.js and Javascript. What's really important. “Functions in Node.js and JavaScript. What's really important” refers to the principles behind functions, which is really important to continue learning, improve your understanding of functions in programming, Node.js and in Javascript.
Before talking about functions in Node.js and JavaScript, it is worth remembering or defining what a function is in programming.
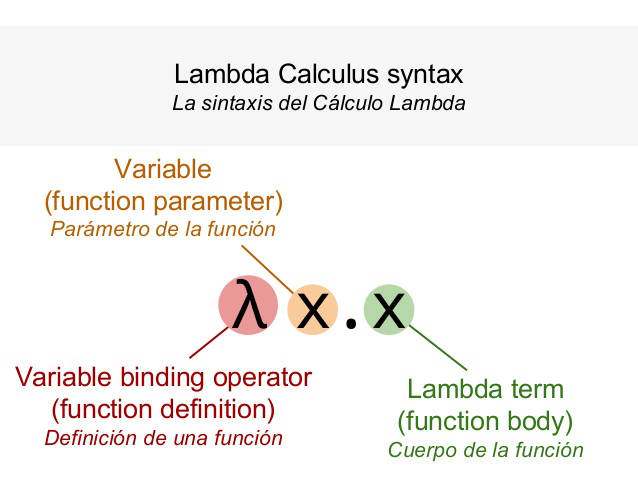
Lambda calculation syntax, functional programming. Image taken from https://www.slideshare.net/FASTPresentations/introduction-to-lambda-calculus-using-smalltalk-by-facundo-javier-gelatti
In the first programming languages, subroutines, procedures and functions were used. Subroutines, procedures and functions have in common that they group a set of operations with the purpose of reusing them many times and only writing them once.
Functions, unlike procedures and subroutines, are still used in modern programming languages, and are the smallest unit of code organization. They are used to define the behavior of objects, composing them with specific functionalities. Let's remember another post that the Objects are a group of functionalities that contribute to communication with other objects.
Without functions, an object wouldn't be of much use. Functions define the behavior of objects.And it also forms larger functions. In conclusion, the functions serve us for.
Organize the code
Reuse code
It is used for the composition of objects, adding behaviors.
It is used for the composition of more complicated functions
What are functions in Node.js and JavaScript?
In Node.js and JavaScript, and indeed in any environment where JavaScript is executed, functions are everything described in the previous section. And also They are objects.
Since they are objects, they can be treated like any other value:
They can be assigned to variables and properties of other objects
Create them dynamically during the execution of the JavaScript code
Have its properties and methods
Be parameters for another function
Be the return value of a function
Additionally, the body of a function provides local scope to variables and parameters.
Although it is not the topic of this post, all the features listed make JavaScript can be used as a functional programming language.
How to create functions in Node.js and JavaScript?
The three recommended ways to create functions are as follows.
Normal declaration
Function as expression
Arrow functions
Function declaration
This is the most common method, very similar in other programming languages. The reserved word is used functions, followed by the function name, then a list of arguments in parentheses, which are separated by commas. This argument list is optional.
Finally the function body using braces{ }. The body of the function contains the statements you need.
To execute the function code it is necessary to invoke it. The invocation is made with a pair of parentheses and the necessary arguments inside, separated by commas. Just like the previous example.
A function always returns some value, even if it is not explicitly defined. If you do not define what a function returns, by default the return value will be undefined.
If we execute the function, it returns undefined because we don't explicitly tell it to return some value
Function in expression form
This way of creating functions is much more flexible, its definition can appear wherever an expression can be defined. That gives it the ability to be assigned to a variable or a property of an object.
Its syntax is the same as the declaration of a function that we saw previously, but when assigned to a variable or property, its name is optional.
// Sin nombre, tambie conocida como funcion anonimaconst sumar =functions(to,b){returnto+b;};// Con nombreconst sumar =functionssumar(to,b){returnto+b;};const calculadora ={sumar:functions(to,b){returnto+b;}};const person ={// como propiedad de un objetoeat:functions(){return'Comiendo...';}};
Arrow functions
Arrow functions are the newest way to create functions, much more similar to mathematical functions in algebra. They feel very convenient because their syntax is much more reduced. They are an alternative to functions in the form of expressions, they are faster to write. However, it has many limitations compared to the other two ways of creating functions. Although if you use them for functional programming they are quite effective.
To be honest, it seems to me that if its use is not focused on functional programming, it does add more complexity to the use of functions in JavaScript, in itself the functions in Node.js and Javascript can be very different compared to other languages.
But well, let's look at its syntax.
argumento=> expresión;// Com mas de un arguento es necesario parentesis(argumento1,argumentN)=> expresión;// Con varias lineas de sentencias, es necesario las llaves {}argumento=>{// sentencias};// Con mas de un argumento y con varias lineas se sentencias(argumento1,argumentoN)=>{// sentencias};
// Sin argumentos es necesario los parentesis()=> expresión
When using expressions, it is not necessary to explicitly define the return. The result of the expression is the return value.
const calcularCuadrado =to=> to * to;const sumar =(to,b)=> to + b;const greet =()=>'Hola';// invocacionescalcularCuadrado(5);// 25sumar(1,2);// 3greet();// 'Hola'
When we want the body of the function to have several lines of statements, curly braces are used. Furthermore, if we want the function to return some value, then we explicitly use the syntax of return.
Examples.
const calcularCuadrado =to=>{constresult=to*to;returnresult;};const sumar = (a, b) =>{ const result = to + b; return result;};// invocacionescalcularCuadrado(5);// 25sumar(1,2);// 3
Nested or internal functions
A function can be defined inside another function, that is, we can dynamically create internal functions inside another main function and invoke them.
In the next section we will see other nested functions.
Local scope of functions
Functions in Node.js and JavaScript provide a scope of values, local to the body of the function, that is, what is defined in the body of the function can only be referenced within the function.
Internal functions can access the variables of their parent function (so to speak). In the previous example you can see that the function sonor you can refer to the constant name of the function grandpaeither. This produces us Jaime Perez. In the next section we explain it better
Closures or closures
Function nesting allows child functions to have their own local scope, hidden from parent functions. At the same time these internal functions have access to the values defined in the parent functions. This encapsulation of information and at the same time access to external information is called closure.
Let's continue with the example from the previous section, the functions grandfather, father and son
The result of the function invocation grandfather is:
Jaime Pérez --> From son function Jaime Buendía --> From father function Jaime Cervantes --> From grandfather function
The more internal the function, the more scope it has to all the areas of the other “external parent” functions. Like the image below, it is as if the function scopes grandfather and father were within the scope of the function son.
Closure, function scope in js
A function will always take the value of the variable that is closest to its own local scope. The variables within their own local scope are the most relevant. This allows variable and constant names to not collide between nested scopes.
The function son, has access to the constants name and last name of the function grandfather. You also have access to the constant last name of the function father. But the constant last name within the function itself son is closer than defined in father and grandfather, has greater relevance. So the full name that is printed to the console is Jaime Perez instead of Jaime Buendía or Jaime Cervantes.
The function father if you have access to the constants name and last name of the function grandfather. In its own sphere it has a constant last name equal to Good day. As this value is closer, it does not take the last name of the function grandfather which is further away. That is why in the console the full name that is printed is Jaime Buendía. Then the function father You do NOT have access to the constant last name of the function son.
Finally it prints to the console Jaime Cervantes Velasco because the constants name and last name They are defined at the local level of the grandfather function. The grandfather function does NOT have access to constants last name of its internal functions father and son.
OOP emerged from functions
Now that we've seen a little about nested functions and closures, we can talk about how object-oriented programming was discovered. This reflects the importance of functions in programming languages.
Ole Johan Dahl and Kristen Nygaard realized that the function call stack in ALGOL could be moved to a Heap. This allows variables declared by a function to exist even after the function finishes executing and returns some value.
In this way the function became the constructor of the class, the local variables became properties of the class instance, and the internal functions became its methods. And so in 1966 object-oriented programming was discovered.
We can implement this behavior using functions in Node.js and JavaScript and taking advantage of their ability to create closures.
The parameters name and last name, are within the local scope of the function createPerson, so they work just like variables inside the function body. The inner functions continue to have access to those parameters even after the parent function returns its value, an object literal that is the instance of a person.
Then when the instance James invokes its method getName, this property refers to the internal function getName of the function createPerson. Due to internal function closure getName, we have access to the parameters name and last name even long after the parent function createPerson has returned its value.
Function Names in Node.js and Javascript
We have to be aware that programming and software development is a social activity, with a lot of communication. And the more efficient this communication is, the greater the success of the software. This allows us to save the time and financial resources of everyone involved. I'm talking about programmers and non-programmers, investors, clients and users.
One of the forms of communication between fellow programmers and often oneself in the future is through easy-to-understand code, and to contribute to this easy understanding we must choose the name of our functions very carefully.
Take into account the following recommendations. But keeping in mind that these are only examples, and when it comes to writing your real functions and with the proper context, you will most likely be able to come up with better function names than those shown here.
Spend enough time naming your role.
Just as important as naming the variables is the functions. Functions are the smallest units that allow us to define behaviors in applications. The time spent naming your functions is much less than the time you have to spend later on yourself and your colleagues trying to figure out what a function actually does. It's like organizing your room, the tidier it is, the faster you will find the things you need, the faster you will change, or the faster you will find your socks, etc.
The name must be very semantic, describe its objective
The name of a function should describe as clearly as possible what it does. It is important that be a verb because a function always performs one or more operations focused on a specific task.
For example, if a function returns the full name of a person, which of the following names fits best?
fullName()getName();getFullName()
The name that best describes the purpose of the function is getFullName.
If the function returns a boolean, the function name must indicate that the result can be true or false. Just like the result of a logical condition. It's like asking a question whose possible answers can only be yes or no.
Yeah hasChildren If it were a method, it would look like this.
if (currentPerson.hasChildren()) {// Haz algo}
You notice how the condition reads like a very understandable phrase. If currentPerson has children, then...do something.
Avoid wrong assumptions
If the name describes things it doesn't actually do, then we should rename that function. For example, if a function forms the full name of a customer and returns that name. Which feature best prevents erroneous assumptions?
functionssetClientName(){}// Se entiende que el nombre del cliente va a ser modificadofunctionsgetFullClientName(){}// Aquí esta claro que solo consigue el nomnbre completo del cliente
setCustomerName It tells us that the client's name will be changed, it is a bad name. So the name that best avoids erroneous assumptions is getFullClientName. It does not say what forms the name, but it does say that it will return a full name. For practical purposes we are not interested in knowing how that full name is formed, just that it does not return them.
Agreements with programmers
It is very important to establish agreements for the appointment of functions. In the previous examples I have been using the prefix get which indicates that I send to obtain something. But it would be confusing if some programmers used the word fetch and others the word retrieve, and others collect either bring.
Use the right context
It is important to understand the context of the function, in previous examples we used the function getFullClientName, but depending on the context of the application, it might be better getFullUserName either getFullEmployeeName.
Although these names have to do with the context of the business or problem, there are also technical terms that programmers are already very accustomed to and should not be mixed with the problem domain.
For example, the observer design pattern contains methods like update, subscribe, publish, notify. If we are working with a magazine application that uses native cell phone notifications, SMS, and makes periodic publications. This can also create confusion, so you should name functions very carefully in such a way that you distinguish between functions or methods of the design pattern and others related to the business.
Function scope helps name length
The name of the functions can be long or short depending on the scope it has in the software. For example, a function that is used a lot in different files is worth keeping its name short. Because if many people use it, it is important that it is easy to write and pronounce.
On the other hand, if it is a function that is only used in a file, its name can be long, these types of functions are normally used internally by other functions with short names. So long name functions are a way to explain what the short name function does. This doesn't mean it can't be short, but if you need more words to better describe the feature, go ahead.
As an example, let's imagine a function that returns the total of your profits to the current date of your entire investment portfolio. Where the profits are the sum of the interest on your investments plus the contributions you have made to date.
// funcion corta, reutilizable en otros archivos o aplicacionesfunctionsgetEarnings(){returncalculateEarnings();}// funciones con nombre más largo que describen a la funcion cortafunctionscalculateEarnings(){constearnings=calculateCurrentTotalInterest();constaditionals=calculateCurrentTotalAdditionalContributions();returnearnings+aditionals;}functionscalculateCurrentTotalInterest(){}functionscalculateCurrentAdditionalContributions(){}
Don't worry so much about these examples, the goal is to give you an idea. In a future publication we will make a small application where we will see how to apply these recommendations.
Conclusions
Functions in Node.js and Javascript is a fairly broad topic, it is one of the best done things in JavaScript that reveal the power of the language. It is noted that Javascript is influenced by LISP and Scheme.
Likewise, let's not forget to name our functions correctly, they are the smallest units that allow the software to be organized into well-defined behaviors.
Functional programming is the first programming paradigm invented, hence the importance of functions, because it is a paradigm from which object-oriented programming took its bases.
Let's not forget that functions in Node.js and JavaScript are objects and therefore can be treated like any value.
We are still missing several important feature topics. These are addressed in this post. If you have any questions, do not hesitate to write them in the comments, we will be happy to help you!
If you want, as an exercise, you can translate all the examples into functions in the form of expression and arrow functions. Have fun!
“Objects in Node.js and Javascript. What's really important” refers to the principles behind objects, which is really important to continue learning, improving the understanding of objects in programming and in Node.js and Javascript.
Let's start with understanding what an object is in programming.
What are objects in programming?
It has been said a lot that object-oriented programming represents the real world. The truth is that programming in general is about representing the real world in something digital. So object-oriented programming is also about digitally representing the real world, just with a little more emphasis on the use of objects. But as we have established in this post, the important thing is NOT the objects, the important thing is:
Message passing for communication between objects
In programming a object It is a digital form of group features and that some of them may be analogous to an object in real life, but that it is much more limited and should not be expected to be the same, because it is only a digital representation.
When you develop software, and you need to add functionality, modify or fix a bug, your logical thinking is based on representation of digital objects, their relationships and communications with other digital entities. You should never think that as the real object behaves in a certain way, so does its representation. It is very helpful conceptually, but in implementation they are very often different.
Let's remember what Alan Kay tells us:
I'm sorry I coined the term a long time ago. Objects for programming because it made people focus on the least important part. The big idea is "Sending messages«
Alan Kay
Also a object serves for store data useful that other objects can use. So an object serves us to:
Create communications between digital representations of objects.
It allows grouping functionalities related to the digital representation of the object.
Stores data that another object can use. (It works like some data structures.)
What are objects in Node.js and JavaScript?
The objects in Node.js and Javascript, they are a collection of pairs name: value, similar to PHP's "associative arrays." These pairs of name/value They are called properties, a property is like a variable and can contain any type of value.
The key to the previous paragraph is that it can contain any type of value, including functions. And with this two types of objects are identified.
Objects with functionalities and communications
Which for the most part have methods to communicate with other objects and solve problems.
Objects with data. Also called data structure
Which for the most part contains data and which helps us to store and send information through messages. These objects are used by objects with functionalities and communications.
Let's remember that everything related to objects also works anywhere JavaScript is executed, node.js including.
How to create objects in Node.js and Javascript?
The simplest way to create an object is through an object literal. A literal object is one that is created with curly braces {}, adding its properties and methods. Like the following example.
const James ={name:'Jaime',last name:'Cervantes',mother's last name:'Velasco',edad:33,getName:functions(){return'Jaime Cervantes Velasco';}};James.getName();// Jaime Cervantes Velasco
We have an object with five properties, name, last name and mother's last name are of type string, age is type number and the last property, getName() is type functions. Here you have more information about data types.
Although we will see the functions in detail later, for now, we can say that the functions allow us to encapsulate and execute a set of operations that we do very often. Instead of repeating the code of these operations many times, we better put these operations inside a function.
Whenever we need to execute these operations, we simply execute the function, this execution of the function is called invocation. Example of invocation is in the last line, where we use parentheses, jaime.getName();.
How do I get the value of a property?
To obtain some property of an object, we can do it in two ways:
Dot notation
Using square brackets, much like accessing data in a array
The first way, dot notation, is very simple, example:
const James ={name:'Jaime',last name:'Cervantes',mother's last name:'Velasco',edad:33,getName:functions(){return'Jaime Cervantes Velasco';}};James.name // 'Jaime'James.last name;// 'Cervantes'James.mother's last name;// 'Velasco'James.edad;// 33James.getName // function () { return 'Jaime Cervantes Velasco'; }
The second way, using square brackets [], example:
const James ={name:'Jaime',last name:'Cervantes',mother's last name:'Velasco',edad:33,getName:functions(){return'Jaime Cervantes Velasco';}};jaime['name'] // 'Jaime'jaime['last name'];// 'Cervantes'jaime['mother's last name'];// 'Velasco'jaime['edad'];// 33jaime['getName'] // function () { return 'Jaime Cervantes Velasco'; }jaime['getName']() // 'Jaime Cervantes Velasco'
Here we access the properties with square brackets using the name of the properties, which are strings.
Highlights how we invoke the function getName. These two statements do the same thing, invoke the function getName:
jaime.getName(); jaime['getName']();
Property names are character strings
When we use square bracket notation, we use a string of characters to get the value. What we mentioned before about An object is a collection of pairs name: value. He name of all properties are strings.
Since property names are strings, we can define properties enclosed by quotes, like the following example:
const James ={name:'Jaime',last name:'Cervantes',mother's last name:'Velasco',edad:33,getName:functions(){return'Jaime Cervantes Velasco';},'nueva-propiedad-con-guion-medio':'Mi propiedad con guión medio encerrada por comillas'};jaime['nueva-propiedad-con-guion-medio'];// 'Mi propiedad con guión medio encerrada por comillas'
And get them with bracket notation like this, jaime['new-property-with-middle-hyphen'].
A property like this cannot be accessed with dot notation, so jaime.new-property-with-script.medium. This statement will give you an error in Javascript because it is not a valid property name.
In fact in Javascript the name of valid variables or properties must:
Start with a letter, included $ and _.
It cannot begin with numbers or characters used in the language for other purposes, e.g. -, %, /, +, &.
After the starting letter you can use numbers, other valid letters, $ and _.
Objects in Node.js and Javascript that contain other objects?
const James ={name:'Jaime',last name:'Cervantes',mother's last name:'Velasco',edad:33,getName:functions(){return'Jaime Cervantes Velasco';},address:{calle:'Melchor Ocampo',numero:2,colonia:'Las Flores',municipio:'Tezonapa',estado:'Veracruz'}};
Here we add an object address to the object James. Simply using curly braces to create object literals.
How do I add, modify and delete properties?
Once you create an object, you can add more properties, modify them, and delete them.
Add properties to objects in Node.js and Javascript
Assignment is used to add new properties that do not previously exist.
const James ={name:'Jaime',};James.last name ='Cervantes';James.appelidoMaterno ='Velasco';console.log(jaime );// { nombre: 'Jaime', apellidoPaterno: 'Cervantes', apellidoMaterno: 'Velasco }
Update properties to objects in Node.js and Javascript
Assignment is also used to update the value of properties that already exist.
const James ={name:'Jaime',last name:'Cervantes',mother's last name:'Velasco',};James.last name ='Perez'James.mother's last name ='Moreno';console.log(jaime );// { nombre: 'Jaime', apellidoPaterno: 'Perez', apellidoMaterno: 'Moreno' }
Remove properties from objects in Node.js and Javascript
To delete properties, use the operator delete. Example:
const James ={name:'Jaime',last name:'Cervantes',mother's last name:'Velasco',};delete James.last name;// o tambien así:delete jaime['apellidoMaterno];console.log(jaime); // { nombre: 'Jaime' }
The properties last name and mother's last name, no longer exists in the object James.
Are objects in Node.js and Javascript a reference or a value?
Objects in Node.js and JavaScript will always be a reference, that is:
const James ={name:'Jaime',last name:'Cervantes',mother's last name:'Velasco',};const Pedro = James;Pedro.name ='Pedro';James.name === Pedro.name;// true;James.name;// 'Pedro'Pedro.name;// 'Pedro'
The constants James and Pedro they refer to same object in memory.
How do I cycle through the properties of an object?
There are several ways, the simplest to go through the properties of an object is the following.
We have the object James:
const James ={name:'Jaime',last name:'Cervantes',mother's last name:'Velasco',edad:33,getName:functions(){return'Jaime Cervantes Velasco';}};
The first thing is to obtain the name of its properties with the method Object.keys, which generates a array with the names of the properties.
Design Patterns: Elements of Reusable Object-Oriented Software
This principle is widely applied in Javascript and therefore applies in the same way in Node.js, in fact that is how it was built. Every object in Javascript has a link to a prototype, and can use all the properties and functions of its prototype.
This prototype link can be referenced in code, using the special property __proto__.
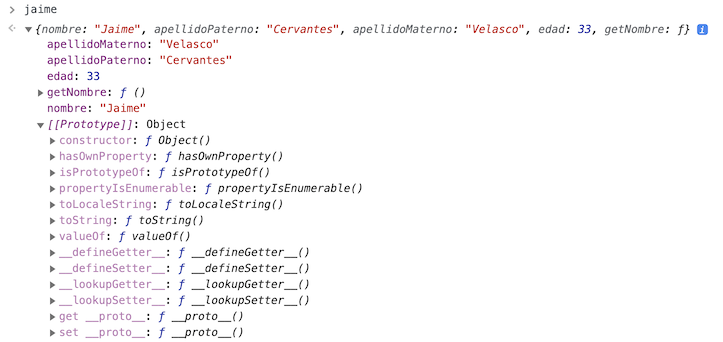
In the case of literal objects, such as James, are linked to Object.prototype, which is the base object of all objects in Javascript.
const James ={name:'Jaime',last name:'Cervantes',mother's last name:'Velasco',edad:33,getName:functions(){return'Jaime Cervantes Velasco';}};James.__proto__;// { constructor: f Object(), hasOwnProperty: f hasOwnProperty, ... }James.__proto__ ===object.prototype;// trueJames.toString ===object.prototype.toString;// trueJames.toString();//[object Object]
If we expand the prototypes in a web browser like chrome, it is displayed like this.
Object literal jaime has Object.prototype as its prototype
Graphically, the prototype link looks like the image below.
Object.prototype jaime's prototype
You can also see the prototype at node.js if you link it to a debugger. But we won't see how to do that today.
What is the prototype chain?
We have created the object James literally, but what if we create it through another object person, making the person object its immediate prototype.
const person ={greet:functions(){return'Hola';},eat:functions(){return'comiendo...';}};const James = object.create(persona);// Creamos jaime en base al prototipo persona
If we now do a console.log(jaime):
console.log(jaime);
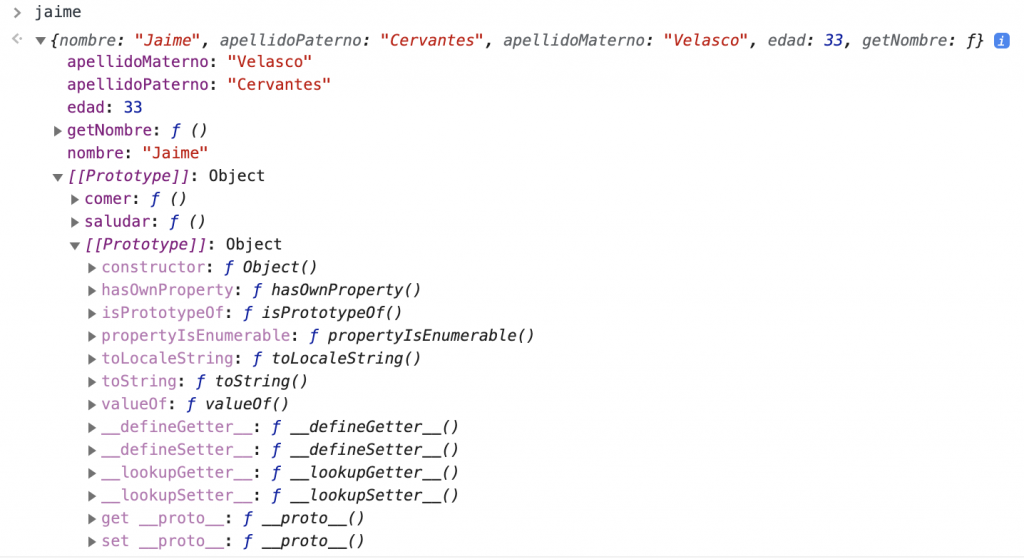
And we expand the result in a web browser like Chrome, the result is displayed as follows.
prototype chain
In the image, we can see that [[prototype]] points to the object person, hence James has access to the methods eat and greet of the object person.
And if we make these comparisons we see that the link to the person prototype exists.
James.__proto__;// { saludar: f (), comer: f () }James.__proto__ === person;// true
We can invoke the methods eat and greet of the person object as if they were James.
Now if we expand the last [[prototype]] What do you think the result will be?
Object.prototype prototype chain
We clearly see that the last [[prototype]] is Object.prototype, the base prototype of all objects in Javascript. And you can check it in code by comparing Object.prototype with special properties __proto__.
We can also use the method toString as if it were from James.
James.toString();// [object Object]
This is called a prototype chain., an object can have the necessary sub prototypes to reuse its properties and methods. In this case it was like this, jaime → person → Object.prototype.
jaime –> person –> Object.prototype
Peculiarities with the prototype chain
Use the methods and properties of sub prototypes
The object James you can directly use the properties and methods of your prototypes.
James.toString();// '[object Object]' --> de Object.prototypeJames.hasOwnProperty('name');// true --> de Object.prototypeJames.greet();// 'Hola' --> de personaJames.eat();// 'Comiendo...' --> de personaJames.name;// 'Jaime' --> de si mismo, objeto jaime
Updating properties does not affect the prototype chain
When we have a property that exists in multiple sub prototypes, javascript uses the one that is closest in the prototype chain. Suppose we want to change the behavior of the method toString in James so instead of using Object.prototype.toString, to James We add a method with the same name.
You can say that what we are doing is updating it.
Now the method is used toString of James, the prototype chain is not traversed until reaching Object.prototype.toString as was done in the previous examples. Because there is already a method toString directly in our object James.
The operator delete does not remove properties from prototypes
When we occupy the operator delete, this never touches the prototype chain, it only eliminates the properties of the object in question.
If a property with the same name as the one we removed exists in the prototype chain, then now that property in the prototype chain will be used.
Using the previous example, of the method toString of James, if we eliminate it with delete, so now the toString() of Object.prototype It is the one that will be used because the person object does not have that method directly.
James.toString=functions(){return`${this.name}${this.edad}`;};James.toString();// 'Jaime 33'delete James.toStringJames.toString();// '[[object Object]]' --> De Object.prototype
In the last line we notice that now James use the again toString() of Object.prototype.
Examples of predefined objects in Node.js and Javascript
As we have already mentioned in other publications, except for primitive types, everything else in javascript are objects. In future publications we will see more detail about type objects functions and array
Since an array is an object, just like a function, you can also add properties to it.
const numeros = [1,2,3,4,5,6];numeros.miPropiedad ='Mi propiedad de un arreglo';console.log(numeros.miPropiedad);// 'Mi propiedad de un arreglo
He array is the clearest object to use as a data structure.
How to create an object date?
const fecha =newdate();console.log(fecha);// Fri May 28 2021 10:46:27 GMT-0500 (hora de verano central)
As you can imagine, we can also add properties to the date object because it is an object
Conclusion
In Javascript and on any platform where it is executed, an example is in node.js, they have the peculiarity of always having a link to a prototype. This is how the language is designed. I already know that classes currently exist, but in reality these are functions that internally make use of prototypes, we will also explain this in another publication.
With the exception of primitive data, everything else in Javascript is objects, it is important to know how they work so as not to get stuck in this learning.
With this information you have enough to continue advancing and use items more wisely.
The topic of objects is quite extensive, there are still many things to take into account, but there is already too much information that we have to divide it into more publications. So very soon we will continue. If you have any questions, do not hesitate to write them in the comments, we will be happy to help you!
Data types in Javascript are a little different compared to other programming languages like C or JAVA.
JavaScript is a weakly typed language, this means that it is not necessary to define the data type. But it is not that it does not have types, since the data type is defined at run time by Javascript.
This behavior and specification of data types applies to any place where javascript is executed, whether in the browser, in node.js, mongodb, or any tool that uses Javascript.
Now if we analyze the concept of types a little, when you make a sum between numbers in the real world you don't care what type it is, you only care that they can be added, regardless of whether it is an integer or decimal. These subtypes of numbers are still part of the set of real numbers, and are used in real life.
Javascript allows us to apply this thinking and with that we save many type comparisons. There will be times when we have no choice but to convert or compare them, but the less we do it, the simpler our code will be, and therefore easier to understand and faster to execute.
It is said that Javascript has a dynamic data type system, this is because the variables that are created can receive any other type of data at any time, and change type depending on the value they store. What we are really interested in is the value and what we can do with that value, not so much the type.
Later we will see some conversions and comparisons that can confuse and complicate the code, the recommendation is to reduce their use as much as possible. Although we will not see each type in great detail, we will see more important things necessary to use data types in Javascript.
It is useful to know how to define variables and constants, if you do not know how to create a variable or a constant, you can review this information before continuing.
Primitive data types
It is one that is not an object
It has no methods.
They are immutable
We have seven guysprimitive data in Javascript.
number, numbers like; 1, 0, 18500, 89.95124
BigInt, added in 2020, to represent very, very large integers, 99999999999999n
String, character string like 'Hello' and "Good night".
Boolean, only accept true either false, that is, yes or no.
null, serves to indicate that something is nothing, its only value is null.
undefined, serves to indicate that something is not yet defined.
symbol, added in 2015, with EcmaScript 6
Data Types Objects
All other data types in Javascript are objects. In the section Objects there is the explanation.
number
If I had written this before 2020, I would tell you that there is only one numeric data type, unfortunately (with some exceptions) a new numeric value called BigInt. In this section we will pretend that it does not exist.
number is a value 64 bit float, that is, it is a number double In other programming languages, this is basically the only numeric data type in JavaScript, there are no integers (except for BigInt), decimals, floats or doubles. Its specification is provided by IEEE-754.
The way to define and use them is very simple, you simply write the number, it does not matter if it is integer or decimal, floating point or double, as we mentioned before, all of these will be of type double for javascript. This is the recommended way to define them.
const edad =33;const PI =3.1416;const descuento =0.30;const pesoEnDolares =0.05;// que tristeza xD!!edad + descuento;// 33.30, no nos interesa el tipo, solo la suma
As we see in the last line, we can add integers and decimals without any problem, we are not interested in the type, we are interested in the ability to add them.
Float values are known to have a certain precision error when performing arithmetic operations, the most obvious operation being division.
0.2+0.1;// es igual a 0.30000000000000004
As we see, it does not give us an exact value of 0.3, to mitigate this you can multiply the values by 100 and then divide the result by 100.
(0.2*100+0.1*100)/100;// es igual a 0.3
NaN
There is a special number called NaN. This value is the error of an operation with numbers.
25*undefined;// es igual a NaN25*{};// es igual a NaN
Any operation you have NaN as one of its operands, will result in NaN.
25*NaN;// es igua a NaN25+NaN;// es igual a NaN
NaN it is not even equal to NaN
NaN===NaN;// es igual a falseNaN==NaN;// es igual a false
To mitigate this strange behavior, it is recommended to use the method Number.isNaN(), there is also a global function called isNaN(), but due to the implicit functionality of Javascript in wanting to convert between types automatically, it can give us very strange results. So as a recommendation always use Number.isNaN(). This last function checks if the type is number and equal to NaN, any other value will return false.
// Usando funcion globalisNaN('James');// true --> Esto esta mal, deberia seguir regresando false// lo que realmente hace es una conversion automaticaconst result =number('James');// NaNisNaN(result);// truenumber.isNaN('343434');// falsenumber.isNaN('James');//falsenumber.isNaN(1+undefined);// true
We can see in the first example that the global function returns true when it should be false, this is due to the automatic type conversion that javascript does.
Function Number(value)
You can convert a value to a number using the function Number(value), just be careful because this function can return 0 for many values, as well as NaN.
Finally we have the functions Number.parseInt(value) and Number.parseFloat(value), if the value is not a string, then convert it to string using the method .toString() before converting to number.
This type of value is new, added to the language in 2020, it is used to represent very large integer values, especially for mathematical calculations with very large quantities.
To use this type of data, the letter is added to the number n in the end. This is the recommended way.
const enteroMuyGrante =999999999999999999999999999999999999999999999999999n;const otroEnteroMuyGrande =55555555555555555555555555555555555555555555555n;const result = enteroMuyGrande * otroEnteroMuyGrande;//
Operations can be performed between the Number type and the BigInt, but because conversion between types can cause loss of precision, it is recommended to only use values BigInt when values greater than 2 are being used53 and only perform operations with values of the same type BigInt.
Another bad news about BigInt is that you cannot use the object's methods on a BigInt value. MathematicsFor example, you cannot use Math.sqrt().
Mathematics.sqrt(99);// 9.9498743710662Mathematics.sqrt(99999999999999999n);// Uncaught TypeError: Cannot convert a BigInt value to a number
As a final recommendation, do not complicate your life, do not use BigInt unless the problem you want to solve necessarily requires very large integers.
BigInt(value) function
You can convert and create a BigInt with the function BigInt(value)
BigInt('9999999999');// 9999999999n
Boolean
Boolean is a logical data type, which is represented by only two values. true and false. Very useful for making decisions in our programs. Named after the mathematician George Boole.
Boolean type values can be defined as follows. This is the recommended way
const tieneHijos =true;const esEstudiante =false;
They are widely used in logical operations, for example:
if (tieneHijos) {// Si "si" tiene hijos, preguntar cuantos hijos tiene}else{// si "no"}if (esEstudiante) {// Si "si" es estuduante, aplicar descuento}else{// si "no"}
Boolean function(value)
Booleans also have a function Boolean(value), is suitable for creating booleans and explicitly converting a value to Boolean. More details below in the section Values that can generate Booleans.
null
This data type in Javascript is very easy, it is a data that means it is nothing compared to the other data types. In other languages null It refers to a pointer or a memory reference that is empty, but in javascript it is different, it is simply a value that means “nothing".
const nada =null;
undefined
This data type represents something that is not yet defined. It is the automatic value of variables, parameters and properties of objects that have not had a value defined.
let name;// undefinedlet edad;// undefinedname ===undefined;// trueedad ===undefined;// true
symbol
This type of data is primarily used to ensure that its value is unique and immutable. It can be used as object properties to reduce access to those properties and thus avoid unwanted modifications. When we look at the objects in more detail we will see their use in practice.
To create this type of primitive data the function is used Symbol(). It is the only way to create a symbols and it is the recommended one.
const name =symbol('Jaime');const nombreIgual =symbol('Jaime');name === nombreIgual;// false
String or string of characters
Strings allow us to save information in text form. They are a sequence of one or more 16-bit, UTF-16 characters. There is no `char` type like in other languages, if you want a character, you simply create a string with a single character. Simple right?
We have three ways to create a string.
Actually you can also create strings with the function String(value) or in constructor form new String(value), but let's not complicate our existence and only use the three below for simplicity:
With single quotes, ''. Recommended if you do not need to evaluate expressions inside.
Double quotation marks, ""
backticks, `` . Recommended if you need to evaluate expressions within.
const name ='Jaime';const last name ="Cervantes";const mother's last name =`Velasco`;
The third way to define Strings, allows us to use expressions within the character string, so it is very useful. For example:
const name ='Jaime';const last name ="Cervantes";const mother's last name =`Velasco`;const nombreCompleto =`${name}${last name}${mother's last name}`;// Jaime Cervantes Velasco
Strings are immutable, when you modify or extend a string a new one is actually generated.
Two character strings can be the same
You can check that two character strings are the same with ===.
The property length of a string is used to know the length of a string of characters, you will see over time that this is useful when working with strings of characters.
const name ='Jaime Cervantes Velasco';name.length // 23
Objects
All other data types are objects, a function is an object. A object is a collection of pairs name: value, similar to PHP's “associative arrays”. These pairs of name/value They are called properties, a property is like a variable and can contain any type of value.
Some objects in Javascript:
object
function
array
date
RegExp
Mistake
Primitive Wrapping Objects
Even primitive data types String, Boolean, Number, BigInt and Symbol has its corresponding representation in Object, called enveloping objects. In fact, Javascript implicitly converts this primitive data to objects in order to occupy useful methods and properties. For example the property length of a string of characters.
How were you planning to get the length of a character string? Understanding that a character string is primitive data and has no methods
'Jaime Cervantes Velasco'.length;// 23, el pri// A groso modo, lo que sucede implictamente al querer obtener lenght:const nuevoString =newString('Jaime Cervantes Velasco');nuevoString.length;// 23(5).toFixed(2);// 5.00// Igual a groso modo pasa algo asi:const numero =newnumber(5);numero.toFixed(2);// 5.00false.toString();// 'false'// Igual a groso modo pasa algo asi:const booleano =newBoolean(false);numero.toString(2);// false// Estos dos tipos de datos primitivos no permiten el uso de new(9n).toLocaleString();// '9'symbol('Hi').toString();// 'Symbol(Hi)'
Although the BigInt and Symbol data types do not allow the use of new It does not mean that objects are not created behind, it is clear that javascript wraps them in an object because it allows us to use the methods of the example, toLocaleString and toString.
How to create an object?
To create an object you don't need to create a class, you simply create the object and start using it. The easiest way to create an object is to use the definition called literal object, where you simply open and close keys {}. This is the recommended way.
In the example we have an object person, has several properties of different types, its name is a String, his age is a number, getName and talk are of type function, functions that are members of an object are called methods.
Below are examples of objects.
Accessing properties with square brackets, ['key']
In the previous example we saw how to access the method talk(), this method is still a property and is of type functions. But there is another notation to access properties, using square brackets. Very similar to how the elements of an array are accessed.
person.edad;// regresa 33persona['edad'];// regresa 33// obtenemos la funciónn con corcheteds y la invocamos con parentesisconst frase = persona['talk']();console.log(frase);// 'Hola soy Jaime Cervantes Velasco, tengo 29 años.'
Since an array is an object, just like a function, you can also add properties to it.
const numeros = [1,2,3,4,5,6];numeros.miPropiedad ='Mi propiedad de un arreglo';console.log(numeros.miPropiedad);// 'Mi propiedad de un arreglo
How to create an object date?
const fecha =newdate();console.log(fecha);// Fri May 28 2021 10:46:27 GMT-0500 (hora de verano central)
As you can imagine, we can also add properties to the date object because it is an object
For now, I hope this gives you an idea of the importance of objects in Javascript and why it deserves a more extensive explanation in a future publication.
Values that can generate a boolean false
There are true values and false values, which when applied to a condition behave like Booleans. This is because Javascript does an implicit type conversion, which can surprise us if we are not careful, so here I leave you the list of values that can return a Boolean false.
false
null
undefined
0
0n
NaN
"", "", " (empty character string)
All other values, including objects, in a condition or passed to the function Boolean(value) the Boolean returns true. A string with a space " ", came back true, and a string with value "false" also returns true.
Boolean function(value)
There is a global function to create Boolean values, Boolean(value). Where yes worth It's a real one, come back true, otherwise it returns false.
Boolean(false);// falseBoolean(null);// falseBoolean(undefined);// falseBoolean(0);// falseBoolean(0n);// falseBoolean(NaN);// falseBoolean('');// false// Todos los demas valores van a regresar trueBoolean('');// trueBoolean('false');// trueBoolean('jaime cervantes');// trueBoolean({});// trueBoolean([]);// true;
Under logical conditions
Logical conditions in javascript check without a return expression true either false, they execute an implicit conversion.
This operator allows us to identify the type of data we are working with, useful in case we do not know where the information comes from, or we want to process the data based on its type. The operator returns the lowercase name of the data type.
typeof5;// 'numbertypeofNaN;// 'number'typeof99999999999999999999999999999999999999999999999n;// 'bigint'typeoftrue;// 'boolean'typeofnull;// 'object', esto es un error que existe desde la primera versión de JStypeofundefined;// 'undefined'typeofsymbol('simbolo');// 'symbol'typeof'cadena de caracteres';// 'string'typeof{};// 'object'typeof [];// 'objecttypeofnewdate();// 'object'typeofnewString('Jaime');// Objecttypeoffunctions(){}// 'function'typeofclassA{}// 'function'
There is a known bug in javascript, when the typeof operator is executed on null, this one comes back'object'. This bug has existed since the first version of Javascript, Bad things happen when you write code on the run.
If all other non-primitive values are objects, when we use the operator typeof about them, what type of data will you tell us what they are? Exactly, 'object'. Just like in the example above when we pass an object literal, an empty array, a date type object and when we use the surrounding objects of primitives like new String('Jaime').
Existe una excepción en typeof, cuando el valor es una función o una clase, regresara functions. Recuerda, una función en javascript, también es un objeto.
Check types with the method Object.prototype.toString
As we saw, it is somewhat confusing to use the operator typeof, I prefer to use a safer method, it is somewhat strange, but since everything in Javascript is an object and the base object from which all data types in javascript start is object, with the exception of the primitive data (although these in turn have their object version), then we can do something like the following.
The special property prototype is very important in Javascript, if you have read more than one of my publications, you will have noticed that I have mentioned that Javascript is a multiparadigm and object-oriented programming language based on prototypes, in another publication we will explain in detail the functionality of prototypes in Javascript .
Conclusion
Everything in Javascript is an object, with the exception of primitive types, but as we already saw, when wanting to use them as objects by invoking some method, that is where javascript wraps them (in practice everything is an object).
Any programming language has good things that we can take advantage of, but it can also have strange and confusing things (compared to most modern programming languages), such as the operator typeof and the method Object.prototype.toString, the value NaN, the values that can generate a boolean false, and many other things we didn't see for simplicity's sake. It is up to the programmer to take the best parts and eliminate or mitigate those that do not help us communicate better with our work team, always with a focus on simplifying things.
In the case of creating some type of data in Javascript, the simplest and easiest way to use is simply creating the values that we are going to use. As recommended in previous sections, this way of creating them is called literal.
const numero =9999.54;const enteroGrande =99999999999999n;const boleano =true;const nulo =null;let noDefinido;const simbolo =symbol('identifier');const cadenaDeCaracteres ='Jaime Cervantes Velasco';const cadenaDeCaractresConExpresion =`El numero ${numero} es "Number"`;const object ={};const arreglo = [];
There are even more details to cover about data types in javascript, but as we go we will see more necessary topics, for now it seems to me that this information is enough.
The model or map of how we see the real world, that is a paradigm, it is a way of seeing and doing things. Following this logic, a programming paradigm is nothing more than a way of viewing and creating programming code.
Paradigms are powerful because they create the glasses or lenses through which we see the world.
There are three main programming paradigms used today and in JavaScript they have always existed since its first version.
Structured programming paradigm
Object-oriented
Functional
Now, if we stick to the phrase of Stephen R. Covey, that paradigms create the lenses through which we see the world. Let's imagine that the three previous paradigms, each, are a pair of glasses that we put on when programming and that we can change those glasses according to our visual needs (for programming or problem solving).
Structured programming paradigm
Origin
In 1954 the FORTRAN programming language appeared, then in 1958 ALGOL and in 1959 COBOL. Time after Edsger Wybe Dijkstra in 1968 discover the structured programming paradigm, we say “discover” because they didn't actually invent it. Although this programming paradigm was formalized some time after the appearance of these programming languages, it was possible to do structured programming in them.
Dijkstra He recognized that programming was difficult, and programmers don't do it very well, which I totally agree with. A program of any complexity has many details for the human brain. In fact, the Neuroscience tells us that the focused mind It can only work with four pieces of data at a time, at most. For this reason, if one small detail is neglected, we create programs that seem to work well, but fail in ways you never imagine.
Evidence
Dijkstra's solution was to use tests, only these tests used a lot of mathematics, which was quite difficult to implement. During his research he found that certain uses of GOTO made it difficult to decompose a large program into smaller pieces, it could not be applied “divide and conquer”, necessary to create reasonable evidence.
Sequence, selection and iteration
Patterns of structured programming
Böhm and Jacopini They proved two years earlier that all programs can be built by just three structures: sequence, selection and iteration. Dijkstra already knew these three structures and discovered that these are the ones necessary to make any part of the program tested. This is where the structured programming paradigm is formalized.
Edsger tells us that it is bad practice to use GOTO and suggests better using the following control structures:
If, then, else (selection)
do, while, until (iteration or repetition)
Decomposition of small units easy to test
Nowadays most programming languages use structured programming, JavaScript uses this type of programming. The simplest example is if conditions.
const EDAD_MINIMA =18;if (edad >= EDAD_MINIMA) {// hacer algo porque es mayor que 18}else{// Hacer otra cosa en caso contraio}
And if we isolate it in a function, we have a decomposition of functionalities or units that can be tested more easily. In the next section we will see the importance of having a completely probable unit
With this condition we have direct control of what can happen if the age is greater than or equal to 18, and also in the event that the age is younger.
Let's not be so strict either, surely the GOTO ruling has its merits and perhaps it was very efficient in some cases, but I think that to avoid misuses that probably caused disasters, Dijkstra recommended to stop using GOTO.
Test, divide and conquer
Structured programming allows us to apply the “divide and conquer” philosophy, because we allows you to create small unit tests, until the entire program is covered. The mathematical solution of Wybe Dijkstra It was never built, precisely because of its difficulty in implementation. And unfortunately today there are still programmers who do not believe that formal tests are useful for create high quality software.
And I say create, because verify correct operation after create, is nothing more than a simple measurement and the opportunity to reduce time and money is lost.
Scientific method, experiments and impiricism
Scientific method, experiments and tests, by ThisIsEngineering Raeng on unsplash
The good news is that the mathematical method is not the only way to verify our code, we also have the scientific method. Which cannot prove that things are absolutely correct from a mathematical point of view. What we can do is create experiments and obtain enough results to verify that our theories work. Since our theories work on these experiments, then we conclude that they are “correct” enough for our validation purposes.
If the theory is easily validated as false, then it is time to modify or change it. This is the scientific method and this is how tests are currently done:
First we establish our theory (write the test), then we build the experiments (write production code) and finally we verify (run the test) and repeat this cycle until we have enough evidence.
Tests show the presence, not the absence, of defects
Edsger Wybe Dijkstra said “Testing shows the presence, not the absence, of defects.” That is, a program can be proven wrong by testing, but it cannot be proven correct. All we can do with our tests is validate that our program works well enough for our goals. But we can never be one hundred percent sure of the absence of defects.
If we can never be one hundred percent sure that our code is correct, even with its tests, what makes us think that without tests we deliver a program with sufficient validity to affirm that no negligence is consciously committed?
direct control
lto structured programming teaches us about direct control, that is, controlling the sequential flow of operations through the control structures, without neglecting the recommendation of Wybe Dijkstra about GOTO. This recommendation also applies to statements that drastically change the normal flow of operations, for example a breakwithin a cycle for nested, that breakIt breaks direct control because it abruptly complicates the understanding of the algorithm. Let's not be purists either, there will surely be cases where you need these sentences, but in the first instance, try to avoid them.
In conclusion, the structured programming paradigm teaches us:
The direct, clear and explicit control of what a piece of code does
Object-oriented programming paradigm
Arised from functions?
The object-oriented programming paradigm was discovered in 1966 by Ole Johan Dahl and Kristen Nygaard when they were developing simula 67. Two years before structured programming and its adoption by the programming community was some time later. In 1967 it was launched Simulates 67, Simulates It was the first object-oriented programming language, it basically added classes and objects to ALGOL, initially Simula was going to be a kind of extension of ALGOL.
During the development of Simula, it was observed that the execution of an ALGOL function requires certain data, which could be moved to a tree structure. This tree structure is a Heap.
The parent function becomes a constructor, the local variables become the properties, and the child (nested) functions become its methods. In fact, this pattern is still widely used by Javascript to create modules and use functional inheritance. This also describes how classes work in Javascript, behind are functions.
Spread of polymorphism
All this helped a lot to implement polymorphism in object-oriented programming languages. Ole Johan Dahl and Kristen Nygaard invented the notation:
object.function(parametro)
The execution of function that belongs to object, but more importantly, we pass a message through parameters from the first part of the code to the second part located in a different object.
Some time later it was created Smalltalk, a much more sophisticated and modern object-oriented programming language, in charge of this project was Alan Kay. This person is credited with the formal definition of object-oriented programming.
The main influence on Alan Kay's object-oriented programming was biology, he has a degree in biology. Although it is obvious that it was influenced by Simula, the influence of LISP (functional programming language) is not so obvious.
From the beginning he thought of objects as interconnected cells in a network, from which they could communicate through messages.
Alan Kay commented:
I'm sorry I coined the term a long time ago. Objects for programming because it made people focus on the least important part. The big idea is “Sending messages“.
Alan Kay
My English is bad so you can check the original text here.
Better object composition over class inheritance
Smalltalk It also allowed the creation of Self, created at Xerox Parc and later migrated to Sun Microsystems Labs. It is said that Self It is an evolution of smalltalk.
In this programming language the idea of prototypes, eliminating the use of classes to create objects, this language uses the objects themselves to allow one object to reuse the functionalities of another.
Self It is a fast language and is generally known for its great performance, self It did a good job on garbage collection systems and also used a virtual machine to manage its execution and memory.
The virtual machine Java HotSpot It could be created thanks to Self. Lars Bak one of Self's latest contributors, he was in charge of creating the V8 Javascript engine. Due to the influence of Self we have today the engine of JavaScriptV8, which uses it node.js, mongoDB andGoogle Chrome internally.
Self followed one of the book's recommendations Design Patterns: Elements of Reusable Object-Oriented Software, long before it came out, published this recommendation:
Better composition of objects to class inheritance.
Design Patterns: Elements of Reusable Object-Oriented Software
Example
Currently Javascript uses prototypes for code reuse, you could say that it uses composition, instead of inheritance. Let's look at an example:
const person ={greet(){return'Hola'}};// se crea un programador con el prototipo igual al objeto personaconst programmer = object.create(persona);programmer.programar=()=>'if true';const saludo = programmer.greet();const codigo = programmer.programar();console.log(saludo);// 'Hola'console.log(codigo);// 'if true'
The object programmer It is based on the prototype of `person`. It doesn't inherit, it just directly reuses the functionality of `person`.
JavaScript emerged shortly after JAVA, in the same year. JavaScript took influences from Self, and in turn Self was influenced by smalltalk.
The syntax of current classes in Javascript is nothing more than a facade, well a little more accurately they are an evolution of the constructor functions, but internally, their basis are functions and prototypes.
Communication with message passing
As we already saw, the origin of object-oriented programming has its origins in functions, and the main idea has always been communication between objects through message passing. We can say that Object-oriented programming tells us of message passing as a key piece for the communication of objects, for example, when a method of one object invokes the method of another.
object.function(parametro);
In conclusion, the object-oriented programming paradigm teaches us:
Message passing for communication between objects
Functional programming paradigm
lambda calculation
Image taken from https://www.slideshare.net/FASTPresentations/introduction-to-lambda-calculus-using-smalltalk-by-facundo-javier-gelatti
Functional programming is the oldest programming paradigm, in fact its discovery was long before computer programming, it was discovered in 1936 by Alonzo Church, when I invented the lambda calculus, based on the same problem to be solved by your student Alan Turing.
As a curious fact, the symbol of the lambda calculus is:
λ
The first language based on functional programming was LISP, created by John McCarthy. As we saw previously, Alan Kay also took influence from LISP to create Smalltalk, with this we can see that the programming paradigms can be united and their relationship between them arises from the idea of how to solve problems more efficiently, they are not fighting, nor Separated, they seek the same goal and somehow evolve together.
The basis of the lambda calculus is immutability,We will review this concept later.
Similarities with OO and structured paradigms
As we saw in the structured programming paradigm, we can decompose our programs into smaller units called procedures or functions. Since functional programming is the oldest paradigm, we can say that the structured programming paradigm also relies on functional programming.
Now, if we analyze the notation a little object.function(x) that we saw in the object-oriented programming paradigm section, is not very different from function(object, parameters), these two lines below are the same, the fundamental idea is the passing of messages, as Alan Kay tells us.
Smalltalk uses the “The Actor Model”, which says that actors communicate with each other through messages.
On the other hand we have LISP, which has a “Function dispatcher model” What we currently call functional language, these models are identical, because what functions and methods do is send messages between actors.
An example of this is when a function calls another function or when an object's method is invoked, what happens is that actors exist and they communicate with each other through messages.
Message passing again
So we can emphasize that the main idea of OOP is the sending of messages and that it is not very different from functional programming, in fact according to what we already established in the previous sections, OOP was born from a functional base. And here it is important to highlight what he said Alan Kay Co-creator of SmallTalk:
I'm sorry I coined the term a long time ago. Objects for programming because it made people focus on the least important part. The big idea is “Sending messages“.
Alan Kay
From the communication models between Smalltalk and LISP messages, it was created scheme.
scheme has the goodness to use tail recursion and closure to obtain a functional language, closure allows access to the variables of an external function even when it has already returned a value. This is the same principle that gave rise to object-oriented programming by Ole Johan Dahl and Kristen Nygaard. Do you remember the closure question in Javascript?
Javascript uses closure a lot in its functional programming paradigm. JavaScript took influences from scheme, at the same time scheme was influenced by LISP.
No side effects
The basis of the lambda calculus is immutability, therefore, lImmutability is also the basis of the functional programming paradigm.
We as functional programmers must follow this principle and limit object mutations as much as possible to avoid side effects.
I repeat, the main idea of functional programming is immutability, which allows you to create your programs with fewer errors by not producing side effects that are difficult to control.
As an example, suppose we have an object person and we want to “change” the name, the most obvious thing would be to modify the name property directly, but what happens if that object is used elsewhere and the name is expected to be “Jaime”, that is why instead of changing the name property , we only create a new person object with a different name, without modifying the original.
functionscambiarNombre(name,person){return{ name:name, edad:person.edad}}const James ={name:'Jaime',edad:30};const juan =cambiarNombre('Juan', jaime);console.log(jaime);// { nombre: 'Jaime', edad: 30 }console.log(juan);// { nombre: 'Juan', edad: 30 }
Here you will find more details about the fundamental principles of functional programming:
Finally, the functional programming paradigm teaches us:
No side effects, for clear expression and less prone to errors
Conclusion
It is important to note that if the three programming paradigms were implemented between 1958 with LISP (functional programming) and Simula (object-oriented programming) in 1966, and the discovery of the structured programming paradigm in 1968, in only a period of 10 For years there has been innovation in programming paradigms, and new paradigms have not really emerged, unless they are based on these three main ones.
Right now more than 60 years have passed, which tells us the importance and firmness they have despite the time that has passed.
Functional programming paradigm (1958, already implemented in a programming language for computers, remember that it was discovered in 1936)
Object Oriented (1966)
Structured (1968)
The implementation of these three paradigms from the beginning within JavaScript has made this programming language the global success it is today. And it proves to us the value of combining paradigms when writing our programs.
JavaScript is a multi-paradigm programming language, so you can combine the paradigms to create much more efficient and expressive code using:
The direct, clear and explicit control of what a piece of code does
Message passing for communication between objects
No side effects, for clear expression and less prone to errors
One of the most used elements are variables in Javascript. We can describe variables in Javascript as boxes to hold information, which we label so that we can find that information easily. This label is the name of the variable and the box is the space used in RAM.
Variables and constants, boxes that store information
This is what variables are like in Javascript, and in fact in any programming language. You can also store any datatype, whether they are numbers, text strings, functions or any type of object.
There are two ways to declare a variable. One is using let and the other using var.
//Variables de tipo Stringvar name ='Jaime';let last name ="Cervantes"
The shape var It is the one that has always existed since the origin of language, then in 2015 it appeared let in order to mitigate certain deficiencies of var. For this reason, the recommendation is to use letIn any case, it is important to know well var because you will come across a lot of code that still uses var.
How are variables used in Javascript?
The name or identifier of a variable, it cannot start with a number, it must start with some letter (including _ and $), and Javascript is also case-sensitive. Is not the same name and Name, these are two different variables.
Variables are defined in two ways:
With a single let:
let name ='Jaime', last name ='Cervantes', mother's last name ='Velasco';
a single var:
var name ='Jaime', last name ='Cervantes', mother's last name ='Velasco';
Now with a let for each variable:
let name ='Jaime';let last name ='Cervantes';let mother's last name ='Velasco';
With a var for each variable.
var name ='Jaime';var last name ='Cervantes';var mother's last name ='Velasco';
In the previous example we define variables of type string (text strings), but remember that you can store any type of data.
It is advisable to put each variable on its own line because it is faster to understand for the “you” of the future and your colleagues who have not touched your code. For example, DO NOT define the variables like this:
let name ='Jaime', last name ='Cervantes', mother's last name ='Velasco'; edad =32, sexo ='H'
Let's try numbers.
let edad =32.9;let hijos =1;
var edad =32.9var hijos =1;
Boolean data only stores false or true.
let esHombre =true;let esAlto =false;
var esHombre =true;var esAlto =false;
As its name says, its value can be variable, therefore you can reassign a new value to your variable:
var name ='Jaime';name ='Pepito';name ='Menganito';console.log(nombre);// 'Menganito'
Variable scopes in Javascript, let vs var
The main difference between variables defined with let and var is the scope they reach when they are declared:
With let you have block scope {}.
With var you have scope of function function() but not block.
Example of block scope.
if (true) {letname='James';}console.log(nombre);// Uncaught ReferenceError: nombre is not defined
Because let has block scope, when wanting to access the variable name Javascript shows:
Uncaught ReferenceError: name is not defined
Try to use block scope with var.
if (true) {varname='Jaime';}console.log(nombre);// 'Jaime';
In this example the variable name If it can be accessed from outside the blocks, this is because it is not inside any function.
Now we are going to declare the variable with var inside a function.
functionssetearNombre(){varname='Jaime';}setearNombre();console.log(nombre);// Uncaught ReferenceError: nombre is not defined
Let's see what happens with let when we try to use function scope.
functionssetearNombre(){letname='Jaime';}setearNombre();console.log(nombre);// Uncaught ReferenceError: nombre is not defined
If we define a variable with let inside a function, we can't access it from outside either, because the function definition itself uses blocks {}.
Constants in Javascript
Constants are in the same way as variables, labeled boxes to store information, with the only difference that they cannot be reassigned to any other value.
const name ="Jaime";name ="Pepito";// Uncaught TypeError: Assignment to constant variable
Let's not forget to declare each constant on its own line to improve the readability of our code.
const name ="Jaime";const last name ="Cervantes";const mother's last name ='Velasco';
const name ='Jaime', last name ='Cervantes', mother's last name ='Velasco';
Same rules as variables with let
Constants follow the same block scope rules as variables in Javascript with let.
As well as let, const has block scope, so if you define a variable with var and has the same name as a constant, the following error will be thrown:
{constname="Jaime";varname="Pepito";// Uncaught SyntaxError: Identifier 'nombre' has already been declared}
Constants in javascript read-only and mutable
Constants are read-only, which is why they cannot be reassigned a value. Even so, these saved values continue to preserve the behavior of their data type.
For example, if you create a constant for an object, you can change the properties of that object.
An object literal in JavaScript is nothing more than a set of values identified with a name or key, like the following:
const James ={name:"Jaime",last name:"Cervantes",mother's last name:"Velasco"};James.name ="Pepito";// todo bien, se puede cambiar una propiedadJames ={};// Uncaught Type Error: Assigment to constant variable
The reference to the object is read-only, but it does not mean that the value is immutable. As seen in the example, you can change the property, but not reassign a new value to the constant James as we can see in the last line of the example.
How to name variables and constants in Javascript?
Any fool can write code that a computer can understand. Good programmers write code that humans can understand.
Martin Fowler
The main objective of naming variables and constants is to immediately understand what we are storing in them. It is important to correctly describe the content of the variables, because this makes life easier for the next person who needs to read and modify our code.
This next person is very often “you” from the future, and unless you are a robot, you won't be able to remember every detail of your code.
Most of the time spent by a programmer is reading and understanding code, we don't want to spend a lot of time deciphering the content of them, as programmers we are happier creating new things.
For this reason we should not be surprised by the importance in naming our variables and constants, it is one of the best ways to not waste our time and the time of our colleagues.
Recommendations:
Take enough time to name a variable. It's like organizing your room, the tidier it is, the faster it will be to find the other sock (it happens to me a lot when I don't organize mine) xd.
The name must be very semantic and explain its context. Avoid names like data either info because they don't say much about the context, it is obvious that they are data and information, but for what? or what?.
Agree with your colleagues on how to name variables, especially those that are closely related to the business. For example, for a user's registration data, it can be “UserRegistration”, “CustomerRegistration”, “VisitorRegistration”, all three forms can be valid (it depends a lot on the context), but it is better to follow a convention through an agreement.
Avoid very short names like “u1”, “a2”, “_”, “_c”
Avoid abbreviations, prefixes, suffixes and infixes. These are difficult to understand. For example pmContentWhat is “pm”?
If the variable or constant has a very small scope, that is, it is used in nearby lines, then the name can be short.
If the variable or constant is used in a large scope, that is, it is referenced over a distance of many lines, then the name must be very descriptive, and therefore it is normal that it can be long.
¿Cómo logramos encapsulación de nuestros nuevos elementos HTML que no provoque conflictos con el resto de una aplicación?, es decir, que los estilos, HTML interno y JS de un componente web, no colisionen con el resto.
La respuesta básicamente es, el Shadow DOM. El Shadow DOM nos permite tener los estilos y contenido HTML interno totalmente aislado del exterior. También se ayuda del API del DOM and custom elements para establecer comunicación con otros elementos y componentes internos. Además con el exterior.
El amor es de naturaleza interna. No lo vas a encontrar en alguien más, naces con ello, es un componente interno de cada persona. Mira a un bebé, simplemente es feliz por el hecho de existir. Irradia amor, te lo comparte.
Anónimo
Antes de comenzar, si aún no estás familiarizado con los custom elements y los componentes web nativos en general, te recomiendo revisar primero estas publicaciones:
Primero vamos a revisar la etiqueta <template>, para luego utilizarla dentro de nuestro componente web usando shadow DOM.
¿Qué es una plantilla?
Un template o plantilla HTML con el tag <template>, es una forma de crear elementos visuales de manera sencilla y eficiente, de tal forma que se pueden definir partes de una página web o aplicación a las cuales les podemos insertar valores.
Este template puede ser reutilizado en diferentes vistas de una aplicación. Tal vez estés familiarizado con jade, pug, mustache, o con algunos frameworks y librerías como angular y vue, los cuales utilizan templates. También si has utilizado wordpress y php, los archivos de los temas serian una especie de templates.
Ahora, los templates que vamos a aprender son específicos de HTML y por lo tanto funcionan en los navegadores web. Para entrar un poco más en contexto veamos un ejemplo sencillo de como podemos crear varios elementos para mostrar un saludo, utilizaremos estas tres fuciones, que forman parte del API del DOM.
document.createDocumentFragment()
document.createElement('nombreTag', [opciones])
nodo.appendChild(nodo)
Queremos mostrar en nuestra aplicación un saludo al usuario y lo hacemos de la siguiente forma:
Ahora veamos como hacer lo mismo, pero utilizando la etiqueta <template>:
Como podemos ver, con la etiqueta <template> se usa mucho menos código, si el contenido de lo que queremos mostrar crece, solo debemos agregar las etiquetas y demás contenido de manera sencilla dentro de la etiqueta <template>. Pero si usamos el primer método, nuestro código javascript crecerá mucho más, esto es más difícil de entender y mantener con el tiempo.
La etiqueta template usa internamente un DocumentFragment, la ventaja de utilizar document fragments es que su contenido no es aún agregado al árbol de nodos, sino que se encuentra en memoria y se inserta una sola vez al final, cuando el contenido esta completo.
// Agregar document fragment a la páginahost.appendChild(df);
Existen 4 puntos importantes al utilizar la etiqueta <template> para crear plantillas:
The label <template> no se pinta en nuestra aplicación, por default tiene un display: none;.
El contenido de la etiqueta <template> es un document fragment, el cual tiene la característica de no estar insertado en el árbol de nodos. Esto es bueno para el rendimiento de la aplicación debido al alto costo de pintar elementos.
El código JS necesario es muy simple y corto
Cuando clonamos el contenido de nuestro template usando cloneNode(), debemos pasar el valor true como parámetro, de otra manera NO clonaríamos los elementos hijos del document fragment de nuestro template.
Shadow DOM
El shadow DOM es un DOM o árbol de nodos en las sombras, escondidos de los demás elementos de una aplicación. Para entender esto vamos a crear nuestro primer componente web utilizando el estándar de custom elements, la etiqueta <template> y el shadow DOM.
Nuestro componente se llama mi-saludo, con el contenido del ejemplo anterior:
Si aún no sabes que son los custom elements, sigue este link. En el ejemplo anterior creamos un custom element llamado mi-saludo, dentro del constructor() creamos una instancia del template.
// Obtengo la única etiqueta 'template'const tpl = document.querySelector('template');// Clono su contenido y se crea una instancia del document fragmentconst tplInst = tpl.content.cloneNode(true);
Luego creamos un shadow DOM y lo adjuntamos al custom element mi-saludo:
// Se crea un nuevi shadow DOM para las instancias de mi-saludothis.attachShadow({mode:'open'});
Y finalmente agregamos el contenido clonado del template dentro del shadow DOM:
// Y se agrega el template dentro del shadow DOM usando el elemento raíz 'shadowRoot'this.shadowRoot.appendChild(tplInst);
En este último paso usamos la propiedad shadowRoot, creada cundo invocamos attachShadow, esta propiedad hace referencia a un nodo raíz especial de donde se empieza a colgar todo lo que definimos dentro de nuestra etiqueta <template>, y es a partir de este nodo que agregamos contenido.
Lo que se agrega al shadow DOM esta oculto para el exterior, ningún document.querySelector() externo puede acceder a los elementos del shadow DOM y los estilos definidos en el exterior no pueden acceder a estos elementos ocultos. Esto quiere decir que dentro del shadow DOM podemos utilizar atributos id and name sin temor a colisionar con los ids y name del exterior.
Cuando creamos un shadow DOM, se hace con la propiedad mode: open, de esta manera se puede acceder al contenido del shadow DOM usando Javascript y el atributo shadowRoot. Sin el atributo shadowRoot es imposible acceder a los elementos y eso nos proporciona encapsulación a nuestro componente.
Para crear una nueva instancia de nuestro nuevo componente, solo utilizamos el nombre que registramos como etiqueta:
// Se registra el custom element para poder ser utilizado declarativamente en el HTML o imperativamente mediante JScustomElements.define('mi-saludo', MiSaludo);
Y en el html utilizamos código declarativo:
<mi-saludo></mi-saludo>
¿Qué pasa si a nuestro template le agregamos una etiqueta style? Debido a que las instancias de nuestro template son agregadas al shadow DOM, entonces esos estilos solo afectan dentro del shadow DOM.
Para establecer estilos dentro del shadow DOM al nuevo tag creado, se utiliza la pseudoclase :host, que hace referencia a la etiqueta huésped del shadow DOM, es decir, mi-saludo.
También agregamos en el exterior estilos para las etiquetas <h1>, estos estilos no pudieron afectar al contenido interno del shadow DOM, el único h1#mi-id con borde rojo es el que se encuentra fuera de nuestro componente. El h1 externo como el interno tienen el mismo id, a causa del encapsulamiento con shadow DOM, no colisionan los estilos con el mismo selector de id.
Ahora en nuestro código html, agreguemos más etiquetas mi-saludo:
Como podemos ver la combinación de estas tres tecnologías; custom elements, template y shadow DOM nos permite crear nuevas etiquetas personalizadas con su propio contenido interno sin afectar el exterior y también el exterior no puede afectar directamente la implementación interna de nuestro componente. En el último ejemplo podemos ver como creamos cuatro instancias de nuestro componente simplemente utilizando etiquetas, es decir, reutilizando nuestro componente encapsulado.
En la próxima publicación veremos como implementar más funcionalidad Javascript encapsulada del componente web y también más características muy útiles del shadow DOM como composición, eventos y más estilos. Finalmente veremos los módulos de JS para completar un componente web reutilizable que pueda ser importado en cualquier otra aplicación web.
“Event loop”, tal vez lo has escuchado. Esto es porque javascript tiene modelo de ejecución de código donde utiliza un ciclo de eventos (event loop), que una vez entendiendo su funcionamiento, se puede crear código mucho más eficiente, y resolver problemas rápidamente, que a simple vista no son tan obvios. Es la base de la concurrencia y el asincronismo.
Para comenzar:
Javascript se ejecuta en un solo hilo de ejecución, como se ejecuta un solo hilo, su ejecución es secuencial, no es como JAVA donde se pueden lanzar otros hilos.
Existen ambientes huéspedes donde se ejecuta javascript que tienen su propia API, ejemplo:
Navegador web
Node.js
Este funcionamiento secuencial es el mismo, no cambia por estar relacionado con un ambiente huésped.
La concurrencia se logra a través de invocaciones asíncronas a la API del ambiente huésped, esto evita que el funcionamiento se bloquee y provoque lentitud de las aplicaciones.
Elementos para la concurrencia
Veamos con más detalle los elementos que hacen funcionar Javascript en los ambientes huéspedes.
Call Stack – Pila de ejecuciones
Callback Queue – Cola de retrollamadas, tambien llamado Task Queue
Event Loop – Ciclo de eventos
Host Environment – Funcionalidad del ambiente huésped
Event loop, ciclo de eventos javascript
Calls Stack, heap y motor de javascript
Del lado izquierdo tenemos al motor de javascript, este motor se encarga de ejecutar nuestro código. A veces es llamado máquina virtual, porque se encarga de interpretar nuestro código a lenguaje máquina y ejecutarlo. Solo puede ejecutar una línea de código a la vez. Tiene un Heap para guardar objetos y demás datos en memoria que el código pueda generar.
Pero también tenemos una Pila de llamadas (Call Stack). Los elementos de la pila son objetos y datos de memoria, pero tienen una estructura especifica. Tienen un orden y el último elemento en entrar es el primero en salir, se le llama LIFO (Last-in, First-out).
Cada elemento de la pila es un trozo de código Javascript y guarda las referencias del contexto y variables utilizadas. La pila ejecuta el trozo de código en turno hasta quedar vacía.
Callbacks Queue
Abajo tenemos Callbacks Queue, es una estructura de datos y guarda pedazos de código que el motor de javascript puede ejecutar. Es una cola, y como la cola de las tortillas el primero en formarse, es el primero en salir (FIFO, First-in, First-out).
Un callback, es una función que se pasa por parámetro a otra, de tal manera que esta última ejecuta el callback en un punto determinado, cuando las condiciones y/o los datos cumplen una cierta regla de invocación.
Event loop
Event Loop, este elemento nos permite mover la siguiente callback del Callbacks Queue al Call Stack. Como es un ciclo, en cada iteración toma un solo callback.
Ambiente huésped
Del lado derecho tenemos El ambiente huésped, el ambiente huésped es el lugar donde corremos Javascript, los más comunes son el Navegador web and Node.js. Las tareas que ejecuta el ambiente huésped son independientes de los demás componentes. En el navegador web tiene sus propias API como fetch, setTimeout, alert. Node.js también cuenta con su propia API como net, path, crypto.
¿Cómo es posible?, ¿Y la concurrencia? ¿Puedo hacer muchas cosas a la vez en un sitio web?
Todo el trabajo de poner un temporizador, renderizar contenido como texto, imágenes, animaciones, o ver videos, están a cargo del ambiente huesped. Lo que pasa es que las APIs del navegador web generan callbacks cuando su tarea ya está completada y los agrega al Callbacks Queue para que el event loop las tome y las mueva al Callstack.
Javascript se comunica con el ambiente huésped a través de su API, mas adelante vamos a utilizar un ejemplo basado en el diagrama de arriba, donde se utiliza window.setTimeout, la cual es una función del navegador web.
Concurrencia
Home es la función principal, con la que se inicia el proceso de ejecución en el call stack. Dentro de inicio tenemos cuatro setTimeout de dos segundos. La función setTimeout es propia del ambiente huésped, y a los cuatro setTimeouts le pasamos un callback, estos son, cb1, cb2, cb3 y cb4.
Los temporizadores setTimeout se ejecutan en la parte de la funcionalidad del ambiente huésped dejando tiempo de ejecución para el call stack. He aquí la concurrencia, mientras el ambiente huésped ejecuta un temporizador, el call stack puede continuar ejecutando código.
Después de los primeros dos segundos, el ambiente huésped, a través del primer setTimeout pasa cb1al callback queue, pero durante estos dos segundos se pueden realizar otras operaciones en el ambiente huésped, en el caso del navegador, un ejemplo seria que el usuario puede seguir escribiendo dentro de un textarea. De nuevo, he aquí la concurrencia.
Tras el primer setTimeout, el segundo setTimeout pasa cb2al callback queue y así sucesivamente hasta el cb4. Mientras los callbacks se pasan al callback queue. He event loop nunca deja de funcionar, por lo que en alguna iteración el event Loop pasa cb1al call stack y se empieza a ejecutar el código de cb1y esto mismo sucede con cb2, cb3 and cb4.
Event loop en acción
Aquí abajo esta el ejemplo del que hablamos, el temporizador genera los callbacks en el orden que aparecen los setTimeouts más dos segundos. El Event Loop toma un callback en cada iteración, por lo que cada cb de setTimeout se invocan uno después del otro, y no exactamente después de dos segundos, pues entre que se posicionan los callbacks en la cola y se mueven al callstack de ejecución transcurre más tiempo. Esto sin contar el tiempo que trascurre entre cada invocación de setTimeout.
Si en los cuatro callbacks se indica el mismo tiempo en milisegundos. Presiona el botón RERUN, Te darás cuenta de que los tiempos no son iguales y que pueden pasar más de dos segundos.
Conclusion
Las APIs huéspedes reciben callbacks que deben insertar en la callback queue cuando el trabajo que se les encomienda esta hecho, por ejemplo un callback de una petición ajax se pasa a la callback queue solo cuando la petición ya obtuvo la respuesta. En el ejemplo que describimos arriba con setTimeout, cuando pasan dos segundos, se inserta el callback al callback queue.
Mientras el ambiente huésped realiza sus tareas, en este caso, los demás temporizadores, el call stack de ejecución de javascript puede ejecutar el código que el event loop le puede pasar desde el callback queue.
He Event loop es un ciclo infinito que mientras existan callbacks en el callback queue, pasara cada callback, uno por uno, al call stack.
He call stack no puede ejecutar más de un código a la vez, va ejecutando desde el último elemento hasta el primero, en nuestro caso hasta la terminación de la función inicio que dio origen a todo el proceso. Es una estructura de datos tipo Pila.
Gracias a que los callbacks se ejecutan hasta que un trabajo específico esté terminado, proporciona una manera asíncrona de ejecutar tareas. Las tareas pueden realizarse en el ambiente huésped sin afectar la ejecución del call stack. En la pila solo se ejecuta código que recibe el resultado de las tareas realizadas por el ambiente huésped.